ginger

You are currently browsing articles tagged ginger.

Mango Cheesecake with Chocolate + GingerCan we talk about cheesecake for a moment? Cool. Please take a seat and make yourself comfortable, this may take a while.

Let’s talk dense, dry cheesecakes. Lingering in our cafés. Lurking beneath cake box lids. Taunting us with a seemingly inviting berry glaze until we discover that chalky mess upon our first bite. Such a shame. A dairy-riddled tragedy. Ordering cheesecake when I’m eating out is a risk I’m just not willing to take these days, it’s an extreme sport of the yuppie variety.

This cake was actually inspired by that girl who cries all the time on MasterChef. She made a messy, lemon cheesecake last week and although I try to sympathise with the pressures of cooking with a plethora of cameras in your face I couldn’t help but feel a little taken back. As soon as the episode finished I promptly began working on this silky wonder to right the wrongs of that young beanie-head. I’m a cheesecake snob, a real jerk I’ll admit, so if I’m into this recipe then I’m sure you’ll be too!

Mango Cheesecake with Chocolate + Ginger

While I’m at it let’s get a dialogue happening regarding ginger because it’s so disappointing when awesome spices have such exhausted connotations. In my day-to-day life ground ginger only makes a brief appearance in hot cross buns at Easter, when not being overpowered by it’s far more popular cousin cinnamon, and on occasion gingerbread makes a vague appearance down here in sunny Australia. Like salt to chocolate, ginger to mango is really special. It makes me all warm and fuzzy.

The base of this cheesecake is wonderfully spiced and the cheese filling bakes to the texture of a firm custard. Add a little more chocolate on top, and… ahh. Hello, lover. I’ve used a combination of biscuits readily available in Australian supermarkets but of course you can use whatever you please so long as they’re crunchy. If you’re reading this out-of-peak mango season then using the tinned stuff is fine as well, the flavour will be a little more subutle.

Mango Cheesecake with Chocolate + Ginger

On another related note, I’ve been spending my free time (or what little of it I have left these days) interning at a really cool magazine here in Sydney taking snaps in cafés and learning heaps along the way from some incredibly talented people. For these shots I mustered everything I had learnt over the week and tried to apply them here; natural lighting, tripod skills and remaining calm. I threw open my blinds and took many deep breaths. Coincidentally they required the least amount of editing of any set of photos I’ve taken. I’m fairly pleased with the results but as always do tell me what you think! This will serve 10-12 people.

Mango Cheesecake with Chocolate + Ginger
(an original recipe)

125g ginger nut biscuits
125g chocolate ripple biscuits
70g butter, melted
1 1/2 tsp ground ginger
Flesh of 1 large mango (around 200g)
250g cream cheese
250g mascarpone
100g sour cream
120g caster sugar
40g brown sugar
2 eggs
1 egg yolk
100g dark chocolate, roughly chopped
40g cream
1 tsp glucose / corn syrup
Cocoa, for serving

1. Preheat oven to 150°C and grease/line a 9 or 10 inch spring form pan.
2. Prepare biscuits in a food processor until ground. Add 1 tsp of ground ginger and stir in melted butter. Press into base of springform pan until flat and firm. Chill in refrigterator.
3. Prepare mango flesh in food processor until beginning to puree. Add cream cheese, mascarpone, sour cream, caster sugar and brown sugar and process until combined. Add the eggs and egg yolk and once again process until combined. Remove base from fridge and pour filling into springform pan. Bake in oven for 1 1/2 hours. The edges should be fairly firm with a bit of wobble towards the centre. Remove cheesecake from pan once cooled and place in the fridge to chill completely.
4. In a small saucepan (or microwave) warm cream until almost boiling. Pour over the chopped chocolate in a heat-proof bowl and stir until mostly melted and combined. Add 1/2 tsp of ground ginger and glucose and again stir to combine. Remove cheesecake from fridge and place on serving platter. Drizzle chocolate sauce over the top, Pollock style. Sprinkle a little cocoa and serve.

NOTE: You can also bake these as cupcakes if you like, I’d suggest baking them for around 25 minutes.

Mango Cheesecake with Chocolate + Ginger

Let’s dedicate this post to all the lost causes out there. Bad cheesecakes, my heart weeps for you. My heart weeps for this too but in a different way. It’s so naughty yet I feel no remorse. None, whatsoever.


Tags: , , , ,

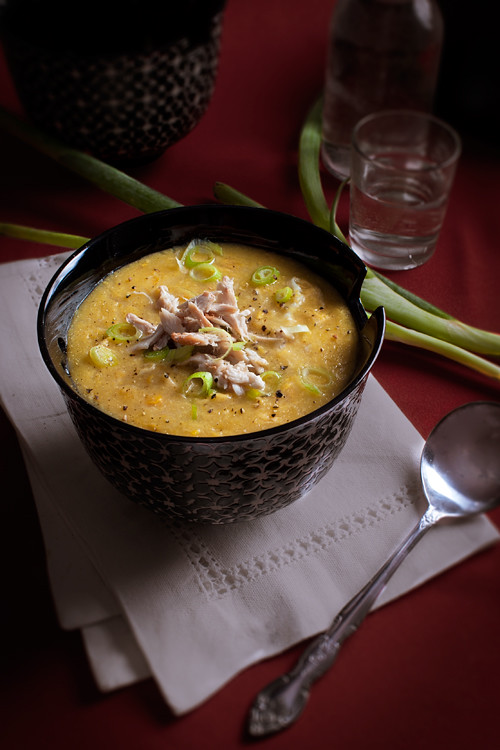
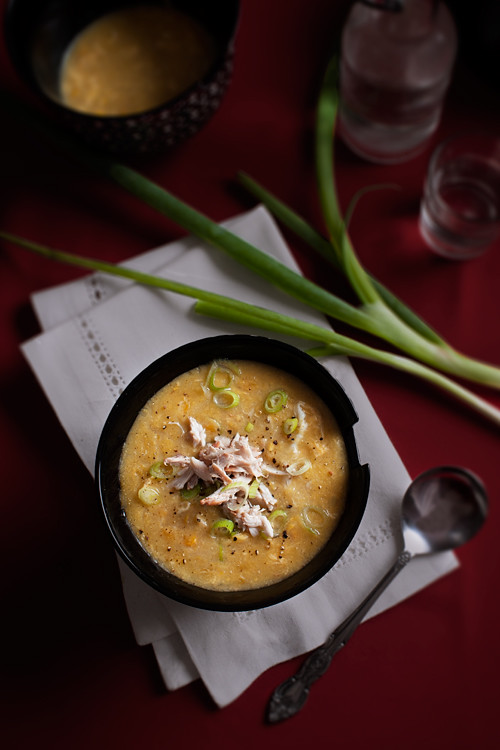
Chicken + Corn + Egg Soup

Back in July I posted this chicken, corn and egg soup recipe. LOLOL, right? Besides the obviously thoughtless styling please allow me to explain my revisiting of this post. I’m in my third year of university (Bachelor of Digital Media) and for my final project I’ve (foolishly?) proposed to design and photograph my very own cookbook. It’s pretty exciting. Here’s a working cover:

Playing the role of both chef, stylist and photographer really takes its toll to the point I’ve been flailing and shouting about never wanting to be a photographer anymore, ever. However I must always keep in mind this is all for the greater good despite the fact I’ll never be able to sit and enjoy my lunch without having spent an hour taking photos of it for the next seven months. Most entries you’ve seen this year will be compiled in my book so THANK YOU SO VERY MUCH to everybody who has offered kind and constructive words re: photography. Keep it coming. And don’t get afraid to get nasty; I’m used to getting my butt kicked at uni so if you see something you don’t like please go nuts with it.

Chicken + Corn + Egg Soup

On to the food; my prior entry explained this soup came about whilst I was very, very ill but this time around I’ve spared a little more effort to transform this into a more graceful dish (using real stock this time, not the supermarket type! Wow!); someone on Pinterest even mentioned I should probably have chicken pieces in here, so thanks for your feedback! I have delivered. This should serve around four friends.

Chicken + Corn + Egg Soup
(an original recipe)

1L chicken stock (please refer to this recipe)
1 tsp sesame oil
1 tbs ginger, minced or finely grated
2x 420g cans creamed corn
1 tbs soy sauce
2 eggs
1 tbs corn flour
Salt and pepper, to taste
Chopped shallots, to serve

1. Prepare chicken stock as per these instructions. Once drained and cooled remove chicken from the bones, lightly shred and reserve for later.
2. In a medium-sized pot sizzle the ginger in sesame oil until fragrant. Add the stock, creamed corn and soy sauce and stir to combine.
3. In a small bowl combine cornflour with equal part water and stir until dissolved. Pour into soup and stir – this works as a thickening agent.
4. In another small bowl whisk the two eggs. Slowly pour in them in ensuring the soup is hot so they cook almost immediately. This will create a lovely, light weave of egg throughout your soup.
5. Ladle out in bowls and adorn with a generous pinch of shredded chicken reserved from earlier. Garnish with chopped shallots and cracked pepper.

Let’s get these bad boys side-by-side; here’s a comparative image from August 2011 to now illustrating a significant improvement of styling and photo editing. Funny how I used to think the photo on the left was the bees knees:

… and in another year’s time I’ll probably be looking back at these photos having a solid laugh too (in fact I’m already finding reasons to dislike them – I’m still clumsy with dark coloured backgrounds). At least it’s comforting to know there’s always room for growth and improvement, right?

PS. On a completely unrelated note – does anybody here use Instagram? Since it’s now available for Android I’ve completely jumped aboard, let’s be friends! My username is bananasoiree.

Tags: , , ,

Chicken + Apricot + Ginger + Rosemary Tagine

One pot. Tender meat. Stone fruits, spice and honey. There a few things more delicious than a spicy chicken tagine.

Cous Cous

Rather than dousing everything in a variety of spices tonight I’ve opted for a different blend of flavours by marrying ginger with rosemary; a herb normally too pungent for chicken, but in this dish it is subtle, fragrant and wonderfully fresh. The beauty of this meal, and every variation of it, is that you can prepare it earlier in the day, pop the entire pot in the fridge and then re-heat it over the stove when you’re ready! It was also a nice opportunity to pick some fresh rosemary from the garden; our new plant being a recent gift from some family friends. This recipe will serve 4 people.

Rosemary Plant + Apricots

Chicken + Apricot + Ginger + Rosemary Tagine

1 kg chicken thigh fillet (8 pieces), sliced

3 tbs olive oil

1 large onion, diced

1 long sprig rosemary – 1/3rd finely chopped, the remainder cut in half

40 g fresh ginger, minced

2 red chillies, finely chopped (and de-seeded for the sensitive)

2 cinnamon sticks OR 1 tsp freshly ground ginger

2 tsp ground corriander seeds

3 tbs honey

200 g dried apricots, cut in halves

1 x 400 g can cherry tomatoes

Salt


Simple couscous

350 g couscous

1 tbs olive oil

Salt


To serve

Bunch of corriander

Handful of pinenuts

1. Prepare a tagine or heavy-based casserole over medium-high heat with olive oil. Add the onion, rosemary, ginger, chilli, cinnamon and corriander seeds and stir until fragrant.

2. Add the chicken pieces and cook until golden brown.

3. Add the honey, dried apricots, rosemary sprigs, cherry tomatoes and salt and stir to combine. Cover your tagine/pot with the lid and allow to simmer for 15 minutes or until chicken has cooked through.

4. Remove lid and continue to simmer until the liquid has reduced to a sticky glaze (around 20 minutes).

5. To prepare the couscous pour grains into a heat proof bowl and (just barely) cover with boiling water. Add oil, salt and quickly cover with plastic wrap. Allow to sit for 10 minutes to absorb the water. Remove plastic and fluff the grains with a fork.

6. To serve place chicken tagine and couscous in separate, large dishes. Adorn with chopped coriander and pine nuts


Chicken + Apricot + Ginger + Rosemary Tagine

Thank you, Morocco – where would our tastebuds be without you?

Tags: , , , ,

Salted Spiced Beer Caramels

A few weeks ago I enthusiastically jumped aboard my beer-wife high-horse and purchased a dozen Brewdog There Is No Santa beers. In retrospect this was a little strange as traditionally I only revel in beers that taste overwhelmingly of fruit and unfortunately this purchase was no exception to my girly tastebuds; despite its charming notes of cinnamon and spice I could only bring myself to drink the one.

Salted Spiced Beer Caramels

However with my glass (stein?) half-full I chose not to see this as a frivolous purchase but as an opportunity to adapt this wonderful beer to the culinary world.

Salted Spiced Beer Caramels

Drawing inspiration from my Framboise Caramels I hoped to achieve a similar chewy and delicious beer-based morsel. With the addition of of some spice to heighten the essence of this micro-brewed Christmas beer you’ll have salty, sweet, buttery, bitter and spicy flavours partying all up and around your mouth. And isn’t this what flavoured caramel is all about?

Salted Spiced Beer Caramels

Shout outs to all fellow beer and candy fans. Oh, and to people who own candy thermometers, shout outs to you too. Seriously! Please don’t try this recipe without one; unless you are Lord of the Fluke the consistency of the caramel won’t turn out as nicely as you’d like so just don’t. Please? Ok good. I’m only harsh because I care. Mwa mwa! This recipe makes around 40 caramels, depending on the size.


Salted Spiced Beer Caramels

(an original recipe)


1x 330ml bottle spiced beer (I used Brewdog’s There Is No Santa)

2/3 cups cream

2 tbs sea salt flakes + more for garnish

1 tsp cinnamon

1 tsp ground ginger

1/4 tsp ground cloves

1 1/2 cups sugar

1/3 cups corn syrup / glucose

120g butter, cubed


1. Pour beer into small pan and simmer over medium heat until reduced to 1/3 cup. This should take around 20-25 minutes. Place in fridge (or freezer) to cool.

Salted Spiced Beer Caramels

2. Line a square tin with baking paper. Once your reduced beer has cooled combine with cream, salt, cinnamon, ground ginger and ground cloves. Stir well.

3. Combine sugar and corn syrup over low heat until dissolved. Increase heat until syrup has caramelised – 112°C on your candy thermometer. Do not stir during this process or the syrup will crystallise.

4. Remove from heat and slowly pour in your cream mixture, stirring quickly as you do so. Be careful has the concoction will try to splutter everywhere. Continue to stir to break up the caramel ball formed whilst adding the cubed butter. Don’t worry if you’re unable to dissolve everything.

5. Return to low heat and stir frequently until the temperature reaches 120°C on your candy thermometer.

6. Pour caramel into prepared tin and allow to cool slightly. Sprinkle with rock salt and allow to cool completely – either overnight on your kitchen bench or in the fridge to speed up the process. Cut into small squares and wrap with baking paper, twisting at the ends like traditional candies. Sprinkle with more rock salt if desired.

Salted Spiced Beer Caramels

BRB, MAKING AN APPOINTMENT WITH THE DENTIST (and possibly AA).

Tags: , , , ,

It’s December! Which marks this month as my very first Christmas as a recipe/food/baking/WHATEVER blogger – all photography from here on in will feature GREEN, RED, CUTENESS, SPARKLES, BAUBLES, etc etc.

Tonight I’m off to an annual Christmas  dinner with my old school friends. Traditionally we give each other small, cute gifts. Last year I made some sugar cookies and fudge however to celebrate this blogging landmark as a vaguely serious baker I figured it was time to step up my game.

At first I was dubious of baking with such a wintery flavour in (what should be) the beginning of Summer here in Sydney however thanks to much unprecedented and rain below-average temperatures I had no qualms whatsoever getting my gingerbread on. This recipe should make around 20-25 macarons, depending on the size.

GINGERBREAD MACARONS

(an original recipe)

 Gingerbread Shells

100g egg whites, room temperature

100g almond meal

200g pure icing sugar

30g caster sugar

1 tsp powdered egg whites

1 heaped tsp ground ginger

Powdered/gel colouring

White Chocolate Ginger Ganacahe

200g white couverture chocolate, chopped

100ml pouring cream

1/2 tsp cinnamon (plus extra for dusting)

1/2 tsp ground cloves

2 tsp ground ginger

2-3 lumps of crystallised ginger (around 10g), finely chopped


1. Preheat your oven 150°C.

2. Sift pure icing sugar, almond meal and ground ginger and place into a bowl and give it a quick stir.

3. Beat eggwhites and eggwhite powder in a separate bowl until soft peaks form. Slowly add the caster sugar, beating well between each addition, until eggwhites are stiff and glossy. This process should take around 5-10 minutes.

4. Pour half of your dry ingredients and colouring (I used half brown half orange gel colour) into the bowl of beaten eggwhites and combine with a flat utensil, like a spatula, using “cutting strokes”. Once incorporated repeat with the remaining icing sugar and almond meal mixture. This is where things begin to get a little tricky as under-mixing or over-mixing will ruin your macarons as they attempt to rise and “grow feet” in the oven. Experts say to stir the mixture until it becomes the consistency of lava. The mixture will be sticky but you’ll know it’s ready when, upon holding your spatula above the bowl, it will begin just begin to flow freely back into the bowl. You’ll need to knock a lot of the air out of it.

5. Prepare a piping bag with the appropriate tip (around 1 cm or less), a baking tray with baking paper, and pipe small rounds (they must be small enough to balance on the cupcakes!). If there are any small lumps left from piping wet your finger and gently press them down (unlike cake batter, macaron mixture does not flatten out when in the oven). Dust some extra cinnamon over the shells and allow tray to rest for 30 minutes.

6. Place baking tray in the oven and allow to bake for around 15-20 minutes (this time will depend entirely on your oven, so keep an eye on them). Within 5 minutes or so they will begin to grow feet.

7. Once ready, remove from oven, and after 5 minutes transfer to cooling racks.

8. Whilst your shells are cooling place your cream in the microwave for 30 seconds or until relatively hot. Pour your chopped chocolate into the bowl and stir continuously until the chocolate has melted and the mixture is combined. Add cinnamon, ground cloves, ground ginger and finely chopped crystallised ginger and stir to combine. Place bowl into the refrigerator to cool and thicken.

9. Prepare another piping bag with a large tip and neatly pipe rounds of ganache into half of the shells. To close, gently place its partner shell on top of the ganache and twist shut, taking care to prevent ganache spilling over the edges.

As well as these macarons I’ve also bundled some of my berry and vanilla infused vodka in adorable little jam jars complete with mini baubles (a fluke discovery at Coles this morning!) – a cute reminder that a cocktail-fueled Summer is just around the corner… maybe.

Sugar and alcohol. Spice and berries. Here’s hoping they like my little edible trinkets!

Tags: , ,