dessert

You are currently browsing articles tagged dessert.

Steven is a beautiful friend of mine I miss every day. His presence in my world is testament that life can work in mysterious ways. Should he still be with us today would be his 30th Birthday – and what a day! There’s such beautiful sunshine here in Sydney inviting us into Spring.

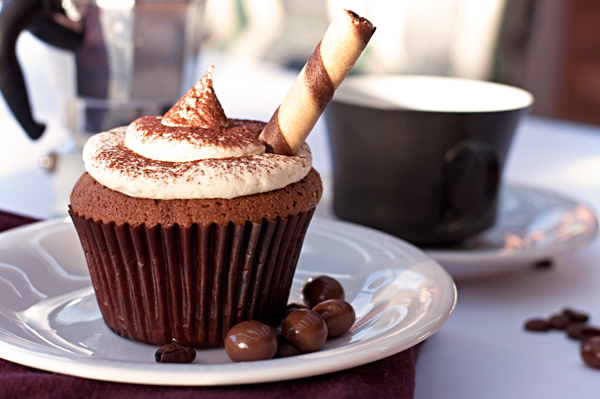
We met a show five years ago and continued seeing shows together like the sweet indie kids we were at the time. Coincidentally we ended up working only doors away from each other so every second-or-so afternoon we would meet in a downstairs cafe, order two coffees and discuss the day’s events. To this day a cappuccino will always remind me of dear Captain Steve who is my inspiration to this lovely recipe – replicating this warming friendship via a warming beverage with warming cake . This will serve 12 lucky caffeine fiends.


Cappuccino Cupcakes for Steven

(an original recipe)

150 g butter (room temperature)

1 cup caster sugar

3 eggs

1 1/2 cups self raising flour

2 shots (60 ml) espresso

1/4 cup milk

1 tsp vanilla extract

1 tbs dutch-process cocoa

Espresso Syrup

3 shots (90 ml) espresso

1/4 cup sugar

Vanilla Buttercream

100 g butter (room temperature)

2 cups icing sugar mixture

1 tsp vanilla extract

3 tbs milk

extra cocoa, for dusting

wafers, chocolate-covered coffee beans for decoration


1. Preheat oven to 180°C. Line a 12-cupcake pan with cupcake liners of your choosing.

2. In a bowl, beat butter for a few minutes until it begins to pale. Add sugar and eggs, one at a time. Beat until fluffy.

3. Add flour, espresso, milk, vanilla and cocoa and beat until combined and light.

4. Divide mixture between your cupcake liners – they should be around 3/4 full. Bake in oven for 20-25 minutes or until the tops are springy to touch.

5. While the cupcakes are baking in a small saucepan combine your espresso and sugar. Allow to boil and leave on medium-high heat for 5-10 minutes without stirring until the mixture thickens to a syrup. Be wary of leaving it too long or it will become toffee.

6. As soon as your cupcakes are removed from the oven lightly prick them a few times with a fork and spoon your espresso syrups over the tops. This will take a few scoops as you must allow the syrup to slowly seep into the cake before the next. Allow to cool.

7. To prepare the vanilla buttercream beat the butter and icing sugar until just beginning to combine. Add the vanilla and slowly add milk until you reach the desired texture.

8. To assemble: prepare a piping bag and carefully ice your cupcakes. There’s no need to apply too much as the cupcakes are already quite sweet; we want to create a nice base to replicate the froth of a cappuccino. Lightly dust with additional cocoa and adorn with wafers or any other relevant candies of your choosing.


Life is precious and I’m so sorry I couldn’t make these for him sooner. Happy Birthday, my wonderful friend! We miss you.

Tags: , , , ,


Inspired by the impending Summer whilst witnessing Heston Blumenthal hurl an entire cherry pie into his creme anglaise on tv I thought – how hard could this be to create a pie-infused ice cream? The answer: NOT VERY. But perhaps I got lucky as this trial-and-error experiment came out pretttttty, pretty good.


Unfortunately the ice cream making process is nowhere near as exciting as Masterchef makes it out to be, no blast chiller means there’s a lot of time spent waiting so if you’re planning on having people over for an ice cream party I suggest you allow a day or two for everything to be prepared, lest you end up with a bowl of slushy, chunky custard. In the meantime however get your patient pants on and prepare a few garnishes like I have below.


APPLE PIE ICE CREAM

1 cup milk

100 g sugar

2 egg yolks

1 medium sized apple pie (from your local bakery or frozen)

1 1/2 cup cream

1 tsp vanilla extract

2 tsp ground cinnamon

CARAMEL SAUCE (adapted from the Women’s Weekly Cooking Class Cookbook)

70 g butter

1/2 cup brown sugar

1/2 cup water

1 tbs golden syrup

1 tsp (heaped) cornflour

2 tbs cream

CANDIED CORNFLAKES

2 cups cornflakes

1/4 cup sugar

2 tbs corn syrup

For the icecream

1. Heat milk in a small saucepan while beating your egg yolks and sugar in a separate bowl. If the apple pie your using is frozen this is a good time to place it in the oven.

2. Once warmed, slowly pour the hot milk over the yolk/sugar mixture whilst stirring constantly. This is to temper your eggs.

3. Pour the mixture pack into the saucepan and heat, whilst stirring, until it becomes a thick custard. Ensure you do this slowly or you’ll end up with sugary scrambled eggs (eww).

4. Remove from heat and allow to cool for half an hour. Add the vanilla, cream and stir to combine. Crumble your pie into the mixture.


5. Put in the refrigerator to cool overnight, or at least 6 hours.

6. The following day strain your mixture to separate the creme anglaise from the apple pie pieces. With a fork, mash the leftover apple pie pieces into a very vague puree and combine once again with creme anglaise. This is entirely optional but I find the pieces of pie in the ice cream create a lovely texture.

7. Prepare in ice cream maker as per manufacturer’s instructions.


For the caramel sauce

1. Combine butter and sugar in a saucepan and stir over low heat until butter melts and sugar dissolves. Bring to bowl then reduce heat and simmer for 3 minutes.

2. Combine water, golden syrup and cornflour in a separate bowl. Add to brown sugar mixture and stir to combine. Bring to boil, reduce heat and summer for 2 minutes.

3. Remove from heat and stir in cream.


For the candied cornflakes

1. Combine sugar and corn syrup in a small saucepan and stir over low heat until combined and sugar has dissolved. Remove from heat and add cornflakes. Stir until cornflakes are completely covered in syrup and turn out onto baking paper and allow to dry. Once dried, break into shards as a lovely garnish.


For the assembly

1. With a warm ice cream scoop, place a few spoons of ice cream in adorable bowls. Top with generous servings of caramel sauce and adorn with candied cornflakes.


And here I was thinking “transeasonal” was a term only used to describe fashion.

Tags: , , , ,

Layer cakes. Who has zero experience in making them? ME. My first attempt at this cake a few days ago was disastrous despite it starting so well; maybe it was the kitsch silicon baking ‘tins’ I was using, maybe it was the cakes baking to thin, maybe I didn’t let them cool enough before handling, whatever the case there were cake crumbs EVERYWHERE. Oh and due to over-pulverizing and over-mixing my oreo cream cheese icing began to turn grey… this was one ugly test cake.

Using 9-inch rounds was a much better idea. The chocolate cake recipe below is adapted from Buddy Valastro of Cake Boss fame. There are a few concessions made in this recipe due to necessity (and laziness) – for example, using less sugar in lieu of the torrent of oreos, substituting buttermilk for yoghurt as I was running low and generally fixing some of the measurements for a more metric experience. It’s a fantastic chocolate cake and coupled with a whole lot of cream cheese icing with smashed oreo stirred through… this is about to get intense.


DOUBLE CHOCOLATE AND OREO CAKE

(cake recipe adapted from Buddy Valastro; makes two 9 inch rounds)

FOR THE CAKES

1 1/2 cups flour

1 cup caster sugar

125 g butter, room temperature

1/3 cup good quality dutch process cocoa

1 teaspoon baking powder

150 g melted chocolate

1/2 cup hot water

2 large eggs, room temperature

1/4 cup milk

1/4 natural yoghurt

FOR THE OREO CREAM CHESE ICING

250 g cream cheese (Philadelphia)

70 g butter

1 tsp vanilla extract

2 cups powdered/icing sugar

1 x 150g packet of oreo biscuits

FOR THE ASSEMBLY

1 x 150g packet of oreo biscuits


1. Pre-heat your oven to  175°C.

2. Beat the butter until it begins to cream. Add flour, sugar, cocoa and baking soda and and beat until combined.

3. Pour in melted chocolate. Beat for one minute, then pour in the hot water. Continue beating until combined then add the eggs one at a time, adding the next one after the previous has been absorbed. Pour in the milk and yoghurt and beat for a few minutes until the everything is well combined, the sugar has dissolved and the batter is lovely and velvety.

4. Prepare two 9-inch cake pans by spraying with oil or greasing with butter. Divide the mixture between the two pans and bake for around 30 minutes or until the cake begins to peel away from the sides and is springy to touch.

5. Allow to cool to room temperature before turning cakes out of the pans. Refrigerate until ready to decorate.

6. Break up one oreo packet into shards, preferably by hand as to not create to much ‘rubble’.

7. Beat butter, cream cheese and vanilla extract until beginning to cream.

8. Add the icing sugar one cup at a time until incorporated and fluffy. You can add more/less icing sugar to taste.

9. Divide icing in around half – but preferably 70/30. In the larger portion stir in your oreos carefully – just enough to combine but do not overmix or the icing will begin to turn grey.

10. With either a piping bag fitted with a large nozzle or a very handy spatula, layer your larger portion of oreo icing over one of the cakes. Make sure to keep this as level as you can so the cake layers look nice and even once sliced. Place your second cake on top.

11. Take your leftover cream cheese icing and layer over the very top of the cake. Once again, break your other packet of ores into shards and scatter atop the cake. Be sure to cover all the ‘white spots’ so the cake looks dense with cookies.

This cake is now packed away ready to take to a friend’s dinner tonight, thank goodness I’m not being left alone with this hot mess of chocolate.

Tags: , , , ,

HELLO! And thanks for visiting my fresh new blog. Unfortunately my first post may be a slight letdown due to an absence of recipe however I would like to share some photos of a recent experiment. BEER MARSHMALLOWS. What? YES! A delicious snack food combined a with delicious alcoholic beverage? Truly match made in heaven.

Have you ever seen a slab of marshmallow? It’s surely a sight to behold, a sluggish rectangular blob vaguely resembling airy tofu. But sticky and gross.

But it’s funny what some knife work, melted chocolate and salted nuts can do.

If you too would like to create your very own drunken mallow army then stay tuned! In this instance I used Young’s Double Chocolate Stout however since these were covered in chocolate… see where I’m getting at? Once I match the perfect beer to this concoction the recipe will be posted ASAP. Oh, err, and remind me to remind you of the dangers of applying carbonated alcohol to heat. HOORAY FOR LEARNING BY DOING!

Tags: , , ,

Newer entries »