buttercream

You are currently browsing articles tagged buttercream.

As bloggers we are content creators, we make neat stuff whether it be photos, drawings or pieces of insightful writing to entertain and/or educate the internet masses. If we have a corner of the internet we have a responsibility to represent ourselves in entirety; creatively, emotionally, whatever. We push the boundaries of what we know and enjoy and create new and exciting things to share. In turn we are inspired by what others do. An honest blog is a beautiful outlet of nice sentiments and hard work. Personally, my benchmark of a good post is one that disregards all the trends and basks in the sweet glow of straight up originality (if there even is such a thing).

However.

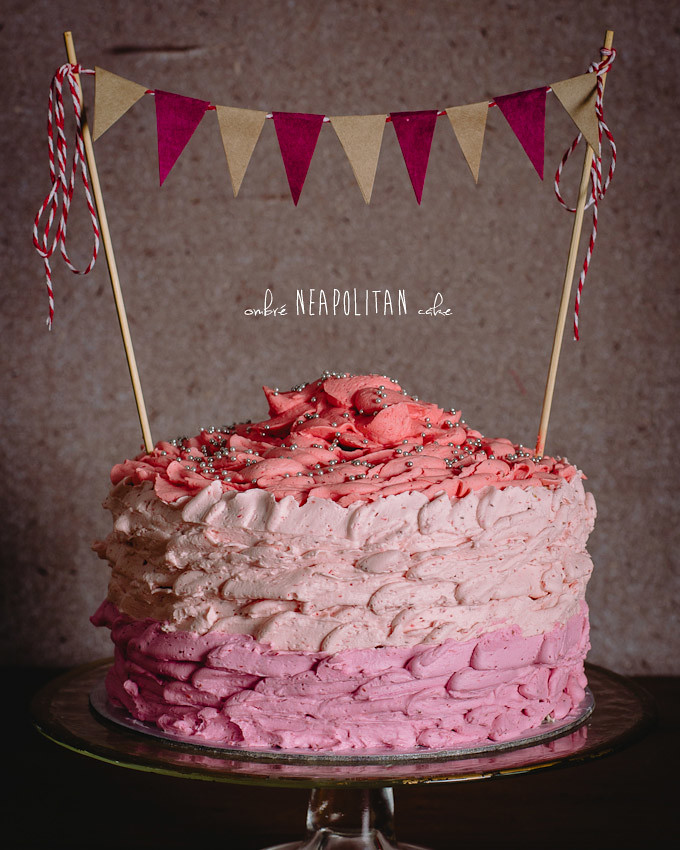
This weekend something took hold of me. A terrible monster. Like the devil’s grip I was thrown into the shallow abyss of kawaii cake trends. On Friday night I was up at 2am gluing small triangles onto striped twine and you know what? I felt so alive… like I was patting a pack of pugs whilst simultaneously poaching an egg for brunch. I made ombré cakes, I stacked them high and got rustic with a Wilton #125 tip. Pink. Chocolate. Strawberries. Ruffles (kinda). Bunting. Is this how God feels (on one of his more leisurely days)? Can I put a bird on it? These are my dirty kicks. I was possessed by a beautiful twee monster all in the name of creating a nice birthday cake for my friend Julie. HAPPY BIRTHDAY JULIE!

Basically what I’m trying to say is sometimes I cannot resist the warm, comforting yet disgusting lure of a good dessert trend. Ombré + bunting. It’s Etsy crack, it’s twee porn. But it’s ok (sometimes), or at least that’s what I’m trying to convince myself. I did not choose the Etsy life, the Etsy life chose me.

I named this a “Neapolitan Cake” mostly for the wank, however, upon actually tasting the combination of vanilla cake, chocolate ganache/buttercream, strawberry swiss meringue buttercream and slices of fresh strawberries together the cake really did emulate flavours of a straight up ghetto tub of Neapolitan ice cream. So good. One of my favourite cakes to date. In fact, pastry chef Felicia said it best when she confided “I know exactly what’s in this icing yet I can’t stop eating it”.

Because I so often keep it real I don’t have any staged “slicing of the cake” photos, instead I have some unglamorous shots as it was divided between the 12 of us at a restaurant in Glebe. In true (new?) alanabread style I’ve illustrated how to construct this tower of twee (no recipe this time but send me an email if you’d like some assistance on that front). Otherwise just stack it, dirty ice it then slater it (maybe stab it with bunting if you’re ready to embrace twee).

Also (not even an attempt at a suave segue here), I was recently informed alanabread was not only nominated but is a finalist in the Voices of 2013 blog awards! So thank you so, so very much to everyone who nominated me and of course to the judges, I really appreciate the recognition. Congratulations to all my blogging peers also, you can find the list of finalists here. But, I digress (sneaky tear), here are some cake related pixels. Good luck and enjoy!

Tags: , , , , , , ,


This post is dedicated to the Australian Women’s Weekly Children’s Birthday Cake Book. Shout outs to my Australian pals!

Hopefully for those living in the great sunny land down-under this image should stir nostalgic delight within each and every one of you.


Perhaps I should explain for my international friends. This book was held precious to many families in the 90s with its simple instructions and how-tos for creating adorable cakes. It’s so popular that a commemorative Vintage Collector’s Edition was released in Februrary this year. It’s so popular it has a number of Facebook fan groups and fan pages. It’s so popular this book has barely aged; it’s incredible to see how many people continue refer to this gem of a book for fun cake ideas. It’s simply amazing.

Amongst its pages of how-tos for the Teddy Bear cake, Train cake, Piano cake and Butterfly cakes lies the most infamous cake of all – The Swimming Pool cake. It was every kid’s dream cake when I was younger, and why wouldn’t it be? Delicious cake slathered in buttercream and jelly (or jell-o for my American pals) covered in lollies and candy. It was a dream come true. I might go as far as to call this an Australian Icon.

Thankfully, however,  the culinary world has evolved from using algae-green jelly and nailpolish as decorating components.

My version is a little different from the recipe listed (I didn’t use “1 packet butter cake mix”, for example) so here’s my step-by-step guide to creating this iconic Australian cake. It’s best started a day in advance to prepare the cake, and more importantly the blue jelly. I hope you have lots of lollies ready in your pantry!

Swimming Pool Cake

(Alana’s Illustrated Guide)

1. BUY LOLLIES AND CANDY. Blue jelly, desiccated coconut, Teevee snacks (or long chocolate covered biscuits), jelly babies, gummy bears, snakes, kool mints and cocktail umbrellas. GO NUTS!

2. Prepare blue jelly according to packet instructions. Place in fridge and allow to set completely.

3. Prepare a 9-inch round cake. I used my standard vanilla cake recipe and added a chocolate swirl by adding a little cocoa in some of the remaining mixture. Once baked (180°C for around 50 minutes), wrap in plastic so it doesn’t dry out and place in the fridge until your jelly is ready.

4. Remove cake from fridge. With a sharp knife trim the cake to remove the dome that has probably formed in the baking process to create a nice, flat surface.

5. With the sharp knife, cut around the top in a circle to represent the wall of the swimming pool. Hollow out the centre if the cake to form a recess for the jelly.

6. Prepare chocolate buttercream by beating 125g butter, 1 1/2 cups icing sugar, 50g melted chocolate and a tablespoon of cocoa. Spread around the cake covering the edges and around the wall of the recess.

7. Prepare green coconut “grass” by combing desiccated coconut with a few drops of green food colouring. Gently place or spoon around the rim of the cake ensuring not to spill any on the sides (a little overflow is fine though as they will be covered by the biscuits). I know it’s looking a little silly now but just bare with me, it will be worth it, I promise!

8. Create the fence of the pool by arranging the Teevee snacks (or biscuits sticks) around the edge of the cake. Be sure to leave a 1 1/2 inch gap to make room for the ladder.

9. Construct the ladder out of must sticks and thin candy strips, I used thin sour laces. Use a little of the buttercream to attach the pieces and lean against the cake.

10. Remove your set jelly from the fridge and mash with a fork to represent water. Carefully spoon into the crevice of your cake, ensuring you don’t spill any onto the coconut grass (once it sticks, it stays!).

11. It’s time for the decoration! Adorn your cake with cocktail umbrellas, jelly babies, gummy bears, kool mints for balls or anything else you like. I had my brother make create some lounging jelly babies floating in pool toys constructed from snakes. Place them in and around the pool edges!


Note: you may have a LOT of sweet treats leftover if you bought as much as I did.

It’s a sight to behold, isn’t it? It’s just so adorable taking a knife to is seems almost blasphemous…

NOOOOOOOOOOOOOOO-

Oh well. Good night, sweet prince.

You were everything I ever dreamed of and more as a 5 year old.

Tags: , , , , ,

About a year ago I was transformed into a macaron making machine. Macaron after macaron, request after request, I was churning these mothers out like a, ahhh… like something that prepares a lot of macarons (you can find some evidence in my old kitchen porfolio). Unfortunately this lead to a great macaron meltdown. I had grown so tired of these adorable, French biscuits I began to despise the process and thus began my temporary retirement. It was an epic rage quit inspired by sugar and ground almonds. Months later (last night) however and due to popular demand (a friend) I managed to pull myself out of my rut and make a great macaron comeback.

The first time I ever tasted pandan was in cake form accompanied by a cup of jasmine tea; a seemingly apt combination for a macaron. If you have reservations about opening an entire can of coconut milk for only 2 tbs I completely understand and suggest you use regular milk. However, like salt to lemon, coconut and pandan compliment each other so wonderfully it really is a shame to tear them apart.

Apologies as mine are a little on the thick side; my excuse being I was adjusting to a brand new piping nib… and I’m out of practice.


JASMINE + PANDAN MACARONS

(an original recipe)

For the shells

1 teabag (or 1 heaped tsp) jasmine tea leaves

100 g almond meal

200 g pure icing sugar

100 g aged eggwhites, room temperature

30 g caster sugar

1 tsp powdered egg whites


For the pandan buttercream

100 g butter, room temperature

2 cups icing sugar mixture

3/4 tsp pandan paste

2 tbs coconut milk

1. Preheat your oven 150°C.

2. Sift pure icing sugar and almond meal and place into a bowl with your jasmine tea leaves and give it a quick stir.

3. Beat eggwhites and eggwhite powder in a separate bowl until soft peaks form. Slowly add the caster sugar, beating well between each addition, until eggwhites are stiff and glossy. This process should take around 10 minutes.

4. Pour half of your dry ingredients into the bowl of beaten eggwhites and combine with a flat utensil, like a spatula, using “cutting strokes”. Once incorporated repeat with the remaining icing sugar/almong meal/jasmine tea mixture. This is where things begin to get a little tricky as under-mixing or over-mixing will ruin your macarons as they attempt to rise and “grow feet” in the oven. Experts say to stir the mixture until it becomes the consistency of lava. The mixture will be sticky but you’ll know it’s ready when, upon holding your spatula above the bowl, it will begin just begin to flow freely back into the bowl. If it’s too watery then you may have mixed too much!

5. Prepare a piping bag with the appropriate tip (around 1 cm or less), a baking tray with baking paper, and pipe rounds. If there are any small lumps left from your piping tip wet your finger and gently press them down (unlike cake batter, macaron mixture does not flatten out when in the oven! Also, ensure you don’t leave drops of water on your macarons or they will balloon whilst baking). Allow tray to rest for 30 minutes.

6. Place baking tray in the oven and allow to bake for around 15 minutes (this time will depend entirely on your oven, so keep an eye on them). Within 5 minutes or so they will begin to grow feet.

7. Once ready, remove from oven, and after 5-10 minutes transfer to cooling racks.

8. Whilst your shells are cooling place butter and icing sugar into a bowl and beat until fluffy. Add pandan paste and beat further. Slowly add coconut milk until the buttercream reaches desired consistency.

9. Prepare another piping bag with a large tip and neatly pipe rounds of buttercream into half of the shells. To close, gently place it’s partner shell on top of the buttercream and twist shut, taking care to prevent buttercream spilling over the edges.

Making macarons is no easy task. This process takes time, patience and most of all PRACTICE. There are too many things that can so wrong so if they haven’t turned out as well you’d like don’t give up! Try, try, try again. It’s a tremendous feeling getting these right. But once you make them…

… they won’t last long.

PS. Have you said hello on Facebook yet?

Tags: , , ,