alcohol

You are currently browsing articles tagged alcohol.

Cravings are weird, right?

Majority of my friends are travelling, or will be travelling in the coming weeks, so to curb my fuming jealously I’ve turned to thoughts of some past adventures yonder seas. In 2008/2009 I hung out in Europe for a couple of months as most 20 year olds do; a few memories of a brief stint in Paris include being rained on tremendously, being kicked out of a souveigner store when I asked the owner for directions, trying to hit on a cab driver with a little help from the ‘romance’ section of my French translation app, seeing many, many boobies at the Moulin Rouge, and, as terribly cliché as it may sound, enjoying a really fantastic French onion soup, or rather, soupe a l’oignon, in a little café.

Since that fleeting thought I hadn’t the will-power to force it out of my mind. MUST HAVE FRENCH ONION SOUP! In a huge coincidence my prayers were answered at dinner at El Circo a couple of weeks ago; an amazing blended soup with a dash of port graced our degustation menu. Mind blowing stuff. And since then it seemed anytime I turned on the TV this soup has been everywhere. Food Safari. MasterChef masterclass. Some other show I can’t remember. The pressure was building up behind my tastebuds; It was time to prepare a soupe a l’oignon of my own.

I began trawling through old photos after making this, and check it out, I found a photo of that soup I ordered in that little Parisian café almost four years ago! Mind you I wasn’t much of a photographer back then with my little Canon snapshot (other photos in this album include me posing idiotically before landmarks, flipping off the Mona Lisa and getting craycray in da club). Hahaha… ahh. Gross.

This recipe is rather rich (beef stock + alcohol + cheese!) and will serve 2 for main or 4 for a little entree. I’ve thrown everything into this one, large pot for all to share at the dinner table but serving them up individually is great for dinner parties too.

Soupe a l’Oignon
(an original recipe)

600g onion (around 4 medium-large), finely sliced
50g butter
2tbs flour
250ml beef stock
500ml water
2 sprigs thyme
Salt
60ml port
60g gruyère, grated
2 slices bread

1. In a large, heavy-based saucepan melt butter over medium heat. Add onions and stir until softened. Continue to cook over medium heat, stirring occasionally, for around an hour or until beginning to caramelise and brown.
2. Add flour to the onions and stir to cook for a few minutes. Add the stock, water and thyme and bring to the boil. Reduce heat and simmer for 30 minutes, adding salt to taste.
3. Preheat oven to 200°C. Place your bread under a grill to toast lightly.
4. Once the soup is ready add the port then carefully ladle into an oven-proof bowl. Add a third of the cheese, then the toasted bread, then top with the remainder of the cheese. Place in the oven for around 10 minutes or until cheese has melted and is deliciously blistered. Serve immediately.

Bon appétit!

Tags: , , , ,

I’m terrible with anecdotes so to spare everyone a long-winded and poorly written story here’s a super condensed version; I was hanging with my friend Mel last week at one of our favourite establishments when I received a text message from home explaining a bag of fresh papaya was just delivered. I’m one of those annoying people who read text messages aloud and Mel must’ve seen the question marks pouring out of my ears so she began to explain all the wonderful benefits of papaya, saying she’d read somewhere its seeds are apparently peppery and delicious. Cool, right?

Thanks to my clever friend and a little dehydration action I’ve come up with this Papaya Pepper Sorbet. It’s times like these I wished I owned a little café or restaurant (my ~FOOD DREAM~) because this is one killer palette cleanser. And shout outs to my vegan pals ‘cos this is one for you! So long as you have some waiting time on your hands this is one of the easiest desserts to create; all you need is some papaya purée, coconut milk, sugar syrup and a spritz of lime. Throw in some ground papaya pepper too for a little something-something, too. It’s pretty great. And can also be made with pawpaw, or a mix of both fruits!

This makes around 8 palette-cleansing serves of papaya sorbet. If you’d prefer to serve this as a full blown dessert dish then I humbly suggest you double the recipe.

Papaya Pepper Sorbet
(an original recipe)

500g papaya, including seeds
65g (1/3 cup) sugar
80ml (1/3 cup) water
60ml (1/4 cup) coconut milk
30ml (1 shot) Malibu, or coconut rum
1 lime

For the papaya pepper
1. Preheat oven to 80°C. Halve the papaya and scoop out seeds. Spread evenly on a baking tray lined with parchment paper and dehydrate for an hour, or until the seeds are dried. Once cooled blitz them in a spice grinder.

For the papaya pepper sorbet
1. Purée papaya flesh in a food processor. Remove and place into a bowl and combine with coconut milk and coconut rum.
2. Prepare sugar syrup by combining sugar, water and juice of half a lime over medium heat until dissolved. Simmer for a few minutes until thickened slightly. Add to papaya mixture along with a squeeze of the remaining lime half. Place in the fridge for a few hours to cool completely, but ideally leave overnight.
3. Add 2 heaped teaspoons of ground papaya pepper into the sorbet mixture and prepare in ice cream maker, as per instructions. Serve immediately, garnishing with a few whole peppercorns.

Thanks to Impact Communications and Australian Papaya for the papaya and pawpaw! You guys are rad!

PS. I’ve been typing this up over the last few incredibly rainy days; the sun has finally decided to show itself today which makes me feel a little less weird about posting a sorbet. AND SPEAKING OF RAIN (clever segue), has anybody managed to get along to Vivid Sydney? Every single evening I’ve been free it has absolutely poured, last night included, but since yesterday was the finale of the festival I threw on many, many layers and braved the cold to enjoy the lights. Lovely stuff (and I’ll take any excuse to throw up a gif).

Tags: , , , ,

Cider Pulled Pork on Apple Crisps

A few weeks ago I received the sweetest delivery; some darling Pink Ladies from Aussie Apples! So this is a somewhat delayed post due to the unfortunate demise of my mandolin. RIP, old, orange friend! I’ve had to wait a couple of weeks to acquire a new one. It’s so super fancy, so fancy in fact that it nearly cut my finger off. Awww yeah.

Cider Pulled Pork on Apple Crisps

Resisting the urge to transform these apples into some kind of dessert (because I really ought to grow up and get my savoury on a little more often) I thought… h’ordeuvres are cool, right? Wonderfully miniature food you can knock back in one mouthful. So, what pairs well with apple? Pork! Ohh, but the whole pulled pork thing is so overdone these days. Why don’t I throw some roasted apple in there to mix it up a bit? Hmm. No. WAIT! I’ll place the pork ON THE APPLE AS LITTLE, EDIBLE PLATES AND IT WILL BE GREAT! And lord knows I love making fruity crisps. And so it was done. Well, the pork was… then my mandolin broke… so I had to wait, my mind heavy with h’ordeuvre love for a few weeks.

Cider Pulled Pork on Apple Crisps

Last time I prepared pulled pork I doused my slow-cooker with beer, which was awesome, but incredibly rich. I considered a 50/50 combination of beer and apple juice until I realised cider would be a much better idea. Thankfully I have a few bottles of homebrewed cider sitting in my room. It’s… not the greatest tasting beverage (why did I use a dry wine yeast to make a fruity cider?!) but it’s ultra-tang makes it very special for cooking. Salty, cidery pork with a sweet, crunchy, apple aftertaste is my idea of fantastic treat.

Cider Pulled Pork on Apple Crisps

I can’t wait to make this for a super funtime party soon. This should make around 60 pieces.

Slow Cooked Cider Pulled Pork on Apple Crisps
(an original recipe)

Apple crisp
3 apples

Cider pulled pork
600g pork chops or shoulder
1 onion, diced
3 cloves garlic, minced
2 tbs paprika
2 tbs cumin
2 tbs crushed coriander seeds
1 diced onion
1 cup apple cider
1 tbs mustard
2 tbs chili flakes (optional)
1 tsp dried thyme
Splash of worcestershire sauce
Splash of soy sauce
Salt
Olive oil

Assembly
A few spinach leaves
Dried thyme
Chili flakes (optional)

For the apple crisp
1. Slice apples on the thinest setting on a mandolin. Preheat oven to 80°C. Lay slices on a baking tray lined with parchment paper and allow to dehydrate in the oven for 2 1/2 hours, turning once halfway through. Once ready, remove from trays and allow to cool on wire racks.

NOTE: This can be done a day ahead. If you find the crisps a little on the limp side the following day you can always re-crisp them in the oven for a few minutes.

For the slow cooked cider pulled pork
1. Combine spices with a little salt and rub into pork pieces. Prepare your slow cooker with a splash of olive oil, and it if has a browning option, add onion and garlic and cook for a few minutes until fragrant. Add pork pieces to brown. Add the cider and other ingredients, turn on the slow cooker option and leave to cook for 6 hours. Check every 1 1/2 hours to turn the pork.

2. Once the pork is tender and cooked through remove pork onto a chopping board and decant juices into a saucepan. Discard any bones. Place over medium-high heat and reduce until halved. Meanwhile, gently break up the pork with two forks (you don’t need to be too thorough) and place into the saucepan of reduced pork juice. Continue to stir and break up the meat until it has reduced a little more; you want the pork to be moist but not too soupy. Remove from heat.

NOTE: This can also be done a day ahead; once prepared from the slow cooker you can separate both meat and juice and refrigerate (or even freeze) for a couple of days until you’re ready. This also provides an opportunity to skim off any fat that may solidify on the surface.

For the assembly
1. Because the apple will curl slightly in the oven, place the crisps the right way up so they stand like a little bowl. Place a small, or a piece of, spinach leaf over the crisp to cover the gap where the core and seeds once were. Top with a generous pinch of pork followed by a sprinkling of dried thyme and chili flakes.

Cider Pulled Pork on Apple Crisps

Mouthfuls of pure happy, these are. I do hope you’re able to try them! GET SOME PORK ON YOUR FORK! And thank you again to Bite Communications and Aussie Apples for the apples. Support your local growers!

Tags: , , , , ,

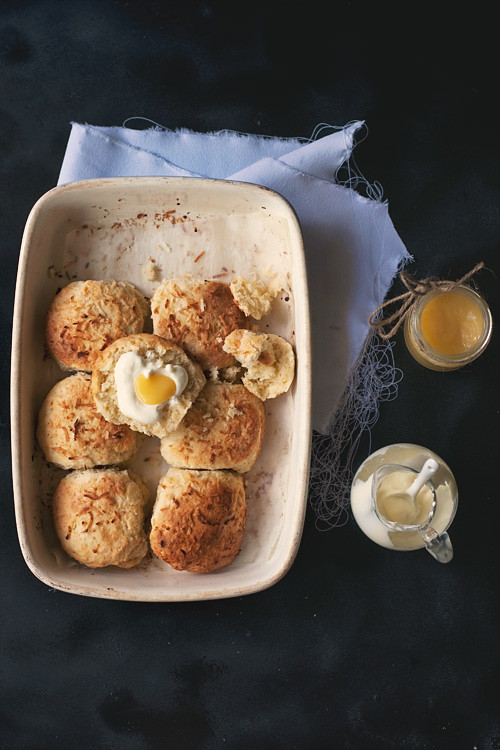
Coconut Scones + Malibu Cream + Lime Curd

Despite being a self-proclaimed “lover of baking” to my friends it’s really rather disturbing how narrow my repertoire really is. Before today I’d never made a scone before… I believe the trouble lies in my apathy for the familiar, if it’s been done I don’t particularly care for it. So, I winged it a little and came up with this cute twist on a traditional recipe.

But before we get into that here’s a little “housekeeping”.


I was given a wonderful opportunity to write a review for SBS Food a couple of weeks ago as a Featured Blog Reviewer and my little piece is up and ready to be enjoyed by all. So check it out! I’ve written about a really gorgeous book, plus the review features my square-cropped, pasty-ethnic face. Oh yeah.

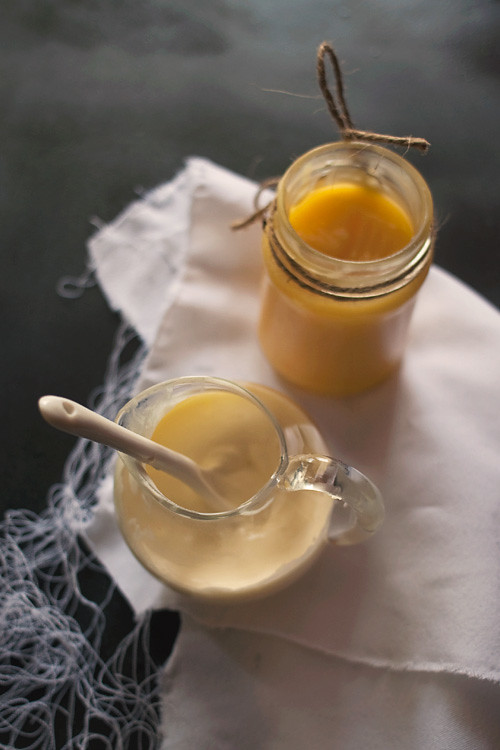
Malibu Cream + Lime Curd

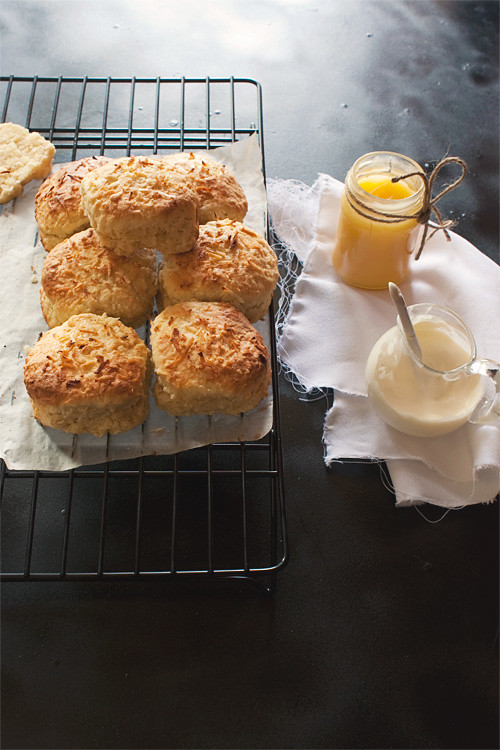
Here’s my recipe for coconut scones. Crumbly and delicious. Below-mentioned condiments are optional however encouraged and of course any fruit jam you may have on hand will work fantastically too. I’ll pull any excuse to bust out my Malibu Cream, a concoction I stumbled across as a happy, pandan-driven accident months ago. It rules.

This recipe will make around 8 scones with cream and curd to spare.

Coconut Scones
300g flour (around 2 1/2 cups) + more for dusting
100g caster sugar
2 tsp baking powder
1/2 tsp salt
75g butter, room temperature
60ml coconut milk
60ml cream
1 egg
1/2 cup flaked coconut (plus more for dusting)
2 tbs milk

Boozy Malibu Cream
240ml (1 cup) cream
30ml Malibu (coconut rum)

Lime Curd
Juice of 2 limes
2 egg yolks
40g sugar
60g butter, cubed

For the coconut scones
1. Preheat oven to 220°C. Grease and line a shallow baking dish.
2. Combine flour, sugar, baking powder and salt into a bowl. Cube butter and rub into the mixture until even. Add the coconut milk, cream, egg and flaked coconut and work with your hands until just combined (overworking the scone mixture may end in disaster).
3. Decant sticky mixture onto a well-floured board and flatten to a 2cm thickness. Sprinkle with more flour, and, with your scone cutter, remove rounds and transfer to the greased baking dish. When arranging the raw scones ensure they fit snuggly and their sides are gently pressed against one another. Brush surfaces with a little milk and sprinkle over additional coconut flakes.
4. Transfer to oven and allow to bake for 15 minutes.

For the boozy Malibu cream
1. Lightly whip cream and Malibu in a small bowl until just thickened.

For the lime curd
1. Combine lime juice, egg yolks and sugar and whisk well. Transfer to a small saucepan and place over medium heat. Stir continuously and gradually add cubes of butter until beginning to thicken (this should take only a few minutes). Remove from heat, continue to stir for 30 seconds more and transfer to a jar or container of your choice. Chill in the refrigerator.

For the assembly
1. Carefully halve your scone. Add a dollop of Malibu cream and a lick of lime curd and enjoy.

Coconut Scones + Malibu Cream + Lime Curd

And yes, I am well aware this combination of cream and curd results in a little faux-egg atop your scone. SOZLOL!

EDIT: Just had one of these with strawberry jam. OH BABY.

Tags: , , ,

Salted Spiced Beer Caramels

A few weeks ago I enthusiastically jumped aboard my beer-wife high-horse and purchased a dozen Brewdog There Is No Santa beers. In retrospect this was a little strange as traditionally I only revel in beers that taste overwhelmingly of fruit and unfortunately this purchase was no exception to my girly tastebuds; despite its charming notes of cinnamon and spice I could only bring myself to drink the one.

Salted Spiced Beer Caramels

However with my glass (stein?) half-full I chose not to see this as a frivolous purchase but as an opportunity to adapt this wonderful beer to the culinary world.

Salted Spiced Beer Caramels

Drawing inspiration from my Framboise Caramels I hoped to achieve a similar chewy and delicious beer-based morsel. With the addition of of some spice to heighten the essence of this micro-brewed Christmas beer you’ll have salty, sweet, buttery, bitter and spicy flavours partying all up and around your mouth. And isn’t this what flavoured caramel is all about?

Salted Spiced Beer Caramels

Shout outs to all fellow beer and candy fans. Oh, and to people who own candy thermometers, shout outs to you too. Seriously! Please don’t try this recipe without one; unless you are Lord of the Fluke the consistency of the caramel won’t turn out as nicely as you’d like so just don’t. Please? Ok good. I’m only harsh because I care. Mwa mwa! This recipe makes around 40 caramels, depending on the size.


Salted Spiced Beer Caramels

(an original recipe)


1x 330ml bottle spiced beer (I used Brewdog’s There Is No Santa)

2/3 cups cream

2 tbs sea salt flakes + more for garnish

1 tsp cinnamon

1 tsp ground ginger

1/4 tsp ground cloves

1 1/2 cups sugar

1/3 cups corn syrup / glucose

120g butter, cubed


1. Pour beer into small pan and simmer over medium heat until reduced to 1/3 cup. This should take around 20-25 minutes. Place in fridge (or freezer) to cool.

Salted Spiced Beer Caramels

2. Line a square tin with baking paper. Once your reduced beer has cooled combine with cream, salt, cinnamon, ground ginger and ground cloves. Stir well.

3. Combine sugar and corn syrup over low heat until dissolved. Increase heat until syrup has caramelised – 112°C on your candy thermometer. Do not stir during this process or the syrup will crystallise.

4. Remove from heat and slowly pour in your cream mixture, stirring quickly as you do so. Be careful has the concoction will try to splutter everywhere. Continue to stir to break up the caramel ball formed whilst adding the cubed butter. Don’t worry if you’re unable to dissolve everything.

5. Return to low heat and stir frequently until the temperature reaches 120°C on your candy thermometer.

6. Pour caramel into prepared tin and allow to cool slightly. Sprinkle with rock salt and allow to cool completely – either overnight on your kitchen bench or in the fridge to speed up the process. Cut into small squares and wrap with baking paper, twisting at the ends like traditional candies. Sprinkle with more rock salt if desired.

Salted Spiced Beer Caramels

BRB, MAKING AN APPOINTMENT WITH THE DENTIST (and possibly AA).

Tags: , , , ,

Before I begin my usual selfish ramble about how wonderful food is I need to thank Diana of Diana’s Desserts for this incredible apple cider baked donut recipe. I’ve seen the term “Apple Cider Doughnuts” wafting about food blogs like crazy as of late but after some investigation I’ve found most of them seem to stem from this recipe. So thank you, Diana, this recipe is amazingly delicious for something so simple (and since I busted my handmixer the other day this recipe was an absolutely blessing to my unfortunate circumstance).


I’ve added my own garnishes to these lovelies (because what’s the fun in cooking straight from a recipe?); my simple apple cider glaze and apple bark. It’s important to use a good quality apple cider here as it is the only wetting agent for the glaze (so if you were considering using Strongbow kindly close this browser now :)). And as for my apple bark – this was a complete(ly successful) afterthought that went down a treat providing a welcomed crunchy tang.  You may want to organise this a few hours prior to baking your goods as it will need around 3 hours in the oven.

As you can see I’ve used donut pans, mini donut pans and a baby cupcake tin so in the spirit of concise headings I’ve umbrella’d these delicious gems under “baked goods”. This recipe does not discriminate against shape!


APPLE CIDER BAKED GOODS + CIDER GLAZE + APPLE BARK

Apple cider baked goods (from Diana’s Desserts)

2 cups plain flour

2 tsp baking powder

1/2 tsp salt

2 tsp cinnamon

1 egg

2/3 cup packed brown sugar

1/2 cup apple sauce

1/3 cup maple syrup (or maple flavoured syrup)

1/3 cup good quality apple cider

1/3 cup vanilla yoghurt

3 tbsp vegetable oil


Apple cider glaze

1 cup icing sugar mixture

1/2 tsp cinnamon

1/4 cup good quality apple cider


Apple bark

1 apple

springkling of cinnamon

For the apple cider baked goods

1. Preheat oven 180°C.

2. In a large bowl combine flour, baking powder, salt and cinnamon.

3. In another bowl combine wet ingredients; beaten egg, brown sugar, apple sauce, maple syrup, apple cider, yoghurt and vegetable oil. Give them a quick whisk then add your bowl of dry ingredients. Whisk until just combined.

4. Divide your mixture between pans/tins of your choosing. For a donut pan bake for 10 minutes, for mini donuts and baby cupcakes bake for 5-7 minutes or until the tops spring back when touched.

5. After 5 minutes transfer to a wire rack and allow to cool completely.

For the apple glaze

1. Combine icing sugar, cinnamon and cider in a small bowl and stir well to remove any lumps.

For the apple bark (do this the morning before)

1. With a sharp vegetable peeler peel thin strips of apple, including the skins, and place on a baking tray. Sprinkle with cinnamon.

2. Bake in a cool oven (around 80-100°C) until completely dried, between 2 -3 hours. (If you are doing this day before you may need to re-crisp your apple bark for half an hour before assembling). Once dried, the apple skins will shrink and curl like little twigs. The apple strips will look like leaves.

For the assembly

1. Hold your baked good up-side-down and dip into the glaze. Shake of any excess and place back on the wire rack. Take a piece of apple bark and place on baked good while the glaze is still wet so it stays in place once dried. Continue with the rest of your donuts and baby cupcakes.


Bring these along to any dinner party and they will be very, very well received.


Trust me; I know from experience.

Tags: , , , , , , ,

Berry Infused Vodka

Still riding the high of my recent LET’S-MAKE-EVERYTHING-FROM-SCRATCH! revelation I decided it was time for a little home alchemy thanks to a friend who, in exchange for my photographic services, presented me with a rather large bottle of vodka. Lovely.

Berry Infused Vodka

Berry Infused Vodka

After trawling the internet regarding the best methods of home infusion I shrugged and tumbled everything into a tub for steeping; I’m talking strawberries, blueberries, lemon rind, sugar syrup, a cinnamon stick and the most potent vanilla bean I have ever had the pleasure of using to create this DIY berry infused vodka.

Berry Infused Vodka

The only difficult step to this process is waiting. I kept this tub in a dark place for three weeks after which time it looked a little something like this; the vodka had completely stripped the berries of their colour and little vanilla bits were floating everywhere. Straining this concoction was incredibly ugly (NOTE: no matter how tempted you are, do not eat the berries; your brain will melt out of your ears if you do).

Berry Infused VodkaBerry Infused Vodka

After further cheesecloth straining I funnelled my wonderful liquor into glass bottles. The result? The most intensely delicious vanilla. Vibrant red and fragrant berry flavours. This was one of those times a pilot experiment has lead to immeasurable happiness!

Berry Infused Vodka

Now, what to do with such a special brew? Keep it simple; one shot over ice, lemonade, freshly sliced strawberries to garnish. This drink is girly as all heck but is so absolutely special I’m convinced the boys will be more than willing to drink this over, and over again. Welcome to vodka with style!

Berry Infused Vodka

EDIT: my brother, my dad and my boyfriend love this so yes, it is a blaring manly success!


Tags: , , , , , , ,