Hey there sugar cookie! I have such a love hate relationship with you. Sometimes you’re adorable and cute, sometimes you’re oozy and shapeless. Sometimes you’re so chewy and delicious, sometimes you’re dry and just plain nasty.

These things are so hit and miss so when I was asked to make a Movember themed thing for a bakesale I was determined to get these cookies right. With a little help from some spice and a simple freezer I present to you my no-fail recipe and tutorial to creating perfectly shaped sugar cookies! They’re perfect for holiday events or themed garnishes, or both! This is also an easy way of creating two biscuit flavours from the same batch of dough. This should make around 30 movember cookies, depending on the size.


Basic Cinnamon + Chocolate Movember Cookies

(an original recipe)

120 g butter (at room temperature)

1 cup sugar

1 egg

2 cups flour

1/2 tsp baking powder

2 tsp cinnamon

1 tsp vanilla extract

pinch of salt

1 tbs milk (optional)

2 tbs dutch-process cocoa


1. Beat butter until it begins to pale. Add sugar and beat until fluffy. Add egg and beat until combined.

2. Add flour, baking powder, cinnamon, vanilla and salt and continue to beat until completely combined. The mixture should begin to come together but of it seems a little crumbly add the milk.

3. Remove half of the mixture, flatten into a disc, cover with plastic wrap and place in the fridge.

4. Add the cocoa to the remaining dough in the bowl and mix until completely combined. As with the earlier half, flatten into a disc, cover with plastic wrap and place in the fridge to firm.

5. Preheat your oven 160°C.

6. Remove dough, one disc as a time, and roll out to around half a centimetre thickness. Stamp out shapes with your cutter of choice, place on a tray lined with baking paper and, once full of shaped cookie dough, immediately place in the freezer for around 20 minutes. This is the most important step to ensure your shapes remain in tact once placed in the hot oven! Otherwise they’ll just ooze and end up looking like an ordinary, misshapen cookie (no disrespect to all the delicious, rustic cookies out there).

7. OPTIONAL: If you have any additional stampers or or textures to add to the cookies, do this now right before placing in the oven.

8. Place in the oven and bake for around 8-12 minutes, depending on the size. You’ll know when to remove them when they begin to brown around thr edges. After 5 minutes, remove tray and transfer cookies to a cooling wrack.

Now they’re ready to decorate! I embedded them in some buttercream-covered pandan cupcakes and added cachous for eyes to make little faces (a good idea in theory however they ended up looking like the Pringles logo in cupcake form. HOW EMBARRASSING).

And I may have had a little too much fun with them too.

I’d like to congratulate everyone who has participated and donated to such a fantastic cause this year. A number of friends took part in this and, despite a little self-consciousnes, did a really excellent job by embracing the mo’. So until next year, happy Movember!

EDIT: A few people have been asking where they can find these cookie cutters and stampers. I’m using the Munchstache set by Fred & Friends; they seem to be available all over the place so have a Google!

Tags: ,


This post is dedicated to the Australian Women’s Weekly Children’s Birthday Cake Book. Shout outs to my Australian pals!

Hopefully for those living in the great sunny land down-under this image should stir nostalgic delight within each and every one of you.


Perhaps I should explain for my international friends. This book was held precious to many families in the 90s with its simple instructions and how-tos for creating adorable cakes. It’s so popular that a commemorative Vintage Collector’s Edition was released in Februrary this year. It’s so popular it has a number of Facebook fan groups and fan pages. It’s so popular this book has barely aged; it’s incredible to see how many people continue refer to this gem of a book for fun cake ideas. It’s simply amazing.

Amongst its pages of how-tos for the Teddy Bear cake, Train cake, Piano cake and Butterfly cakes lies the most infamous cake of all – The Swimming Pool cake. It was every kid’s dream cake when I was younger, and why wouldn’t it be? Delicious cake slathered in buttercream and jelly (or jell-o for my American pals) covered in lollies and candy. It was a dream come true. I might go as far as to call this an Australian Icon.

Thankfully, however,  the culinary world has evolved from using algae-green jelly and nailpolish as decorating components.

My version is a little different from the recipe listed (I didn’t use “1 packet butter cake mix”, for example) so here’s my step-by-step guide to creating this iconic Australian cake. It’s best started a day in advance to prepare the cake, and more importantly the blue jelly. I hope you have lots of lollies ready in your pantry!

Swimming Pool Cake

(Alana’s Illustrated Guide)

1. BUY LOLLIES AND CANDY. Blue jelly, desiccated coconut, Teevee snacks (or long chocolate covered biscuits), jelly babies, gummy bears, snakes, kool mints and cocktail umbrellas. GO NUTS!

2. Prepare blue jelly according to packet instructions. Place in fridge and allow to set completely.

3. Prepare a 9-inch round cake. I used my standard vanilla cake recipe and added a chocolate swirl by adding a little cocoa in some of the remaining mixture. Once baked (180°C for around 50 minutes), wrap in plastic so it doesn’t dry out and place in the fridge until your jelly is ready.

4. Remove cake from fridge. With a sharp knife trim the cake to remove the dome that has probably formed in the baking process to create a nice, flat surface.

5. With the sharp knife, cut around the top in a circle to represent the wall of the swimming pool. Hollow out the centre if the cake to form a recess for the jelly.

6. Prepare chocolate buttercream by beating 125g butter, 1 1/2 cups icing sugar, 50g melted chocolate and a tablespoon of cocoa. Spread around the cake covering the edges and around the wall of the recess.

7. Prepare green coconut “grass” by combing desiccated coconut with a few drops of green food colouring. Gently place or spoon around the rim of the cake ensuring not to spill any on the sides (a little overflow is fine though as they will be covered by the biscuits). I know it’s looking a little silly now but just bare with me, it will be worth it, I promise!

8. Create the fence of the pool by arranging the Teevee snacks (or biscuits sticks) around the edge of the cake. Be sure to leave a 1 1/2 inch gap to make room for the ladder.

9. Construct the ladder out of must sticks and thin candy strips, I used thin sour laces. Use a little of the buttercream to attach the pieces and lean against the cake.

10. Remove your set jelly from the fridge and mash with a fork to represent water. Carefully spoon into the crevice of your cake, ensuring you don’t spill any onto the coconut grass (once it sticks, it stays!).

11. It’s time for the decoration! Adorn your cake with cocktail umbrellas, jelly babies, gummy bears, kool mints for balls or anything else you like. I had my brother make create some lounging jelly babies floating in pool toys constructed from snakes. Place them in and around the pool edges!


Note: you may have a LOT of sweet treats leftover if you bought as much as I did.

It’s a sight to behold, isn’t it? It’s just so adorable taking a knife to is seems almost blasphemous…

NOOOOOOOOOOOOOOO-

Oh well. Good night, sweet prince.

You were everything I ever dreamed of and more as a 5 year old.

Tags: , , , , ,

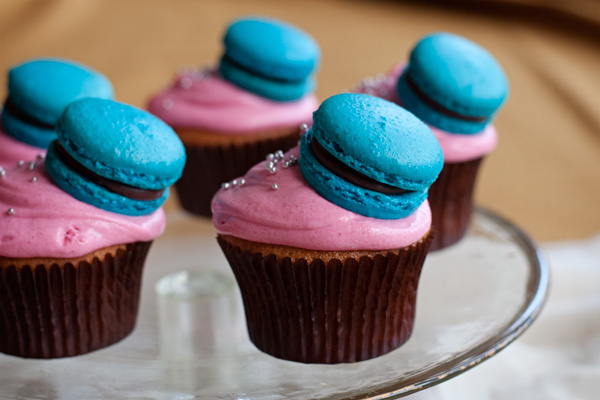
Macaron Cupcakes. MACARON. CUPCAKES. Why aren’t these a “thing” on the internet yet? A dessert garnished with another dessert; genius (if I do say so myself)! I first made a dozen of these a few months ago for Australia’s Biggest Morning Tea, an annual event to raise both awareness and funds for The Cancer Council. My vague instructions were to “make cupcakes, or macarons, or I don’t know, SOMETHING” so I took it in my stride to combine the two aforementioned goods to create the absolute ~CUTEST~ cupcake known to man. They were a hit! And of course the inspiration behind the alanabread logo.

So when my friend Bayden of Packwood recently asked if I could bring something along to the accompanying bakesale at Folkraiser @ Hibernian House this weekend there was only one adorable cake on my mind.

If you’re already experienced in macaron and cupcake baking then this should be an absolute breeze, albeit a little time consuming. The great thing about this combination is that you can mix up the flavours as freely as you’d like and, with the addition of some lovely pastel colours, they’ll always look fantastic. They basically advertise themselves! And who wouldn’t want a delicious cupcake with a macaron top-hat?!

This recipe will make 12 macaron cupcakes with some extra macarons to spare.


MACARON CUPCAKES

(an original recipe)

Macaron Shells

100g egg whites, room temperature

100g almond meal

200g pure icing sugar

30g caster sugar

1 tsp powdered egg whites

Powdered food colouring of your choice


Salted Callebaut Ganache

140g Callebaut chocolate, chopped (I used half milk, half dark)

80ml pouring cream

sea salt, to taste


Vanilla Bean Cupcakes

100g butter, room temperature

1 cup caster sugar

1 vanilla bean

3/4 cups self-raising flour

1/2 cup +2 tbs plain flour

2 eggs, room temperature

1/2 cup buttermilk


Cream Cheese Icing

250g cream cheese, room temperature

2 cups icing sugar mixture

Food colouring of your choice


Assembly

Mini cachous


For the salted Callebaut macarons

1. Preheat your oven 150°C.

2. Sift pure icing sugar and almond meal and place into a bowl and give it a quick stir.

3. Beat eggwhites and eggwhite powder in a separate bowl until soft peaks form. Slowly add the caster sugar, beating well between each addition, until eggwhites are stiff and glossy. This process should take around 5-10 minutes.

4. Pour half of your dry ingredients into the bowl of beaten eggwhites and combine with a flat utensil, like a spatula, using “cutting strokes”. Once incorporated repeat with the remaining icing sugar and almond meal mixture. This is where things begin to get a little tricky as under-mixing or over-mixing will ruin your macarons as they attempt to rise and “grow feet” in the oven. Experts say to stir the mixture until it becomes the consistency of lava. The mixture will be sticky but you’ll know it’s ready when, upon holding your spatula above the bowl, it will begin just begin to flow freely back into the bowl. You’ll need to knock a lot of the air out of it.

5. Prepare a piping bag with the appropriate tip (around 1 cm or less), a baking tray with baking paper, and pipe small rounds (they must be small enough to balance on the cupcakes!). If there are any small lumps left from piping wet your finger and gently press them down (unlike cake batter, macaron mixture does not flatten out when in the oven). Allow tray to rest for 30 minutes.

6. Place baking tray in the oven and allow to bake for around 15 minutes (this time will depend entirely on your oven, so keep an eye on them). Within 5 minutes or so they will begin to grow feet.

7. Once ready, remove from oven, and after 5 minutes transfer to cooling racks.

8. Whilst your shells are cooling place your cream in the microwave for 30 seconds or until relatively hot. Pour your chopped Callebaut into the bowl and stir continuously until the chocolate has melted and the mixture is combined. Add sea salt, to taste, until you chocolate flavour begins to “pop” (this took me a few turns of my salt mill). Place bowl into the refrigerator to cool and thicken.

9. Prepare another piping bag with a large tip and neatly pipe rounds of ganache into half of the shells. To close, gently place its partner shell on top of the ganache and twist shut, taking care to prevent ganache spilling over the edges.

For the vanilla bean cupcakes

1. Preheat oven to 180°C.

2. Beat butter until it begins to cream and pale. Scrape the seeds from the vanilla pod into the butter, add the sugar and continue to beat until combined and fluffy. You should be able to see the flecks of vanilla bean.

3. Add the eggs one at a time beating after each addition. Add the self-raising flour, milk, then plain flour once again beating after each addition.

4. Spoon into a prepared cupcake tin with liners, filling each to around two thirds full. Rap the pan by dropping it from a small height to knock out any air bubbles.

5. Place in oven and bake for aound 15-20 minutes or until the tops spring back when touched. Allow to cool for 5 minutes then transfer cupcakes to a wire rack to cool completely.

6. While these are cooling, prepare your cream cheese icing by beating the cream cheese with icing sugar and food colouring until combined and creamy.


For the assembly

1. With a piping bag with a large tip attached carefully pipe cream cheese icing over cupcakes. Carefully take macarons and place at an angle on each cupcake ensuring their placed firmly enough that they won’t slip off. Sprinkle with mini cachous and place cupcakes in the fridge for the icing to firm up to ensure the macarons will stay put.


All packed up and ready to go!

If you’d like to hear more of Packwood’s tunes you can check out the Facebook page here, also the alanabread facebook page is here too. Here’s a fan-video from our friend Zohara from a show a couple of months ago (you can hear me playing piano at 5:30!):

Lessons learnt the past few days: 1) orchestral folk music is cool, 2) being a baker/musician for a night is a total dream come true, and 3) there is something strangely satisfying about baking your own logo.

Tags: , , ,

Awesome friends? Check. Picnic blanket? Check. Great location? Check. Lots of fresh and delicious food? Double check.

Unfortunately I left my darling camera at home over the weekend so you’ll just have to take my word that splendid picnic times were had yesterday. As usual we all prepared some things to share and, to comply with the eating habits of my wonderfully diverse group, I decided it was time to venture into vegan baking.

The ‘V’ word is often a little daunting. Unfortunately many make assumptions of bland, tasteless and generally odd looking food. While this is sometimes the case true vegan cooking/baking can produce the most amazingly ingenious dishes so long as your core ingredients are substituted accurately (I have one of my favourite pals, vegan chef extraordinaire Ro, to thank for this revelation over the past couple of years).

Despite the challenges one must overcome in the absence of milk, butter and eggs this is a very simple cake to prepare as there is no beating required. A simple bowl and spoon is all you need to make these vegan chocolate cupcakes!

Decorating cakes that sit below the rim of the baking cup is a rarity for me so when I realised these cakes weren’t going to rise too much it became a fun learning exercise in decorating with glaze. Ideally I’d have used fresh cherries as a garnish, but you know, cherry season is yet to grace us.

I’ll spare you my horrendous recipe sketch covered in water and cocoa, here’s a nice, neat typed version for you to try at home. Makes 12 vegan treats.


Vegan cherry + choc + coconut cupcakes

(an original recipe)

1 1/4 cup flour

1 cup sugar

1/3 cup good quality, dutch-process cocoa

1 tsp baking powder

1/2 tsp salt

1 cup coconut milk

1/3 cup vegetable oil

2 tsp apple cider vinegar

1 tsp vanilla extract

1 cup preserved morello cherries, roughly chopped

1/2 cup desiccated coconut


Vegan chocolate glaze

1/2 cup sugar

4 tbsp vegan margarine (eg, Nuttelex)

2 tbsp good quality, dutch-process cocoa

2 tbsp coconut milk

2 tsp vanilla extract


12 fresh, glacé or any other candied cherries to serve


1. Preheat your oven to 180°C and prepare a muffin tin with 12 baking cups.

2. Combine your dry ingredients  (flour, sugar, cocoa, baking powder and salt) into a bowl. Then add the coconut milk, vegetable oil, apple cider vinegar and vanilla extract and stir until well combined.

3. Remove morello cherries from jar and chop roughly, placing on paper towels to remove some of the moisture. Add them to your mixture as well as your desiccated coconut and once again stir to combine ensuring the cherries are evenly distributed.

4. Place mixture in baking cups around two thirds full and bake for around 20 minutes, or until a skewer inserted comes out clean. Allow to cool for five minutes then transfer to a wire rack.

5. Meanwhile, combine sugar, margarine, cocoa, coconut milk and vanilla into a saucepan and bring to the boil. Simmer for five minutes then remove from heat. Stir constantly for five minutes; the glaze will begin to thicken.

6. Carefully spoon the glaze onto each cupcake make sure to bring it to edge of the baking cup. Adorn each with a glacé cherry and allow to set for 1-2 hours.

Gives these a try and I promise these will be a part of your permanent baking repertoire. Wait, actually, one of my friend’s just called me then so say that these were really great. AWW! Based on this, and my adorable animated gif, you should definitely make these right away.

Tags: , , ,

I hate Summer. I hate, hate, hate it. What’s there to like about the heat, sweatiness and general discomfort? Ever since I was young I’ve had an irrational fear of sand (true story) so I find the beach unbearable too. That’s so un-Australian, right m8?! I should probably trade passports with an English backpacker as I’m constantly avoiding Australia’s (apparent) greatest features in the search for air conditioning and fashionable Winter accessories. I am the original Summer Scrooge.

After waking up frustrated from the tropical temperature in my room this morning I knew I had to prepare something refreshing lest I immediately purchase a one way ticket to Europe; my only option was to turn to the freezer for inspiration. Frozen raspberries in hand I picked a fresh lime from the tree in the backyard and convinced myself I was going to make the most delicious, refreshing thing I had ever tasted. Or I would cry.

With only five ingredients and three steps is one of the easiest recipes I’ve posted here; it involves preparing a simple syrup and combining it with some crushed frozen raspberries. Try adding a variation of frozen berries or even upping the amount of booze on this if you’re in the mood to get your buzz on!


Raspberry Sorbet (with Lime and Cointreau)

(an original recipe)

1/3 cup sugar

1/3 cup water

1 lime

3 1/2 cups frozen raspberries

2 tbs Cointreau


1. Combine sugar, water and juice from half a lime into a saucepan over medium heat. Allow sugar to dissolve, then boil gently for 5 minutes to form a sugar syrup. Once prepared decant into a heatproof bowl and place in the fridge/freezer to cool completely.

2. Meanwhile, place raspberries into a food processor and churn until crushed. Place into a bowl and add the juice of the remaining half a lime and the Cointreau.

3. Once the sugar syrup has cooled completely pour into your raspberry mixture and stir to combine. Prepare in ice cream maker as per manufacturer’s instructions.

Okay, okay, maybe there is one redeeming quality about Summer; eating lots and lots of raspberry sorbet.

Tags:

Before I begin my usual selfish ramble about how wonderful food is I need to thank Diana of Diana’s Desserts for this incredible apple cider baked donut recipe. I’ve seen the term “Apple Cider Doughnuts” wafting about food blogs like crazy as of late but after some investigation I’ve found most of them seem to stem from this recipe. So thank you, Diana, this recipe is amazingly delicious for something so simple (and since I busted my handmixer the other day this recipe was an absolutely blessing to my unfortunate circumstance).


I’ve added my own garnishes to these lovelies (because what’s the fun in cooking straight from a recipe?); my simple apple cider glaze and apple bark. It’s important to use a good quality apple cider here as it is the only wetting agent for the glaze (so if you were considering using Strongbow kindly close this browser now :)). And as for my apple bark – this was a complete(ly successful) afterthought that went down a treat providing a welcomed crunchy tang.  You may want to organise this a few hours prior to baking your goods as it will need around 3 hours in the oven.

As you can see I’ve used donut pans, mini donut pans and a baby cupcake tin so in the spirit of concise headings I’ve umbrella’d these delicious gems under “baked goods”. This recipe does not discriminate against shape!


APPLE CIDER BAKED GOODS + CIDER GLAZE + APPLE BARK

Apple cider baked goods (from Diana’s Desserts)

2 cups plain flour

2 tsp baking powder

1/2 tsp salt

2 tsp cinnamon

1 egg

2/3 cup packed brown sugar

1/2 cup apple sauce

1/3 cup maple syrup (or maple flavoured syrup)

1/3 cup good quality apple cider

1/3 cup vanilla yoghurt

3 tbsp vegetable oil


Apple cider glaze

1 cup icing sugar mixture

1/2 tsp cinnamon

1/4 cup good quality apple cider


Apple bark

1 apple

springkling of cinnamon

For the apple cider baked goods

1. Preheat oven 180°C.

2. In a large bowl combine flour, baking powder, salt and cinnamon.

3. In another bowl combine wet ingredients; beaten egg, brown sugar, apple sauce, maple syrup, apple cider, yoghurt and vegetable oil. Give them a quick whisk then add your bowl of dry ingredients. Whisk until just combined.

4. Divide your mixture between pans/tins of your choosing. For a donut pan bake for 10 minutes, for mini donuts and baby cupcakes bake for 5-7 minutes or until the tops spring back when touched.

5. After 5 minutes transfer to a wire rack and allow to cool completely.

For the apple glaze

1. Combine icing sugar, cinnamon and cider in a small bowl and stir well to remove any lumps.

For the apple bark (do this the morning before)

1. With a sharp vegetable peeler peel thin strips of apple, including the skins, and place on a baking tray. Sprinkle with cinnamon.

2. Bake in a cool oven (around 80-100°C) until completely dried, between 2 -3 hours. (If you are doing this day before you may need to re-crisp your apple bark for half an hour before assembling). Once dried, the apple skins will shrink and curl like little twigs. The apple strips will look like leaves.

For the assembly

1. Hold your baked good up-side-down and dip into the glaze. Shake of any excess and place back on the wire rack. Take a piece of apple bark and place on baked good while the glaze is still wet so it stays in place once dried. Continue with the rest of your donuts and baby cupcakes.


Bring these along to any dinner party and they will be very, very well received.


Trust me; I know from experience.

Tags: , , , , , , ,

About a year ago I was transformed into a macaron making machine. Macaron after macaron, request after request, I was churning these mothers out like a, ahhh… like something that prepares a lot of macarons (you can find some evidence in my old kitchen porfolio). Unfortunately this lead to a great macaron meltdown. I had grown so tired of these adorable, French biscuits I began to despise the process and thus began my temporary retirement. It was an epic rage quit inspired by sugar and ground almonds. Months later (last night) however and due to popular demand (a friend) I managed to pull myself out of my rut and make a great macaron comeback.

The first time I ever tasted pandan was in cake form accompanied by a cup of jasmine tea; a seemingly apt combination for a macaron. If you have reservations about opening an entire can of coconut milk for only 2 tbs I completely understand and suggest you use regular milk. However, like salt to lemon, coconut and pandan compliment each other so wonderfully it really is a shame to tear them apart.

Apologies as mine are a little on the thick side; my excuse being I was adjusting to a brand new piping nib… and I’m out of practice.


JASMINE + PANDAN MACARONS

(an original recipe)

For the shells

1 teabag (or 1 heaped tsp) jasmine tea leaves

100 g almond meal

200 g pure icing sugar

100 g aged eggwhites, room temperature

30 g caster sugar

1 tsp powdered egg whites


For the pandan buttercream

100 g butter, room temperature

2 cups icing sugar mixture

3/4 tsp pandan paste

2 tbs coconut milk

1. Preheat your oven 150°C.

2. Sift pure icing sugar and almond meal and place into a bowl with your jasmine tea leaves and give it a quick stir.

3. Beat eggwhites and eggwhite powder in a separate bowl until soft peaks form. Slowly add the caster sugar, beating well between each addition, until eggwhites are stiff and glossy. This process should take around 10 minutes.

4. Pour half of your dry ingredients into the bowl of beaten eggwhites and combine with a flat utensil, like a spatula, using “cutting strokes”. Once incorporated repeat with the remaining icing sugar/almong meal/jasmine tea mixture. This is where things begin to get a little tricky as under-mixing or over-mixing will ruin your macarons as they attempt to rise and “grow feet” in the oven. Experts say to stir the mixture until it becomes the consistency of lava. The mixture will be sticky but you’ll know it’s ready when, upon holding your spatula above the bowl, it will begin just begin to flow freely back into the bowl. If it’s too watery then you may have mixed too much!

5. Prepare a piping bag with the appropriate tip (around 1 cm or less), a baking tray with baking paper, and pipe rounds. If there are any small lumps left from your piping tip wet your finger and gently press them down (unlike cake batter, macaron mixture does not flatten out when in the oven! Also, ensure you don’t leave drops of water on your macarons or they will balloon whilst baking). Allow tray to rest for 30 minutes.

6. Place baking tray in the oven and allow to bake for around 15 minutes (this time will depend entirely on your oven, so keep an eye on them). Within 5 minutes or so they will begin to grow feet.

7. Once ready, remove from oven, and after 5-10 minutes transfer to cooling racks.

8. Whilst your shells are cooling place butter and icing sugar into a bowl and beat until fluffy. Add pandan paste and beat further. Slowly add coconut milk until the buttercream reaches desired consistency.

9. Prepare another piping bag with a large tip and neatly pipe rounds of buttercream into half of the shells. To close, gently place it’s partner shell on top of the buttercream and twist shut, taking care to prevent buttercream spilling over the edges.

Making macarons is no easy task. This process takes time, patience and most of all PRACTICE. There are too many things that can so wrong so if they haven’t turned out as well you’d like don’t give up! Try, try, try again. It’s a tremendous feeling getting these right. But once you make them…

… they won’t last long.

PS. Have you said hello on Facebook yet?

Tags: , , ,

Hi Alan, we are delighted to confirm you will be part of the MasterChef Live Masterclass this Thursday. The reason for this masterclass is to showcase to the media a snap shot of what you can do at the MasterChef Live event coming up in a few weeks time.

Receiving this email on Tuesday had me so elated I was willing to forgive the blatant typo of my name. And also the section that read “Arrival time: 7:15 am for registration”? Yeah, I was blinded by my excitement on that one as well. Morning struggles aside however, I arrived fresh (I’m lying) with digital media comrade and fellow food blogger Dorothy of Zumboriffic fame.


Being welcomed by the glorious, infamous Masterchef clock was enough to shake the decaffeinated mess out of me.

We weren’t entirely sure what to expect besides the chorizo, flames and “white shirt, dark pants” dress code mentioned in the email but we were very kindly explained this would be a brief masterclass covering some kitchen basics and the majestic art of the flambé. Oooooooh.

First lesson: knife skills. Because I understand a photo of chopped herbs makes for riveting blogging here you go, my shallots finely chopped to perfection (cough).

Some familiar faces dropped by to assist. Here’s Adriano Zumbo sans dessert in hand.

Miguel Maestre seemed comfortable wooing the ladies whilst educating the audience of the correct pronounciation of chorizo (“CHORIIITHHHOOOOOOO”).

Second lesson: mis en place. A truly commendable effort, our group’s sliced chorizo.

Amongst the commotion Dorothy and I were able to fangirl our way into a couple of photos. You know that vaguely awkward moment when someone offers to take your photo and they don’t particularly turn out how you would like? So I ask you, what’s better; a blurry photo or a photo where you’re either blinking or about to start speaking with squishy face? You decide.

BOOM BOOM SHAKE THE ROOM.

More slicing and dicing ensued amongst the chaos of the celebrity chef’s presence. And girls swooning over Hayden.

“Hey, this bread looks pretty good. Where did it come from? Oh… duh. Hahahaha.”

Everyone crowds around the gas burners for the first flambé of the morning. Say hello to Allesandro Pavoni and Shaun Presland (and get a load of the BFFs on the left).

Lessons learnt? A little fire brings so much joy to even the most experienced of chefs. Perhaps anyone who enjoys cooking is just a pyro with a cause.

… and eating garlicy chorizo for breakfast, as delicious as it may be, leaves you feeling a little on the “seasoned” side for the rest of the day. Thanks again to MasterChef Live and Cheeky for such a fun filled morning!

Tags: , , ,

Berry Infused Vodka

Still riding the high of my recent LET’S-MAKE-EVERYTHING-FROM-SCRATCH! revelation I decided it was time for a little home alchemy thanks to a friend who, in exchange for my photographic services, presented me with a rather large bottle of vodka. Lovely.

Berry Infused Vodka

Berry Infused Vodka

After trawling the internet regarding the best methods of home infusion I shrugged and tumbled everything into a tub for steeping; I’m talking strawberries, blueberries, lemon rind, sugar syrup, a cinnamon stick and the most potent vanilla bean I have ever had the pleasure of using to create this DIY berry infused vodka.

Berry Infused Vodka

The only difficult step to this process is waiting. I kept this tub in a dark place for three weeks after which time it looked a little something like this; the vodka had completely stripped the berries of their colour and little vanilla bits were floating everywhere. Straining this concoction was incredibly ugly (NOTE: no matter how tempted you are, do not eat the berries; your brain will melt out of your ears if you do).

Berry Infused VodkaBerry Infused Vodka

After further cheesecloth straining I funnelled my wonderful liquor into glass bottles. The result? The most intensely delicious vanilla. Vibrant red and fragrant berry flavours. This was one of those times a pilot experiment has lead to immeasurable happiness!

Berry Infused Vodka

Now, what to do with such a special brew? Keep it simple; one shot over ice, lemonade, freshly sliced strawberries to garnish. This drink is girly as all heck but is so absolutely special I’m convinced the boys will be more than willing to drink this over, and over again. Welcome to vodka with style!

Berry Infused Vodka

EDIT: my brother, my dad and my boyfriend love this so yes, it is a blaring manly success!


Tags: , , , , , , ,

Fancy beers and candy making. This new, almost-obsession of mine would not be possible without the influence of my boyfriend, the boutique beer connoisseur slash home-brewer, who has taught me there is life outside of gaging over Coronas.

This little experiment is testament to the cliché “if at first you don’t succeed; try, try, try again”. My first attempt tasted spectacular but didn’t set. My second attempt set however lacked that caramely-smack-in-the-mouth (is that even a thing? It is now). My third attempt, thank goodness, was wonderful!

The beer I’m using is a framboise; a lambic beer brewed with raspberries. Timmermans is a more syrupy beer than most which makes for a fantastic ingredient in this recipe (if you’re eager to enjoy one in its pure form however I would recommend a Lindemans Framboise for its tangy edge. Mmm).

Combined with caramels, you’ll get sweet, salty, tangy and berry all in one mouthful. Heavenly. And the best advice I can give before you begin this delicious journey into sticky bliss; follow the recipe to a tee! The figures are there for a reason. I’ve based my recipe from this spiced apple recipe as it allows room for variation. Bust out your candy thermometers, things are about to get messy.


HOME MADE SALTED FRAMBOISE CARAMELS

2 cups (or 1 bottle) Framboise beer

2/3 cups cream

1 tsp salt + more for garnish

1 1/2 cups sugar

1/4 cups corn syrup / glucose

80 g butter, cubed

powdered red food colouring

1. Pour framboise into small pan and simmer over medium heat until reduced to 1/3 cup. Place in fridge (or freezer) to cool.

2. Line a square tin with baking paper. Once your reduced framboise has cooled, combine with cream, salt and food colouring.

3. Combine sugar and corn syrup over low heat until dissolved. Increase heat until syrup has caramelised – 112°C on your candy thermometer. Do not stir during this process or the syrup will crystallise.

4. Remove from heat and slowly pour in your cream mixture, stirring quickly as you do so. Be careful has the concoction will splutter everywhere. Continue to stir to break up the caramel ball formed whilst adding the cubed butter. Don’t worry if you’re unable to dissolve everything.

5. Return to low heat and stir frequently until the temperature reaches 120°C on your candy thermometer.

6. Pour caramel into prepared tin and allow to cool slightly. Sprinkle with rock salt and allow to cool completely – either overnight on your kitchen bench or in the fridge to speed up the process. Cut into small squared and wrap with baking paper, twisting at the ends like traditional candies. Sprinkle with more rock salt if desired.


Being married into beer culture can be pretty neat sometimes.


Tags: , , , , ,

« Older entries § Newer entries »