I’m terrible with anecdotes so to spare everyone a long-winded and poorly written story here’s a super condensed version; I was hanging with my friend Mel last week at one of our favourite establishments when I received a text message from home explaining a bag of fresh papaya was just delivered. I’m one of those annoying people who read text messages aloud and Mel must’ve seen the question marks pouring out of my ears so she began to explain all the wonderful benefits of papaya, saying she’d read somewhere its seeds are apparently peppery and delicious. Cool, right?

Thanks to my clever friend and a little dehydration action I’ve come up with this Papaya Pepper Sorbet. It’s times like these I wished I owned a little café or restaurant (my ~FOOD DREAM~) because this is one killer palette cleanser. And shout outs to my vegan pals ‘cos this is one for you! So long as you have some waiting time on your hands this is one of the easiest desserts to create; all you need is some papaya purée, coconut milk, sugar syrup and a spritz of lime. Throw in some ground papaya pepper too for a little something-something, too. It’s pretty great. And can also be made with pawpaw, or a mix of both fruits!

This makes around 8 palette-cleansing serves of papaya sorbet. If you’d prefer to serve this as a full blown dessert dish then I humbly suggest you double the recipe.

Papaya Pepper Sorbet
(an original recipe)

500g papaya, including seeds
65g (1/3 cup) sugar
80ml (1/3 cup) water
60ml (1/4 cup) coconut milk
30ml (1 shot) Malibu, or coconut rum
1 lime

For the papaya pepper
1. Preheat oven to 80°C. Halve the papaya and scoop out seeds. Spread evenly on a baking tray lined with parchment paper and dehydrate for an hour, or until the seeds are dried. Once cooled blitz them in a spice grinder.

For the papaya pepper sorbet
1. Purée papaya flesh in a food processor. Remove and place into a bowl and combine with coconut milk and coconut rum.
2. Prepare sugar syrup by combining sugar, water and juice of half a lime over medium heat until dissolved. Simmer for a few minutes until thickened slightly. Add to papaya mixture along with a squeeze of the remaining lime half. Place in the fridge for a few hours to cool completely, but ideally leave overnight.
3. Add 2 heaped teaspoons of ground papaya pepper into the sorbet mixture and prepare in ice cream maker, as per instructions. Serve immediately, garnishing with a few whole peppercorns.

Thanks to Impact Communications and Australian Papaya for the papaya and pawpaw! You guys are rad!

PS. I’ve been typing this up over the last few incredibly rainy days; the sun has finally decided to show itself today which makes me feel a little less weird about posting a sorbet. AND SPEAKING OF RAIN (clever segue), has anybody managed to get along to Vivid Sydney? Every single evening I’ve been free it has absolutely poured, last night included, but since yesterday was the finale of the festival I threw on many, many layers and braved the cold to enjoy the lights. Lovely stuff (and I’ll take any excuse to throw up a gif).

Tags: , , , ,

Apple Caramel Cupcakes

It’s 2am. I’m perched before my computer in the shadows, my face illuminated only by the sickly glow of the monitor. My eyes, heavy like a million suns, desperately struggle to remain alert. Amongst piles of notes, papers (and at least 40 tabs open in Safari) sits a solitary tub of Nutella. From my mouth hangs a chocolate-stained spoon. Sanity in a jar. Sweet, hazelnutty stress relief.

Okay, I’m not the most poetic of writers so I’ll just draw the scene for you instead.

Apple Caramel Cupcakes

So amongst the chaos that have been the past three weeks (taking photos, essay writing, picture editing, interning, event snapping, illustrating, etc etc!) my dad asked yesterday if I could make something for his fundraising morning tea at work for tomorrow. WHERE WILL I FIND THE TIME TO DO THIS?! Oh dad, it’s lucky this is for a charity event and there’s no way I could possibly say no to you, lord knows how much I love to bake for a good cause and help you out.

Apple Caramel Cupcakes

I remember seeing this style of decorating around the internet, I’m sure if you google “apple cupcakes” some similar looking treats will appear. I just winged it (this is the first time I’ve ever used fondant, ahh) but if anybody knows the original instructions to transforming the humble cupcake into a sparkling faux-apple please let me know so I can link it!

I Instagramed this earlier today as I didn’t think I’d have the time (or daylight, rather) to photograph + blog which explains why I have no detailed/photographed instructions re: the assembly so I drew something stupid for your viewing pleasure instead. This recipe makes 12 adorable cupcakes.

Apple Caramel Cupcakes

Apple Caramel Cupcakes
(an original recipe)

Caramel apple
1 large apple, chopped into small pieces
20g butter
30g brown sugar

Cake batter
100g butter, room temperature
100g (1/2 cup) caster sugar
30g (1/4 cup) brown sugar
2 eggs, room temperature
170g (1 1/2 cups) flour
125ml (1/2 cup) milk
2 tsp baking powder
2 tsp cinnamon

Buttercream
150g butter, room temperature
350g (3 cups) icing sugar
1 tsp vanilla extract
2 tbs milk
Red and green food colouring (I used gel)

Assembly
Red and green sanding sugar
1 Flake
Fondant
Green food colouring

For the caramel apple
1. In a small frying pan melt butter and sugar over medium heat. Add chopped apples and stir until sauce has reduced and caramelised nicely. The apples should just be beginning to tender. Remove from heat and place in a heatproof bowl to cool.

For the cake batter
1. Preheat oven to 180°C.
2. Beat butter until it begins to cream and pale. Add the sugars and continue to beat until combined and fluffy. Add eggs one at a time, beating and incorporating well after each addition. Add the flour, milk, baking powder and cinnamon and once again beat until completely combined. Stir in the caramel apple pieces.
3. Spoon batter into a prepared cupcake tin with liners. Place in oven and bake for aound 15-20 minutes or until the tops spring back when touched. Allow to cool for 5 minutes then transfer cupcakes to a wire rack to cool completely.

For the buttercream
1. Beat butter until it begins to cream and pale. Add icing sugar and vanilla and continue to beat until fluffy. Add milk until an ideal consistency is reached; it should be firm yet spreadable. Divide buttercream in half and add red colouring to one portion and green to the other.

Apple Caramel Cupcakes

For the assembly
1. Prepare fondant with green food colouring. Take a small piece and roll into a ball in the palm of your hand. Flatten into an oval shape and, with the back of a knife, score the piece vertically down the middle. Add a few additional, horizontal scores. Curl the leaf slightly, pinch its edges and allow to sit to return to room temperature.
2. Ice your cupcakes ensuring its entire surface is covered. Dip cupcakes into a bowl of sanding sugar ensuring the buttercream can no longer be seen. Gently break up the flake bar and insert a pice into each cupcake as the twig. Add the fondant leaves with a little buttercream to ensure they will stay put.

Apple Caramel Cupcakes

Okay, that was a nice distraction, I must now to finish this essay by midnight and it’s not going to write itself. Wish me luck!!

Tags: , , ,

Mango Cheesecake with Chocolate + GingerCan we talk about cheesecake for a moment? Cool. Please take a seat and make yourself comfortable, this may take a while.

Let’s talk dense, dry cheesecakes. Lingering in our cafés. Lurking beneath cake box lids. Taunting us with a seemingly inviting berry glaze until we discover that chalky mess upon our first bite. Such a shame. A dairy-riddled tragedy. Ordering cheesecake when I’m eating out is a risk I’m just not willing to take these days, it’s an extreme sport of the yuppie variety.

This cake was actually inspired by that girl who cries all the time on MasterChef. She made a messy, lemon cheesecake last week and although I try to sympathise with the pressures of cooking with a plethora of cameras in your face I couldn’t help but feel a little taken back. As soon as the episode finished I promptly began working on this silky wonder to right the wrongs of that young beanie-head. I’m a cheesecake snob, a real jerk I’ll admit, so if I’m into this recipe then I’m sure you’ll be too!

Mango Cheesecake with Chocolate + Ginger

While I’m at it let’s get a dialogue happening regarding ginger because it’s so disappointing when awesome spices have such exhausted connotations. In my day-to-day life ground ginger only makes a brief appearance in hot cross buns at Easter, when not being overpowered by it’s far more popular cousin cinnamon, and on occasion gingerbread makes a vague appearance down here in sunny Australia. Like salt to chocolate, ginger to mango is really special. It makes me all warm and fuzzy.

The base of this cheesecake is wonderfully spiced and the cheese filling bakes to the texture of a firm custard. Add a little more chocolate on top, and… ahh. Hello, lover. I’ve used a combination of biscuits readily available in Australian supermarkets but of course you can use whatever you please so long as they’re crunchy. If you’re reading this out-of-peak mango season then using the tinned stuff is fine as well, the flavour will be a little more subutle.

Mango Cheesecake with Chocolate + Ginger

On another related note, I’ve been spending my free time (or what little of it I have left these days) interning at a really cool magazine here in Sydney taking snaps in cafés and learning heaps along the way from some incredibly talented people. For these shots I mustered everything I had learnt over the week and tried to apply them here; natural lighting, tripod skills and remaining calm. I threw open my blinds and took many deep breaths. Coincidentally they required the least amount of editing of any set of photos I’ve taken. I’m fairly pleased with the results but as always do tell me what you think! This will serve 10-12 people.

Mango Cheesecake with Chocolate + Ginger
(an original recipe)

125g ginger nut biscuits
125g chocolate ripple biscuits
70g butter, melted
1 1/2 tsp ground ginger
Flesh of 1 large mango (around 200g)
250g cream cheese
250g mascarpone
100g sour cream
120g caster sugar
40g brown sugar
2 eggs
1 egg yolk
100g dark chocolate, roughly chopped
40g cream
1 tsp glucose / corn syrup
Cocoa, for serving

1. Preheat oven to 150°C and grease/line a 9 or 10 inch spring form pan.
2. Prepare biscuits in a food processor until ground. Add 1 tsp of ground ginger and stir in melted butter. Press into base of springform pan until flat and firm. Chill in refrigterator.
3. Prepare mango flesh in food processor until beginning to puree. Add cream cheese, mascarpone, sour cream, caster sugar and brown sugar and process until combined. Add the eggs and egg yolk and once again process until combined. Remove base from fridge and pour filling into springform pan. Bake in oven for 1 1/2 hours. The edges should be fairly firm with a bit of wobble towards the centre. Remove cheesecake from pan once cooled and place in the fridge to chill completely.
4. In a small saucepan (or microwave) warm cream until almost boiling. Pour over the chopped chocolate in a heat-proof bowl and stir until mostly melted and combined. Add 1/2 tsp of ground ginger and glucose and again stir to combine. Remove cheesecake from fridge and place on serving platter. Drizzle chocolate sauce over the top, Pollock style. Sprinkle a little cocoa and serve.

NOTE: You can also bake these as cupcakes if you like, I’d suggest baking them for around 25 minutes.

Mango Cheesecake with Chocolate + Ginger

Let’s dedicate this post to all the lost causes out there. Bad cheesecakes, my heart weeps for you. My heart weeps for this too but in a different way. It’s so naughty yet I feel no remorse. None, whatsoever.


Tags: , , , ,

Welcome friends to my Middle Eastern and completely photo-heavy extravaganza of a post! The very nice people at Essential Cuisine were kind enough to send me a wonderful basket of goodies last week to participate in a little friendly cooking competition to put their new range of gourmet stocks to good use. Although I completely and utterly dig making stock from scratch when I have the time the reality is sometimes we’ve all just got too much on and unfortunately a lot of supermarket substitutes just won’t suffice. I think these guys have tapped into a much desired and appreciated niche of the home cooking world.

My food genre of choice for this challenge is Middle Eastern since 50% of my genes hail from Egypt. Obviously these dishes aren’t strictly Egyptian but our general mentality has something to do with a lot of spice, sweetness and FLAVOUR. How awesome is flavour?! Prettyyyyy, pretty good.

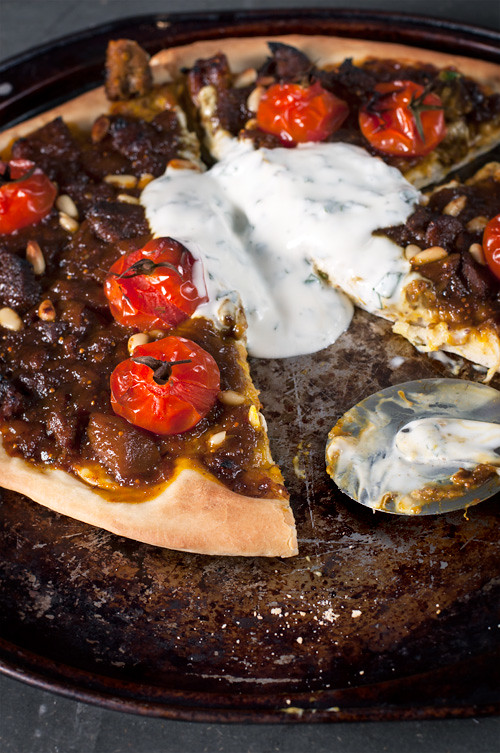
The original plan was to have four recipes up for you all to try however, most unfortunately, this crazy week involving too much work and a computer crash (!!!) has contributed to the demise of a few folders of images, mystery dish included. It’s a massive shame because it’s mighty fine! I promise to re-shoot and get it up as soon as possible because I’m sure you’re going to love it. And if you don’t… come at me bro. So in lieu of my disasterously hectic week I’ve come up with three publishable dishes! Firstly is a Lamb, Fig and Date Pizza. Oh my gosh. Since this challenge was about being creative I thought “why not throw a tagine on a pizza?!” Genius. You don’t even need to make, or add, pizza sauce. When I made it for my family the other night their faces literlly melted off… really truly. I had some for lunch and dinner and my brother polished off the leftovers for breakfast the following day. It’s seriously good. I also have a couple of sides; Buttery Pomegranate Couscous and Spiced, Roasted Chickpeas, they’re like ethnic wasabi peas! The couscous would have made a little more sense with the other dish I was going to post, but, yeah. Massive apologies again. :(

And, as always, I am always photographing for my book project so without further adieu, here’s a whole lot of photos!

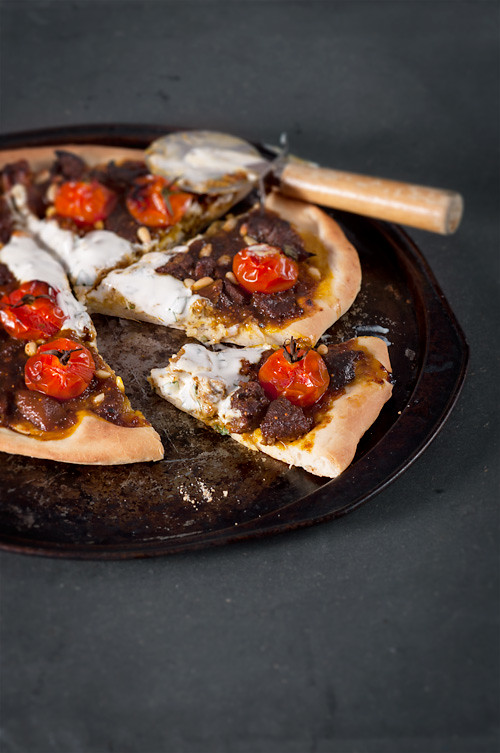
Lamb + Fig + Date Pizza with Minted Yoghurt (makes 3 pizzas)
Lamb Tagine
3 tsp cumin
2 tsp crushed corriander seeds
1 tsp tumeric
1/2 tsp ground ginger
1/2 tsp saffron powder
1 tsp salt
1 tsp fennel seeds
3 tsp cardamon pods, seeds removed
2 tsp peppercorns
1 cinnamon quill
2 onion
3 cloves garlic
30g fresh ginger, grated
1 kg diced lamb (I used leg)
250ml lamb stock
50g dried dates, chopped
80g dried figs, chopped
2 tbs (heaped) honey
Olive oil

Pizza Dough
14g (2 sachets) dry yest
1 1/2 cups warm water
4 cups flour
1 tsp caster sugar
1 tsp salt
60ml olive oil

Assembly
Truss of fresh cherry tomatoes
1 cup natural yoghurt
Handful of finely chopped mint
Handful of pinenuts

For the lamb tagine
1. In a mortar and pestle crush the fennel seeds, cardamon and peppercorns. Combine with the rest of the spices. Dice onion, finely slice the garlic and mince the fresh ginger.
2. Drizzle olive oil in a large pot over medium-high heat. Add the onion, garlic and ginger and cook through, continually stirring, until beginning to soften (around 5 minutes). Add the spices and cinnamon quill and, once fragrant, add the diced lamb. Once it is nicely browned pour in the lamb stock and add the dried dates and figs. Turn the heat down, cover and allow to simmer for an hour.
3. Remove the lid and add the honey. Bring heat up to a vigorous boil for a few minutes to reduce the liquid. It needs to be of a thick, stewy consistency as this will also double as the pizza sauce. Once ready, decant to a shallow bowl and break up the lamb pieces with two forks, roughly shredding.

For the pizza dough
1. Combine warm water with yeast, sugar and salt. Cover and allow to stand for 5 minutes in a warm area. If the mixture does not become frothy discard and start again.
2. Add yeast mixture to flour and knead on a lightly floured surface for 10 minutes. Roll into a ball, cover with a damp towel and allow to rest in a warm place for 30 minutes. The dough should double in size.
3. Punch the dough to remove air and knead for a couple of minutes. Divide into thirds and roll out as pizza bases.

For the assembly
1. Preheat oven to 200°C. Place truss tomatoes on a baking try and roast for 20 minutes. Remove and turn up oven to 250°C.
2. Place pizza bases on a baking tray and divide the lamb tagine between them, leaving a border of a few centimetres. Sprinkle with pine nuts and dot with cherry tomatoes once removed from the truss. Bake in the oven for 10 minutes or until dough is browned and cooked through.
3. Combine yoghurt with mint and dollop in the centre of the pizzas.

Buttery Pomegranate Couscous
1 cup couscous
1 cup chicken stock
1 tsp ground cinnamon
1 tsp ground corriander seeds
1 tsp salt
1 tbs butter
1 pomegranate, deseeded
Chopped coriander (optional)

1. Heat chicken stock in a saucepan until just beginning to boil. Place couscous, spices and salt in a heatproof bowl and pour over the warmed stock. Cover immediately with plastic wrap for 5 minutes. Gently fluff the couscous with a fork and stir in the butter. Sprinkle with pomegranate seeds and chopped coriander.

Roasted + Spiced Chickpeas
375g dried chickpeas
2 tsp paprika
2 tsp ground corriander seeds
2 tsp cumin
2 tsp sumac
2 tsp chili flakes (optional)
2 tsp salt
50ml olive oil

1. Pour dried chickpeas in a bowl and cover with double the amount of water. Leave to soak overnight.
2. Preheat oven to 180°C. Drain chickpeas into a large saucepan. Cover with water and boil for an hour or until beginning to tender.
3. Decant into a bowl and toss through spices, salt and olive oil. Move to a baking tray and bake for 1 hour, stirring the chickpeas occasionally to ensure they’re cooked consistently. Serve with a sprinkling of paprika.

Phew! I hope your monitors have survived this epic lamb pizza post. I promise to post up that mystery recipe soon as well with another Middle Eastern inspired dessert I prepared very soon. Thanks again to Essential Cuisine for allowing me to try their stock! You guys are just too cool for pushing me to create such tasty things for my family.

Tags: , , , , , , , ,

Cider Pulled Pork on Apple Crisps

A few weeks ago I received the sweetest delivery; some darling Pink Ladies from Aussie Apples! So this is a somewhat delayed post due to the unfortunate demise of my mandolin. RIP, old, orange friend! I’ve had to wait a couple of weeks to acquire a new one. It’s so super fancy, so fancy in fact that it nearly cut my finger off. Awww yeah.

Cider Pulled Pork on Apple Crisps

Resisting the urge to transform these apples into some kind of dessert (because I really ought to grow up and get my savoury on a little more often) I thought… h’ordeuvres are cool, right? Wonderfully miniature food you can knock back in one mouthful. So, what pairs well with apple? Pork! Ohh, but the whole pulled pork thing is so overdone these days. Why don’t I throw some roasted apple in there to mix it up a bit? Hmm. No. WAIT! I’ll place the pork ON THE APPLE AS LITTLE, EDIBLE PLATES AND IT WILL BE GREAT! And lord knows I love making fruity crisps. And so it was done. Well, the pork was… then my mandolin broke… so I had to wait, my mind heavy with h’ordeuvre love for a few weeks.

Cider Pulled Pork on Apple Crisps

Last time I prepared pulled pork I doused my slow-cooker with beer, which was awesome, but incredibly rich. I considered a 50/50 combination of beer and apple juice until I realised cider would be a much better idea. Thankfully I have a few bottles of homebrewed cider sitting in my room. It’s… not the greatest tasting beverage (why did I use a dry wine yeast to make a fruity cider?!) but it’s ultra-tang makes it very special for cooking. Salty, cidery pork with a sweet, crunchy, apple aftertaste is my idea of fantastic treat.

Cider Pulled Pork on Apple Crisps

I can’t wait to make this for a super funtime party soon. This should make around 60 pieces.

Slow Cooked Cider Pulled Pork on Apple Crisps
(an original recipe)

Apple crisp
3 apples

Cider pulled pork
600g pork chops or shoulder
1 onion, diced
3 cloves garlic, minced
2 tbs paprika
2 tbs cumin
2 tbs crushed coriander seeds
1 diced onion
1 cup apple cider
1 tbs mustard
2 tbs chili flakes (optional)
1 tsp dried thyme
Splash of worcestershire sauce
Splash of soy sauce
Salt
Olive oil

Assembly
A few spinach leaves
Dried thyme
Chili flakes (optional)

For the apple crisp
1. Slice apples on the thinest setting on a mandolin. Preheat oven to 80°C. Lay slices on a baking tray lined with parchment paper and allow to dehydrate in the oven for 2 1/2 hours, turning once halfway through. Once ready, remove from trays and allow to cool on wire racks.

NOTE: This can be done a day ahead. If you find the crisps a little on the limp side the following day you can always re-crisp them in the oven for a few minutes.

For the slow cooked cider pulled pork
1. Combine spices with a little salt and rub into pork pieces. Prepare your slow cooker with a splash of olive oil, and it if has a browning option, add onion and garlic and cook for a few minutes until fragrant. Add pork pieces to brown. Add the cider and other ingredients, turn on the slow cooker option and leave to cook for 6 hours. Check every 1 1/2 hours to turn the pork.

2. Once the pork is tender and cooked through remove pork onto a chopping board and decant juices into a saucepan. Discard any bones. Place over medium-high heat and reduce until halved. Meanwhile, gently break up the pork with two forks (you don’t need to be too thorough) and place into the saucepan of reduced pork juice. Continue to stir and break up the meat until it has reduced a little more; you want the pork to be moist but not too soupy. Remove from heat.

NOTE: This can also be done a day ahead; once prepared from the slow cooker you can separate both meat and juice and refrigerate (or even freeze) for a couple of days until you’re ready. This also provides an opportunity to skim off any fat that may solidify on the surface.

For the assembly
1. Because the apple will curl slightly in the oven, place the crisps the right way up so they stand like a little bowl. Place a small, or a piece of, spinach leaf over the crisp to cover the gap where the core and seeds once were. Top with a generous pinch of pork followed by a sprinkling of dried thyme and chili flakes.

Cider Pulled Pork on Apple Crisps

Mouthfuls of pure happy, these are. I do hope you’re able to try them! GET SOME PORK ON YOUR FORK! And thank you again to Bite Communications and Aussie Apples for the apples. Support your local growers!

Tags: , , , , ,

No Churn Iced VoVo Ice Cream

Making a no-churn ice cream has been on my to-do list since discovering the real me (an impatient self) so I’ve gone out on a limb dedicating this frozen experiment of convenience to some delicious Australiana. Enter: the Iced VoVo. It’s proper grouse. Ace. A real corker. ONYA MATES.

No Churn Iced VoVo Ice Cream

The Iced VoVo has been around for over 100 years. Breaking it down it’s a buttery biscuit topped with fondant, strawberry jam and coconut – naturally an inviting combination for the base of any ice cream. I never enjoyed the VoVo when I was younger (I had a thing with desiccated coconut) but thank goodness times and palettes change. This recipe is a bit ridiculous, but lots of fun – be warned though it’s super creamy and sweet so give your dentist a heads up before throwing this in your freezer.

No Churn Iced VoVo Ice Cream
 No Churn Iced VoVo Ice Cream
(an original recipe)

1 x 395ml can sweetened condensed milk
600ml thickened cream (around 2 cups)
300g Iced VoVo biscuits (1 1/2 packtes)
1/2 cup desiccated coconut
1/3 cup strawberry jam
1 tsp vanilla extract

1. Combine condensed milk and vanilla in a large bowl.
2. In another bowl, whip cream until stiff peaks form. Carefully fold cream into the condensed milk. Crush Iced Vovo biscuits in food processor (or with a large, heavy kitchen utensil) and combine with cream mixture along with the coconut.
3. Place jam in a small heat proof bowl and microwave for 30 seconds. Mash with fork to remove lumps (discard any large chunks of strawberry that do not budge). Drizzle over ice cream and gently swirl through. Freeze for a few hours, ideally overnight.

For those who don’t have access to these across the other side of the world I ask you, is there any sort of vague equivalent? Do tell!

Tags: , , ,

Chicken + Corn + Egg Soup

Back in July I posted this chicken, corn and egg soup recipe. LOLOL, right? Besides the obviously thoughtless styling please allow me to explain my revisiting of this post. I’m in my third year of university (Bachelor of Digital Media) and for my final project I’ve (foolishly?) proposed to design and photograph my very own cookbook. It’s pretty exciting. Here’s a working cover:

Playing the role of both chef, stylist and photographer really takes its toll to the point I’ve been flailing and shouting about never wanting to be a photographer anymore, ever. However I must always keep in mind this is all for the greater good despite the fact I’ll never be able to sit and enjoy my lunch without having spent an hour taking photos of it for the next seven months. Most entries you’ve seen this year will be compiled in my book so THANK YOU SO VERY MUCH to everybody who has offered kind and constructive words re: photography. Keep it coming. And don’t get afraid to get nasty; I’m used to getting my butt kicked at uni so if you see something you don’t like please go nuts with it.

Chicken + Corn + Egg Soup

On to the food; my prior entry explained this soup came about whilst I was very, very ill but this time around I’ve spared a little more effort to transform this into a more graceful dish (using real stock this time, not the supermarket type! Wow!); someone on Pinterest even mentioned I should probably have chicken pieces in here, so thanks for your feedback! I have delivered. This should serve around four friends.

Chicken + Corn + Egg Soup
(an original recipe)

1L chicken stock (please refer to this recipe)
1 tsp sesame oil
1 tbs ginger, minced or finely grated
2x 420g cans creamed corn
1 tbs soy sauce
2 eggs
1 tbs corn flour
Salt and pepper, to taste
Chopped shallots, to serve

1. Prepare chicken stock as per these instructions. Once drained and cooled remove chicken from the bones, lightly shred and reserve for later.
2. In a medium-sized pot sizzle the ginger in sesame oil until fragrant. Add the stock, creamed corn and soy sauce and stir to combine.
3. In a small bowl combine cornflour with equal part water and stir until dissolved. Pour into soup and stir – this works as a thickening agent.
4. In another small bowl whisk the two eggs. Slowly pour in them in ensuring the soup is hot so they cook almost immediately. This will create a lovely, light weave of egg throughout your soup.
5. Ladle out in bowls and adorn with a generous pinch of shredded chicken reserved from earlier. Garnish with chopped shallots and cracked pepper.

Let’s get these bad boys side-by-side; here’s a comparative image from August 2011 to now illustrating a significant improvement of styling and photo editing. Funny how I used to think the photo on the left was the bees knees:

… and in another year’s time I’ll probably be looking back at these photos having a solid laugh too (in fact I’m already finding reasons to dislike them – I’m still clumsy with dark coloured backgrounds). At least it’s comforting to know there’s always room for growth and improvement, right?

PS. On a completely unrelated note – does anybody here use Instagram? Since it’s now available for Android I’ve completely jumped aboard, let’s be friends! My username is bananasoiree.

Tags: , , ,

Cadbury Creme Egg + Solders

HAPPY EASTER EVERYONE! This is just a little update as unfortunately I’m snowed under with life at the moment, it’s a miracle I found the time to bust this out! The thought of missing out on my very first Easter post as a blogger was beginning to upset me a little. Having a food blog is an absolute JOY as it provides an outlet to make some ridiculous stuff. Combine with this with the only time of the year we’re able to indulge in the miraculous, the stupendous Cadbury Creme Egg, and, well, the photos speak for themselves really. And if they don’t I’ll spell it out for you: YOU WANT THIS. YOU REALLY, REALLY WANT TO EAT THIS.

Cadbury Creme Egg + Solders

This is obviously a spectacular sugar hit but not without purpose; the toffee brioche sticks provide incredible crunch when coupled with a mouthful of egg goo (gross). It’s just delightul. Or potentially diabetic, I’m not quite sure which yet. Probably both. This will serve four people so get ready, it’s time to get stupid with eggs!

Cadbury Creme Egg + Soldiers
4 Cadbury Creme Eggs
4 slices thick brioche or bread
1 tbs butter
1 cup sugar

1. Slice bread/brioche into strips. Heat the butter in a pan and fry strips until beginning to brown. Ensure you rotate the pieces so all sides are evenly charred. Remove from pan and allow to drain on paper towels. Clean pan, return to heat and melt 1/4 cup of sugar until beginning to caramelise. Add soldiers, remove from heat and rotate once more so all strips are evenly coated. Transfer to parchment paper to cool. Repeat with remaining “naked” soldiers.

2. Remove tops of Creme Eggs with a knife. Place in egg cup and arrange with brioche soldiers.

Cadbury Creme Egg + Soldiers

HAPPY EASTER and I hope you all have a safe and wonderful holiday!

Tags: , ,

Pear Vanilla Bean Brûlée Tarts + Pear Crisp

As my harshest critic, I rarely, no, NEVER, make statements of this nature however the time has come where I have finally blown my own mind; ladies and gents, this has to be one of the most fabulous thing I’ve ever created.

No, really.

I was invited to take part in Australian Pears’ What Can You Pair with a Pear competition for Australian Pear Month and naturally I couldn’t resist the challenge; from a very young age I never enjoyed the pear (I’ll put it down to an amazing aversion to soft fruit) but lately I’ve been sneaking pear into my salads to shed the irrational reluctance. Also, have you ever experienced the joy of receiving fresh produce via courier? Feels good, man.

Pear Vanilla Bean Brûlée Tarts + Pear Crisp

A few ideas for a new pear dish included salads and poaching etc however I ended up a little carried away so this may be a little lengthy for the Australian Pears were after (err, sorry!). For those wanting to try this recipe; I prepared the crisp, crème pâtissière and pastry on one day one, baked the tart shells and filled them on day two and blow-torched on day three.

The pear flavour isn’t overwhelming but instead offers a massive hit of freshness behind the crème pâtissière. The tart shells are buttery and sweet and of course the brûlée provides a shardy crack and amazing crunch. And as for the embedded pear crisp; well, it’s like eating magically charred toffee pear. It’s one of those rare occasions where completely winging it resulted in complete success! The only thing I’d considering trying for next time is using a little more pear purée. This recipe makes four 12cm tarts, or, many little tartlets.

Pear Vanilla Bean Brûlée Tarts + Pear Crisp

Pear Vanilla Bean Brûlée Tarts + Pear Crisp
(an original recipe)

Pear crisp
1/2 pear

Pear crème pâtissière
2 Williams pears, peeled, cores removed
200ml cream
1/2 vanilla bean
100g (approx. 5) egg yolks
100g caster sugar
60g corn flour
70g butter

Pastry
200g flour
60g pure icing sugar
Pinch of salt
120g cold butter
30ml cold water

Assembly
1 cup sugar

For the pear crisp
1. Preheat oven to 100°C.
2. Slice pear along its cross section and very finely slice with a mandolin. Transfer to baking tray and bake for 2-3 hours, checking occasionally, until pieces have dried out. Store in a sealed container until use.

For the pear crème pâtissière
1. Roughly chop pears and purée in a food processor. Push through a fine sieve.
2. In a separate bowl combine egg yolks, sugar and cornflour and whisk until combined.
3. Over medium heat place pear purée, cream and scraped, split vanilla bean and stir continuously. Heat until just beginning to boil. Slowly pour mixture into bowl of yolk mixture to temper then return to pan and heat. Again, whisk continuously until beginning to thicken, this should take a few minutes.
4. Decant into another bowl, remove vanilla bean husk and cover with plastic wrap until cool enough to touch. Gradually add cubed butter, whisking after each addition.
5. Return plastic wrap and place in fridge to cool completely.

For the pastry
1. Preheat oven to 180°C.
2. Combine flour, icing sugar and and salt in a food processor. Cube butter, add to mix and process once more. Add the cold water and once again process until mixture forms a ball. Remove, form into a disc, wrap in plastic and refrigerate for a few hours (or until cool if you’re in a hurry).
3. Roll out pastry, stamp out circles and prepare into tart greased tart tins. Fill with pastry weights (or rice, or beans) and bake for 15 minutes. Remove weights and bake for a further 15 minutes until browned and cooked through. Remove from tart tins and allow to cool completely on a wire rack.

For the assembly
1. Carefully spoon pear crème pâtissière into tart shells until just overflowing. Flatten with a palette knife and allow to cool and set in the fridge for at least a few hours. Once ready (the surface will have firmed up) sprinkle with an even layer of sugar and scorch with a kitchen blow-torch until toffee has formed. Place a pear crisp round in the centre, sprinkle with more sugar and again scorch with blow-torch until toasted and embedded. Serve immediately with additional pear crisps on the side.

Pear Vanilla Bean Brûlée Tarts + Pear Crisp

Or rather; enjoy immediately. Happy Australian Pear month!

Coconut Scones + Malibu Cream + Lime Curd

Despite being a self-proclaimed “lover of baking” to my friends it’s really rather disturbing how narrow my repertoire really is. Before today I’d never made a scone before… I believe the trouble lies in my apathy for the familiar, if it’s been done I don’t particularly care for it. So, I winged it a little and came up with this cute twist on a traditional recipe.

But before we get into that here’s a little “housekeeping”.


I was given a wonderful opportunity to write a review for SBS Food a couple of weeks ago as a Featured Blog Reviewer and my little piece is up and ready to be enjoyed by all. So check it out! I’ve written about a really gorgeous book, plus the review features my square-cropped, pasty-ethnic face. Oh yeah.

Malibu Cream + Lime Curd

Here’s my recipe for coconut scones. Crumbly and delicious. Below-mentioned condiments are optional however encouraged and of course any fruit jam you may have on hand will work fantastically too. I’ll pull any excuse to bust out my Malibu Cream, a concoction I stumbled across as a happy, pandan-driven accident months ago. It rules.

This recipe will make around 8 scones with cream and curd to spare.

Coconut Scones
300g flour (around 2 1/2 cups) + more for dusting
100g caster sugar
2 tsp baking powder
1/2 tsp salt
75g butter, room temperature
60ml coconut milk
60ml cream
1 egg
1/2 cup flaked coconut (plus more for dusting)
2 tbs milk

Boozy Malibu Cream
240ml (1 cup) cream
30ml Malibu (coconut rum)

Lime Curd
Juice of 2 limes
2 egg yolks
40g sugar
60g butter, cubed

For the coconut scones
1. Preheat oven to 220°C. Grease and line a shallow baking dish.
2. Combine flour, sugar, baking powder and salt into a bowl. Cube butter and rub into the mixture until even. Add the coconut milk, cream, egg and flaked coconut and work with your hands until just combined (overworking the scone mixture may end in disaster).
3. Decant sticky mixture onto a well-floured board and flatten to a 2cm thickness. Sprinkle with more flour, and, with your scone cutter, remove rounds and transfer to the greased baking dish. When arranging the raw scones ensure they fit snuggly and their sides are gently pressed against one another. Brush surfaces with a little milk and sprinkle over additional coconut flakes.
4. Transfer to oven and allow to bake for 15 minutes.

For the boozy Malibu cream
1. Lightly whip cream and Malibu in a small bowl until just thickened.

For the lime curd
1. Combine lime juice, egg yolks and sugar and whisk well. Transfer to a small saucepan and place over medium heat. Stir continuously and gradually add cubes of butter until beginning to thicken (this should take only a few minutes). Remove from heat, continue to stir for 30 seconds more and transfer to a jar or container of your choice. Chill in the refrigerator.

For the assembly
1. Carefully halve your scone. Add a dollop of Malibu cream and a lick of lime curd and enjoy.

Coconut Scones + Malibu Cream + Lime Curd

And yes, I am well aware this combination of cream and curd results in a little faux-egg atop your scone. SOZLOL!

EDIT: Just had one of these with strawberry jam. OH BABY.

Tags: , , ,

« Older entries § Newer entries »