Macarons

You are currently browsing the archive for the Macarons category.

It’s December! Which marks this month as my very first Christmas as a recipe/food/baking/WHATEVER blogger – all photography from here on in will feature GREEN, RED, CUTENESS, SPARKLES, BAUBLES, etc etc.

Tonight I’m off to an annual Christmas  dinner with my old school friends. Traditionally we give each other small, cute gifts. Last year I made some sugar cookies and fudge however to celebrate this blogging landmark as a vaguely serious baker I figured it was time to step up my game.

At first I was dubious of baking with such a wintery flavour in (what should be) the beginning of Summer here in Sydney however thanks to much unprecedented and rain below-average temperatures I had no qualms whatsoever getting my gingerbread on. This recipe should make around 20-25 macarons, depending on the size.

GINGERBREAD MACARONS

(an original recipe)

 Gingerbread Shells

100g egg whites, room temperature

100g almond meal

200g pure icing sugar

30g caster sugar

1 tsp powdered egg whites

1 heaped tsp ground ginger

Powdered/gel colouring

White Chocolate Ginger Ganacahe

200g white couverture chocolate, chopped

100ml pouring cream

1/2 tsp cinnamon (plus extra for dusting)

1/2 tsp ground cloves

2 tsp ground ginger

2-3 lumps of crystallised ginger (around 10g), finely chopped


1. Preheat your oven 150°C.

2. Sift pure icing sugar, almond meal and ground ginger and place into a bowl and give it a quick stir.

3. Beat eggwhites and eggwhite powder in a separate bowl until soft peaks form. Slowly add the caster sugar, beating well between each addition, until eggwhites are stiff and glossy. This process should take around 5-10 minutes.

4. Pour half of your dry ingredients and colouring (I used half brown half orange gel colour) into the bowl of beaten eggwhites and combine with a flat utensil, like a spatula, using “cutting strokes”. Once incorporated repeat with the remaining icing sugar and almond meal mixture. This is where things begin to get a little tricky as under-mixing or over-mixing will ruin your macarons as they attempt to rise and “grow feet” in the oven. Experts say to stir the mixture until it becomes the consistency of lava. The mixture will be sticky but you’ll know it’s ready when, upon holding your spatula above the bowl, it will begin just begin to flow freely back into the bowl. You’ll need to knock a lot of the air out of it.

5. Prepare a piping bag with the appropriate tip (around 1 cm or less), a baking tray with baking paper, and pipe small rounds (they must be small enough to balance on the cupcakes!). If there are any small lumps left from piping wet your finger and gently press them down (unlike cake batter, macaron mixture does not flatten out when in the oven). Dust some extra cinnamon over the shells and allow tray to rest for 30 minutes.

6. Place baking tray in the oven and allow to bake for around 15-20 minutes (this time will depend entirely on your oven, so keep an eye on them). Within 5 minutes or so they will begin to grow feet.

7. Once ready, remove from oven, and after 5 minutes transfer to cooling racks.

8. Whilst your shells are cooling place your cream in the microwave for 30 seconds or until relatively hot. Pour your chopped chocolate into the bowl and stir continuously until the chocolate has melted and the mixture is combined. Add cinnamon, ground cloves, ground ginger and finely chopped crystallised ginger and stir to combine. Place bowl into the refrigerator to cool and thicken.

9. Prepare another piping bag with a large tip and neatly pipe rounds of ganache into half of the shells. To close, gently place its partner shell on top of the ganache and twist shut, taking care to prevent ganache spilling over the edges.

As well as these macarons I’ve also bundled some of my berry and vanilla infused vodka in adorable little jam jars complete with mini baubles (a fluke discovery at Coles this morning!) – a cute reminder that a cocktail-fueled Summer is just around the corner… maybe.

Sugar and alcohol. Spice and berries. Here’s hoping they like my little edible trinkets!

Tags: , ,

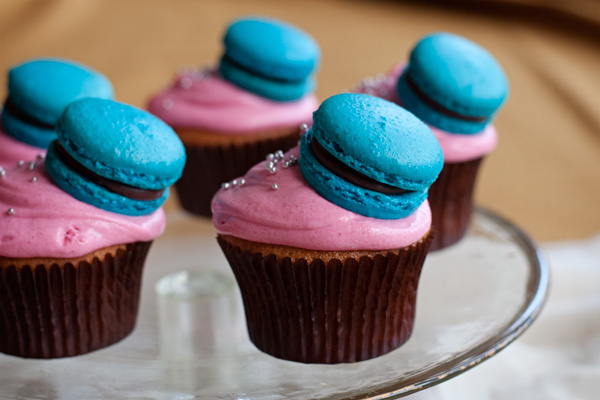
Macaron Cupcakes. MACARON. CUPCAKES. Why aren’t these a “thing” on the internet yet? A dessert garnished with another dessert; genius (if I do say so myself)! I first made a dozen of these a few months ago for Australia’s Biggest Morning Tea, an annual event to raise both awareness and funds for The Cancer Council. My vague instructions were to “make cupcakes, or macarons, or I don’t know, SOMETHING” so I took it in my stride to combine the two aforementioned goods to create the absolute ~CUTEST~ cupcake known to man. They were a hit! And of course the inspiration behind the alanabread logo.

So when my friend Bayden of Packwood recently asked if I could bring something along to the accompanying bakesale at Folkraiser @ Hibernian House this weekend there was only one adorable cake on my mind.

If you’re already experienced in macaron and cupcake baking then this should be an absolute breeze, albeit a little time consuming. The great thing about this combination is that you can mix up the flavours as freely as you’d like and, with the addition of some lovely pastel colours, they’ll always look fantastic. They basically advertise themselves! And who wouldn’t want a delicious cupcake with a macaron top-hat?!

This recipe will make 12 macaron cupcakes with some extra macarons to spare.


MACARON CUPCAKES

(an original recipe)

Macaron Shells

100g egg whites, room temperature

100g almond meal

200g pure icing sugar

30g caster sugar

1 tsp powdered egg whites

Powdered food colouring of your choice


Salted Callebaut Ganache

140g Callebaut chocolate, chopped (I used half milk, half dark)

80ml pouring cream

sea salt, to taste


Vanilla Bean Cupcakes

100g butter, room temperature

1 cup caster sugar

1 vanilla bean

3/4 cups self-raising flour

1/2 cup +2 tbs plain flour

2 eggs, room temperature

1/2 cup buttermilk


Cream Cheese Icing

250g cream cheese, room temperature

2 cups icing sugar mixture

Food colouring of your choice


Assembly

Mini cachous


For the salted Callebaut macarons

1. Preheat your oven 150°C.

2. Sift pure icing sugar and almond meal and place into a bowl and give it a quick stir.

3. Beat eggwhites and eggwhite powder in a separate bowl until soft peaks form. Slowly add the caster sugar, beating well between each addition, until eggwhites are stiff and glossy. This process should take around 5-10 minutes.

4. Pour half of your dry ingredients into the bowl of beaten eggwhites and combine with a flat utensil, like a spatula, using “cutting strokes”. Once incorporated repeat with the remaining icing sugar and almond meal mixture. This is where things begin to get a little tricky as under-mixing or over-mixing will ruin your macarons as they attempt to rise and “grow feet” in the oven. Experts say to stir the mixture until it becomes the consistency of lava. The mixture will be sticky but you’ll know it’s ready when, upon holding your spatula above the bowl, it will begin just begin to flow freely back into the bowl. You’ll need to knock a lot of the air out of it.

5. Prepare a piping bag with the appropriate tip (around 1 cm or less), a baking tray with baking paper, and pipe small rounds (they must be small enough to balance on the cupcakes!). If there are any small lumps left from piping wet your finger and gently press them down (unlike cake batter, macaron mixture does not flatten out when in the oven). Allow tray to rest for 30 minutes.

6. Place baking tray in the oven and allow to bake for around 15 minutes (this time will depend entirely on your oven, so keep an eye on them). Within 5 minutes or so they will begin to grow feet.

7. Once ready, remove from oven, and after 5 minutes transfer to cooling racks.

8. Whilst your shells are cooling place your cream in the microwave for 30 seconds or until relatively hot. Pour your chopped Callebaut into the bowl and stir continuously until the chocolate has melted and the mixture is combined. Add sea salt, to taste, until you chocolate flavour begins to “pop” (this took me a few turns of my salt mill). Place bowl into the refrigerator to cool and thicken.

9. Prepare another piping bag with a large tip and neatly pipe rounds of ganache into half of the shells. To close, gently place its partner shell on top of the ganache and twist shut, taking care to prevent ganache spilling over the edges.

For the vanilla bean cupcakes

1. Preheat oven to 180°C.

2. Beat butter until it begins to cream and pale. Scrape the seeds from the vanilla pod into the butter, add the sugar and continue to beat until combined and fluffy. You should be able to see the flecks of vanilla bean.

3. Add the eggs one at a time beating after each addition. Add the self-raising flour, milk, then plain flour once again beating after each addition.

4. Spoon into a prepared cupcake tin with liners, filling each to around two thirds full. Rap the pan by dropping it from a small height to knock out any air bubbles.

5. Place in oven and bake for aound 15-20 minutes or until the tops spring back when touched. Allow to cool for 5 minutes then transfer cupcakes to a wire rack to cool completely.

6. While these are cooling, prepare your cream cheese icing by beating the cream cheese with icing sugar and food colouring until combined and creamy.


For the assembly

1. With a piping bag with a large tip attached carefully pipe cream cheese icing over cupcakes. Carefully take macarons and place at an angle on each cupcake ensuring their placed firmly enough that they won’t slip off. Sprinkle with mini cachous and place cupcakes in the fridge for the icing to firm up to ensure the macarons will stay put.


All packed up and ready to go!

If you’d like to hear more of Packwood’s tunes you can check out the Facebook page here, also the alanabread facebook page is here too. Here’s a fan-video from our friend Zohara from a show a couple of months ago (you can hear me playing piano at 5:30!):

Lessons learnt the past few days: 1) orchestral folk music is cool, 2) being a baker/musician for a night is a total dream come true, and 3) there is something strangely satisfying about baking your own logo.

Tags: , , ,

About a year ago I was transformed into a macaron making machine. Macaron after macaron, request after request, I was churning these mothers out like a, ahhh… like something that prepares a lot of macarons (you can find some evidence in my old kitchen porfolio). Unfortunately this lead to a great macaron meltdown. I had grown so tired of these adorable, French biscuits I began to despise the process and thus began my temporary retirement. It was an epic rage quit inspired by sugar and ground almonds. Months later (last night) however and due to popular demand (a friend) I managed to pull myself out of my rut and make a great macaron comeback.

The first time I ever tasted pandan was in cake form accompanied by a cup of jasmine tea; a seemingly apt combination for a macaron. If you have reservations about opening an entire can of coconut milk for only 2 tbs I completely understand and suggest you use regular milk. However, like salt to lemon, coconut and pandan compliment each other so wonderfully it really is a shame to tear them apart.

Apologies as mine are a little on the thick side; my excuse being I was adjusting to a brand new piping nib… and I’m out of practice.


JASMINE + PANDAN MACARONS

(an original recipe)

For the shells

1 teabag (or 1 heaped tsp) jasmine tea leaves

100 g almond meal

200 g pure icing sugar

100 g aged eggwhites, room temperature

30 g caster sugar

1 tsp powdered egg whites


For the pandan buttercream

100 g butter, room temperature

2 cups icing sugar mixture

3/4 tsp pandan paste

2 tbs coconut milk

1. Preheat your oven 150°C.

2. Sift pure icing sugar and almond meal and place into a bowl with your jasmine tea leaves and give it a quick stir.

3. Beat eggwhites and eggwhite powder in a separate bowl until soft peaks form. Slowly add the caster sugar, beating well between each addition, until eggwhites are stiff and glossy. This process should take around 10 minutes.

4. Pour half of your dry ingredients into the bowl of beaten eggwhites and combine with a flat utensil, like a spatula, using “cutting strokes”. Once incorporated repeat with the remaining icing sugar/almong meal/jasmine tea mixture. This is where things begin to get a little tricky as under-mixing or over-mixing will ruin your macarons as they attempt to rise and “grow feet” in the oven. Experts say to stir the mixture until it becomes the consistency of lava. The mixture will be sticky but you’ll know it’s ready when, upon holding your spatula above the bowl, it will begin just begin to flow freely back into the bowl. If it’s too watery then you may have mixed too much!

5. Prepare a piping bag with the appropriate tip (around 1 cm or less), a baking tray with baking paper, and pipe rounds. If there are any small lumps left from your piping tip wet your finger and gently press them down (unlike cake batter, macaron mixture does not flatten out when in the oven! Also, ensure you don’t leave drops of water on your macarons or they will balloon whilst baking). Allow tray to rest for 30 minutes.

6. Place baking tray in the oven and allow to bake for around 15 minutes (this time will depend entirely on your oven, so keep an eye on them). Within 5 minutes or so they will begin to grow feet.

7. Once ready, remove from oven, and after 5-10 minutes transfer to cooling racks.

8. Whilst your shells are cooling place butter and icing sugar into a bowl and beat until fluffy. Add pandan paste and beat further. Slowly add coconut milk until the buttercream reaches desired consistency.

9. Prepare another piping bag with a large tip and neatly pipe rounds of buttercream into half of the shells. To close, gently place it’s partner shell on top of the buttercream and twist shut, taking care to prevent buttercream spilling over the edges.

Making macarons is no easy task. This process takes time, patience and most of all PRACTICE. There are too many things that can so wrong so if they haven’t turned out as well you’d like don’t give up! Try, try, try again. It’s a tremendous feeling getting these right. But once you make them…

… they won’t last long.

PS. Have you said hello on Facebook yet?

Tags: , , ,