Cakes + Cupcakes

You are currently browsing the archive for the Cakes + Cupcakes category.

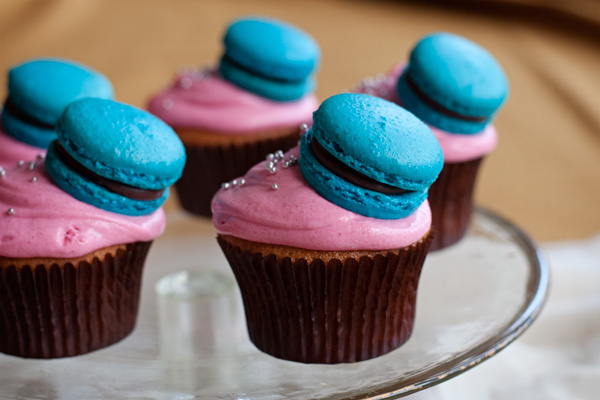
Macaron Cupcakes. MACARON. CUPCAKES. Why aren’t these a “thing” on the internet yet? A dessert garnished with another dessert; genius (if I do say so myself)! I first made a dozen of these a few months ago for Australia’s Biggest Morning Tea, an annual event to raise both awareness and funds for The Cancer Council. My vague instructions were to “make cupcakes, or macarons, or I don’t know, SOMETHING” so I took it in my stride to combine the two aforementioned goods to create the absolute ~CUTEST~ cupcake known to man. They were a hit! And of course the inspiration behind the alanabread logo.

So when my friend Bayden of Packwood recently asked if I could bring something along to the accompanying bakesale at Folkraiser @ Hibernian House this weekend there was only one adorable cake on my mind.

If you’re already experienced in macaron and cupcake baking then this should be an absolute breeze, albeit a little time consuming. The great thing about this combination is that you can mix up the flavours as freely as you’d like and, with the addition of some lovely pastel colours, they’ll always look fantastic. They basically advertise themselves! And who wouldn’t want a delicious cupcake with a macaron top-hat?!

This recipe will make 12 macaron cupcakes with some extra macarons to spare.


MACARON CUPCAKES

(an original recipe)

Macaron Shells

100g egg whites, room temperature

100g almond meal

200g pure icing sugar

30g caster sugar

1 tsp powdered egg whites

Powdered food colouring of your choice


Salted Callebaut Ganache

140g Callebaut chocolate, chopped (I used half milk, half dark)

80ml pouring cream

sea salt, to taste


Vanilla Bean Cupcakes

100g butter, room temperature

1 cup caster sugar

1 vanilla bean

3/4 cups self-raising flour

1/2 cup +2 tbs plain flour

2 eggs, room temperature

1/2 cup buttermilk


Cream Cheese Icing

250g cream cheese, room temperature

2 cups icing sugar mixture

Food colouring of your choice


Assembly

Mini cachous


For the salted Callebaut macarons

1. Preheat your oven 150°C.

2. Sift pure icing sugar and almond meal and place into a bowl and give it a quick stir.

3. Beat eggwhites and eggwhite powder in a separate bowl until soft peaks form. Slowly add the caster sugar, beating well between each addition, until eggwhites are stiff and glossy. This process should take around 5-10 minutes.

4. Pour half of your dry ingredients into the bowl of beaten eggwhites and combine with a flat utensil, like a spatula, using “cutting strokes”. Once incorporated repeat with the remaining icing sugar and almond meal mixture. This is where things begin to get a little tricky as under-mixing or over-mixing will ruin your macarons as they attempt to rise and “grow feet” in the oven. Experts say to stir the mixture until it becomes the consistency of lava. The mixture will be sticky but you’ll know it’s ready when, upon holding your spatula above the bowl, it will begin just begin to flow freely back into the bowl. You’ll need to knock a lot of the air out of it.

5. Prepare a piping bag with the appropriate tip (around 1 cm or less), a baking tray with baking paper, and pipe small rounds (they must be small enough to balance on the cupcakes!). If there are any small lumps left from piping wet your finger and gently press them down (unlike cake batter, macaron mixture does not flatten out when in the oven). Allow tray to rest for 30 minutes.

6. Place baking tray in the oven and allow to bake for around 15 minutes (this time will depend entirely on your oven, so keep an eye on them). Within 5 minutes or so they will begin to grow feet.

7. Once ready, remove from oven, and after 5 minutes transfer to cooling racks.

8. Whilst your shells are cooling place your cream in the microwave for 30 seconds or until relatively hot. Pour your chopped Callebaut into the bowl and stir continuously until the chocolate has melted and the mixture is combined. Add sea salt, to taste, until you chocolate flavour begins to “pop” (this took me a few turns of my salt mill). Place bowl into the refrigerator to cool and thicken.

9. Prepare another piping bag with a large tip and neatly pipe rounds of ganache into half of the shells. To close, gently place its partner shell on top of the ganache and twist shut, taking care to prevent ganache spilling over the edges.

For the vanilla bean cupcakes

1. Preheat oven to 180°C.

2. Beat butter until it begins to cream and pale. Scrape the seeds from the vanilla pod into the butter, add the sugar and continue to beat until combined and fluffy. You should be able to see the flecks of vanilla bean.

3. Add the eggs one at a time beating after each addition. Add the self-raising flour, milk, then plain flour once again beating after each addition.

4. Spoon into a prepared cupcake tin with liners, filling each to around two thirds full. Rap the pan by dropping it from a small height to knock out any air bubbles.

5. Place in oven and bake for aound 15-20 minutes or until the tops spring back when touched. Allow to cool for 5 minutes then transfer cupcakes to a wire rack to cool completely.

6. While these are cooling, prepare your cream cheese icing by beating the cream cheese with icing sugar and food colouring until combined and creamy.


For the assembly

1. With a piping bag with a large tip attached carefully pipe cream cheese icing over cupcakes. Carefully take macarons and place at an angle on each cupcake ensuring their placed firmly enough that they won’t slip off. Sprinkle with mini cachous and place cupcakes in the fridge for the icing to firm up to ensure the macarons will stay put.


All packed up and ready to go!

If you’d like to hear more of Packwood’s tunes you can check out the Facebook page here, also the alanabread facebook page is here too. Here’s a fan-video from our friend Zohara from a show a couple of months ago (you can hear me playing piano at 5:30!):

Lessons learnt the past few days: 1) orchestral folk music is cool, 2) being a baker/musician for a night is a total dream come true, and 3) there is something strangely satisfying about baking your own logo.

Tags: , , ,

Awesome friends? Check. Picnic blanket? Check. Great location? Check. Lots of fresh and delicious food? Double check.

Unfortunately I left my darling camera at home over the weekend so you’ll just have to take my word that splendid picnic times were had yesterday. As usual we all prepared some things to share and, to comply with the eating habits of my wonderfully diverse group, I decided it was time to venture into vegan baking.

The ‘V’ word is often a little daunting. Unfortunately many make assumptions of bland, tasteless and generally odd looking food. While this is sometimes the case true vegan cooking/baking can produce the most amazingly ingenious dishes so long as your core ingredients are substituted accurately (I have one of my favourite pals, vegan chef extraordinaire Ro, to thank for this revelation over the past couple of years).

Despite the challenges one must overcome in the absence of milk, butter and eggs this is a very simple cake to prepare as there is no beating required. A simple bowl and spoon is all you need to make these vegan chocolate cupcakes!

Decorating cakes that sit below the rim of the baking cup is a rarity for me so when I realised these cakes weren’t going to rise too much it became a fun learning exercise in decorating with glaze. Ideally I’d have used fresh cherries as a garnish, but you know, cherry season is yet to grace us.

I’ll spare you my horrendous recipe sketch covered in water and cocoa, here’s a nice, neat typed version for you to try at home. Makes 12 vegan treats.


Vegan cherry + choc + coconut cupcakes

(an original recipe)

1 1/4 cup flour

1 cup sugar

1/3 cup good quality, dutch-process cocoa

1 tsp baking powder

1/2 tsp salt

1 cup coconut milk

1/3 cup vegetable oil

2 tsp apple cider vinegar

1 tsp vanilla extract

1 cup preserved morello cherries, roughly chopped

1/2 cup desiccated coconut


Vegan chocolate glaze

1/2 cup sugar

4 tbsp vegan margarine (eg, Nuttelex)

2 tbsp good quality, dutch-process cocoa

2 tbsp coconut milk

2 tsp vanilla extract


12 fresh, glacé or any other candied cherries to serve


1. Preheat your oven to 180°C and prepare a muffin tin with 12 baking cups.

2. Combine your dry ingredients  (flour, sugar, cocoa, baking powder and salt) into a bowl. Then add the coconut milk, vegetable oil, apple cider vinegar and vanilla extract and stir until well combined.

3. Remove morello cherries from jar and chop roughly, placing on paper towels to remove some of the moisture. Add them to your mixture as well as your desiccated coconut and once again stir to combine ensuring the cherries are evenly distributed.

4. Place mixture in baking cups around two thirds full and bake for around 20 minutes, or until a skewer inserted comes out clean. Allow to cool for five minutes then transfer to a wire rack.

5. Meanwhile, combine sugar, margarine, cocoa, coconut milk and vanilla into a saucepan and bring to the boil. Simmer for five minutes then remove from heat. Stir constantly for five minutes; the glaze will begin to thicken.

6. Carefully spoon the glaze onto each cupcake make sure to bring it to edge of the baking cup. Adorn each with a glacé cherry and allow to set for 1-2 hours.

Gives these a try and I promise these will be a part of your permanent baking repertoire. Wait, actually, one of my friend’s just called me then so say that these were really great. AWW! Based on this, and my adorable animated gif, you should definitely make these right away.

Tags: , , ,

Before I begin my usual selfish ramble about how wonderful food is I need to thank Diana of Diana’s Desserts for this incredible apple cider baked donut recipe. I’ve seen the term “Apple Cider Doughnuts” wafting about food blogs like crazy as of late but after some investigation I’ve found most of them seem to stem from this recipe. So thank you, Diana, this recipe is amazingly delicious for something so simple (and since I busted my handmixer the other day this recipe was an absolutely blessing to my unfortunate circumstance).


I’ve added my own garnishes to these lovelies (because what’s the fun in cooking straight from a recipe?); my simple apple cider glaze and apple bark. It’s important to use a good quality apple cider here as it is the only wetting agent for the glaze (so if you were considering using Strongbow kindly close this browser now :)). And as for my apple bark – this was a complete(ly successful) afterthought that went down a treat providing a welcomed crunchy tang.  You may want to organise this a few hours prior to baking your goods as it will need around 3 hours in the oven.

As you can see I’ve used donut pans, mini donut pans and a baby cupcake tin so in the spirit of concise headings I’ve umbrella’d these delicious gems under “baked goods”. This recipe does not discriminate against shape!


APPLE CIDER BAKED GOODS + CIDER GLAZE + APPLE BARK

Apple cider baked goods (from Diana’s Desserts)

2 cups plain flour

2 tsp baking powder

1/2 tsp salt

2 tsp cinnamon

1 egg

2/3 cup packed brown sugar

1/2 cup apple sauce

1/3 cup maple syrup (or maple flavoured syrup)

1/3 cup good quality apple cider

1/3 cup vanilla yoghurt

3 tbsp vegetable oil


Apple cider glaze

1 cup icing sugar mixture

1/2 tsp cinnamon

1/4 cup good quality apple cider


Apple bark

1 apple

springkling of cinnamon

For the apple cider baked goods

1. Preheat oven 180°C.

2. In a large bowl combine flour, baking powder, salt and cinnamon.

3. In another bowl combine wet ingredients; beaten egg, brown sugar, apple sauce, maple syrup, apple cider, yoghurt and vegetable oil. Give them a quick whisk then add your bowl of dry ingredients. Whisk until just combined.

4. Divide your mixture between pans/tins of your choosing. For a donut pan bake for 10 minutes, for mini donuts and baby cupcakes bake for 5-7 minutes or until the tops spring back when touched.

5. After 5 minutes transfer to a wire rack and allow to cool completely.

For the apple glaze

1. Combine icing sugar, cinnamon and cider in a small bowl and stir well to remove any lumps.

For the apple bark (do this the morning before)

1. With a sharp vegetable peeler peel thin strips of apple, including the skins, and place on a baking tray. Sprinkle with cinnamon.

2. Bake in a cool oven (around 80-100°C) until completely dried, between 2 -3 hours. (If you are doing this day before you may need to re-crisp your apple bark for half an hour before assembling). Once dried, the apple skins will shrink and curl like little twigs. The apple strips will look like leaves.

For the assembly

1. Hold your baked good up-side-down and dip into the glaze. Shake of any excess and place back on the wire rack. Take a piece of apple bark and place on baked good while the glaze is still wet so it stays in place once dried. Continue with the rest of your donuts and baby cupcakes.


Bring these along to any dinner party and they will be very, very well received.


Trust me; I know from experience.

Tags: , , , , , , ,

Steven is a beautiful friend of mine I miss every day. His presence in my world is testament that life can work in mysterious ways. Should he still be with us today would be his 30th Birthday – and what a day! There’s such beautiful sunshine here in Sydney inviting us into Spring.

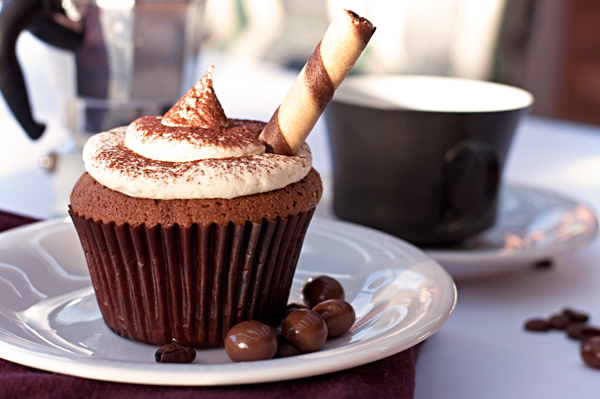
We met a show five years ago and continued seeing shows together like the sweet indie kids we were at the time. Coincidentally we ended up working only doors away from each other so every second-or-so afternoon we would meet in a downstairs cafe, order two coffees and discuss the day’s events. To this day a cappuccino will always remind me of dear Captain Steve who is my inspiration to this lovely recipe – replicating this warming friendship via a warming beverage with warming cake . This will serve 12 lucky caffeine fiends.


Cappuccino Cupcakes for Steven

(an original recipe)

150 g butter (room temperature)

1 cup caster sugar

3 eggs

1 1/2 cups self raising flour

2 shots (60 ml) espresso

1/4 cup milk

1 tsp vanilla extract

1 tbs dutch-process cocoa

Espresso Syrup

3 shots (90 ml) espresso

1/4 cup sugar

Vanilla Buttercream

100 g butter (room temperature)

2 cups icing sugar mixture

1 tsp vanilla extract

3 tbs milk

extra cocoa, for dusting

wafers, chocolate-covered coffee beans for decoration


1. Preheat oven to 180°C. Line a 12-cupcake pan with cupcake liners of your choosing.

2. In a bowl, beat butter for a few minutes until it begins to pale. Add sugar and eggs, one at a time. Beat until fluffy.

3. Add flour, espresso, milk, vanilla and cocoa and beat until combined and light.

4. Divide mixture between your cupcake liners – they should be around 3/4 full. Bake in oven for 20-25 minutes or until the tops are springy to touch.

5. While the cupcakes are baking in a small saucepan combine your espresso and sugar. Allow to boil and leave on medium-high heat for 5-10 minutes without stirring until the mixture thickens to a syrup. Be wary of leaving it too long or it will become toffee.

6. As soon as your cupcakes are removed from the oven lightly prick them a few times with a fork and spoon your espresso syrups over the tops. This will take a few scoops as you must allow the syrup to slowly seep into the cake before the next. Allow to cool.

7. To prepare the vanilla buttercream beat the butter and icing sugar until just beginning to combine. Add the vanilla and slowly add milk until you reach the desired texture.

8. To assemble: prepare a piping bag and carefully ice your cupcakes. There’s no need to apply too much as the cupcakes are already quite sweet; we want to create a nice base to replicate the froth of a cappuccino. Lightly dust with additional cocoa and adorn with wafers or any other relevant candies of your choosing.


Life is precious and I’m so sorry I couldn’t make these for him sooner. Happy Birthday, my wonderful friend! We miss you.

Tags: , , , ,

Layer cakes. Who has zero experience in making them? ME. My first attempt at this cake a few days ago was disastrous despite it starting so well; maybe it was the kitsch silicon baking ‘tins’ I was using, maybe it was the cakes baking to thin, maybe I didn’t let them cool enough before handling, whatever the case there were cake crumbs EVERYWHERE. Oh and due to over-pulverizing and over-mixing my oreo cream cheese icing began to turn grey… this was one ugly test cake.

Using 9-inch rounds was a much better idea. The chocolate cake recipe below is adapted from Buddy Valastro of Cake Boss fame. There are a few concessions made in this recipe due to necessity (and laziness) – for example, using less sugar in lieu of the torrent of oreos, substituting buttermilk for yoghurt as I was running low and generally fixing some of the measurements for a more metric experience. It’s a fantastic chocolate cake and coupled with a whole lot of cream cheese icing with smashed oreo stirred through… this is about to get intense.


DOUBLE CHOCOLATE AND OREO CAKE

(cake recipe adapted from Buddy Valastro; makes two 9 inch rounds)

FOR THE CAKES

1 1/2 cups flour

1 cup caster sugar

125 g butter, room temperature

1/3 cup good quality dutch process cocoa

1 teaspoon baking powder

150 g melted chocolate

1/2 cup hot water

2 large eggs, room temperature

1/4 cup milk

1/4 natural yoghurt

FOR THE OREO CREAM CHESE ICING

250 g cream cheese (Philadelphia)

70 g butter

1 tsp vanilla extract

2 cups powdered/icing sugar

1 x 150g packet of oreo biscuits

FOR THE ASSEMBLY

1 x 150g packet of oreo biscuits


1. Pre-heat your oven to  175°C.

2. Beat the butter until it begins to cream. Add flour, sugar, cocoa and baking soda and and beat until combined.

3. Pour in melted chocolate. Beat for one minute, then pour in the hot water. Continue beating until combined then add the eggs one at a time, adding the next one after the previous has been absorbed. Pour in the milk and yoghurt and beat for a few minutes until the everything is well combined, the sugar has dissolved and the batter is lovely and velvety.

4. Prepare two 9-inch cake pans by spraying with oil or greasing with butter. Divide the mixture between the two pans and bake for around 30 minutes or until the cake begins to peel away from the sides and is springy to touch.

5. Allow to cool to room temperature before turning cakes out of the pans. Refrigerate until ready to decorate.

6. Break up one oreo packet into shards, preferably by hand as to not create to much ‘rubble’.

7. Beat butter, cream cheese and vanilla extract until beginning to cream.

8. Add the icing sugar one cup at a time until incorporated and fluffy. You can add more/less icing sugar to taste.

9. Divide icing in around half – but preferably 70/30. In the larger portion stir in your oreos carefully – just enough to combine but do not overmix or the icing will begin to turn grey.

10. With either a piping bag fitted with a large nozzle or a very handy spatula, layer your larger portion of oreo icing over one of the cakes. Make sure to keep this as level as you can so the cake layers look nice and even once sliced. Place your second cake on top.

11. Take your leftover cream cheese icing and layer over the very top of the cake. Once again, break your other packet of ores into shards and scatter atop the cake. Be sure to cover all the ‘white spots’ so the cake looks dense with cookies.

This cake is now packed away ready to take to a friend’s dinner tonight, thank goodness I’m not being left alone with this hot mess of chocolate.

Tags: , , , ,

Newer entries »