Cakes + Cupcakes

You are currently browsing the archive for the Cakes + Cupcakes category.

I can’t tell you why I feel it all around whenever I hear the word affogato. The mere thought of that holy combination of life giving caffeine and a dairy-based dessert gets me weak at the knees and foggy in the head. Perhaps it’s old memories of my dad pressing ice cream into latte glasses with the gaze and conviction of a man on a mission, or maybe it was that time in Italy in 2008 when I asked a friend to order me an affogato, and once I returned from a neighbouring ATM I caught her pronouncing “aff-row-JAHHHH-teee” with such gusto only to have everybody within earshot laughing so loud she refused to speak to me for a while. I’m sorry. But I still say “aff-row-JAHHHH-teee” sometimes.

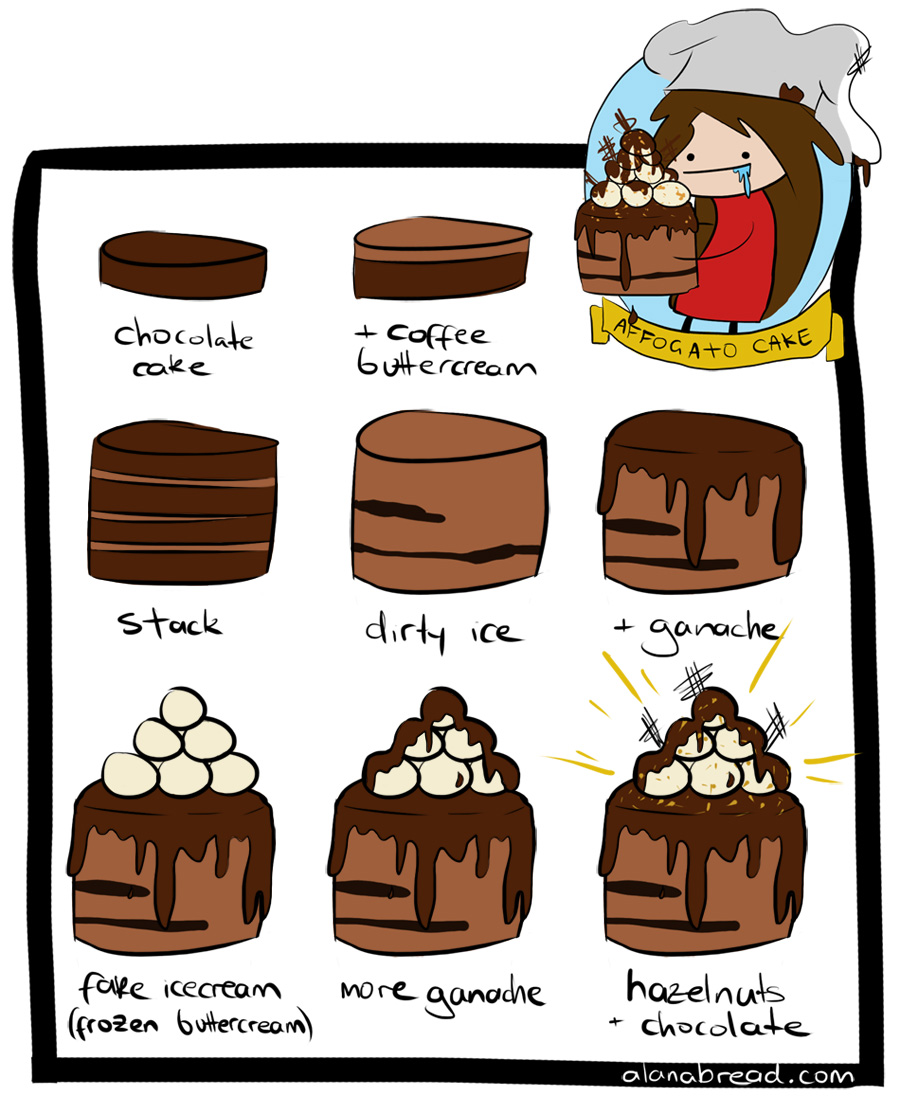
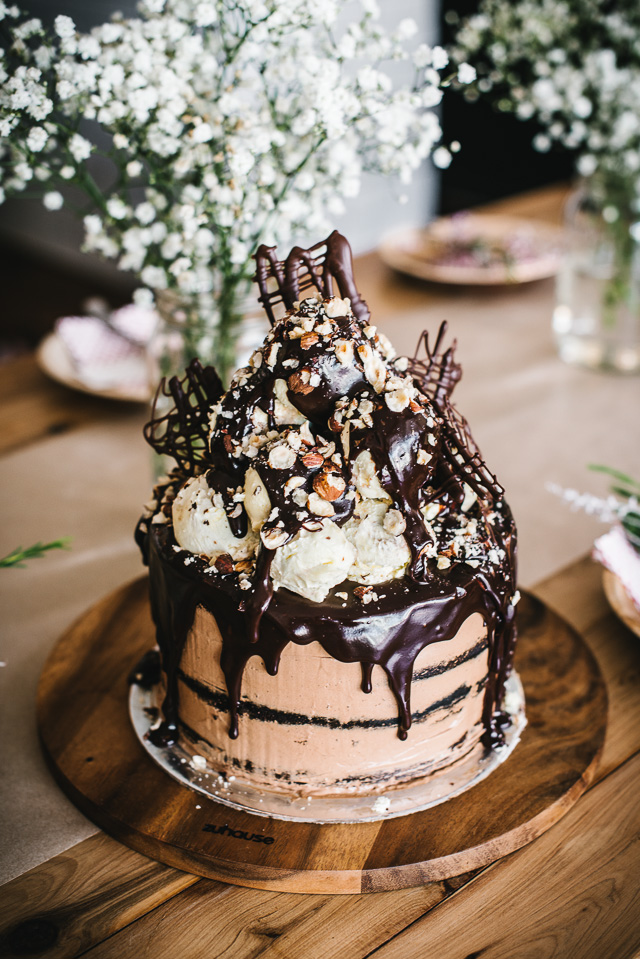
Or, maybe it’s because I know how to do fake ice cream on cakes well.

Whatever the case, it was a pleasure and a privilege to bake a big cake for The Makers Society Great Bake Swap at The Hop and Grain last weekend. Assembly instructions are below in terrible animated glory, but as for the “recipe”: I used Tartine’s devil food cake recipe to bake two cakes sliced in half; the icing is Linda Lomelino’s chocolate fudge frosting with the addition of some dissolved instant coffee (replace some of the milk and add to taste) and the drippy chocolate is nothing but ganache (dark chocolate and cream) with a couple of tablespoons of glucose / corn syrup. For the fake ice cream, throw some buttercream in a bowl, freeze it, scoop out some rounds with an ice cream scoop then re-freeze them for easy stacking. I was lazy and used compound chocolate for garnishing, except the Sydney sun was merciless that day and annihilated my rustic spokes. I forgot to take some photos at home before the event (unless instagram counts) so thank you ladies for being so patient with me as I spent too long trying to take a decent photo and thank you for sharing my aff-row-jahhh-teee cake.

Affogato CakeAffogato CakeAffogato CakeAffogato CakeAffogato CakeAffogato CakeAffogato CakeAffogato CakeAffogato CakeAffogato CakeAffogato CakeAffogato CakeAffogato CakeAffogato Cake

Affogato Cake

Tags: , , , , ,

S'mores Cake

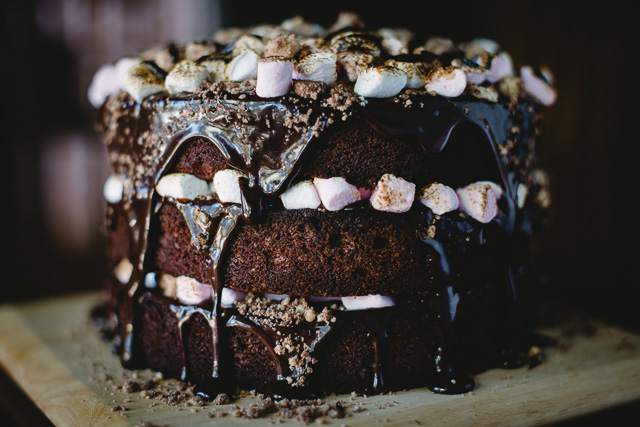
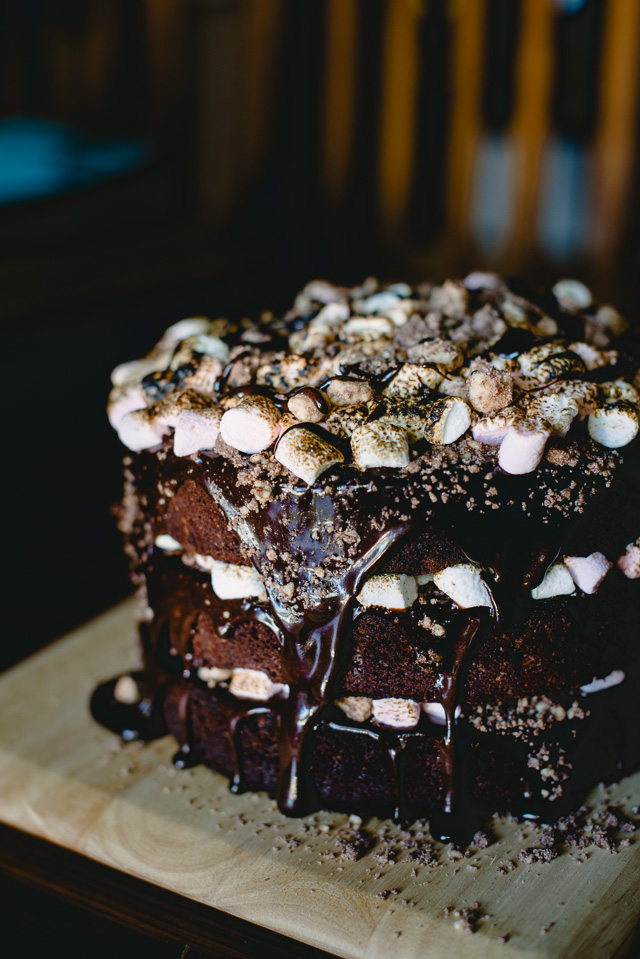
I do not have a clever anecdote, relevant life story or poignant statement in relation to this cake, instead I can offer a few simple home truths. It was my friend Felicia’s birthday yesterday, she’s a pastry chef and therefore deserved a spectacle more thoughtful and curious than the usual birthday fare; rich chocolate cake, malty and salty ganache, crunchy crumbs and chewy, charred marshmallow. Sound legit? Well. This cake ended up so intense it made the aperture blades in my brand new lens seize up (no joke, I’m now spending my day off tomorrow visiting the camera service centre). This s’mores cake literally forced my camera into a food coma just by looking at it.

The directions, dare I say gospel, according to Momofuku’s class act via Bonappetit were followed to a tee however their signature naked-cake style was abandoned in lieu of my penchant for a good chocolate drip cake. It was kept messy all ’round since successfully hiding behind the guise of rustic when in actual fact I lack kitchen finesse is my greatest aesthetic flaw trait. If you enjoy your sweet treats tall and gooey this might just be the cake for you, a Momofuku recipe with a heavy-handed twist.

S'mores Cake
S'mores Cake
S'mores Cake
S'mores Cake


S’mores Cake (by Momofuku / Christina Tosi via Bon Appetit)
Milk Crumbs
3/4 cup milk powder
1/2 cup flour
3 tablespoons sugar
2 tablespoons corn flour
3/4 teaspoon sea salt flakes
80g butter, melted
12 tablespoons Ovaltine mix
80g white chocolate, melted

Malt-fudge sauce
1 1/3 cups Ovaltine mix
120g dark chocolate (I used Lindt 70%)
1 teaspoon molasses
Pinch of sea salt flakes
1/2 cup cream
1/2 cup glucose / corn syrup
1/4 cup sugar

Chocolate cake
60g dark chocolate
1 3/4 cups flour
3/4 cup dutch-process cocoa
2 teaspoons baking powder
1 teaspoon sea salt flakes
170g butter, room temperature
2 1/4 cups sugar
3 tablespoons glucose / corn syrup
3 eggs
3/4 cup buttermilk
1/3 cup vegetable oil
1 teaspoon vanilla extract

Malt soak
1/2 cup milk
3 tablespoons Ovaltine mix

Assembly
2x packets mini marshmallows (sorry didn’t make note of the grams!)
Brûlée torch

Milk crumbs
1. Preheat oven to 130°C. Combine milk powder, flour, sugar, corn flour and salt in medium bowl; toss to mix evenly. Add melted butter and stir with fork until clusters form. Spread mixture evenly onto baking tray lined with parchment paper. Bake until crumbs are dry and crumbly but still pale, about 10-15 minutes. Once cool toss in a bowl with Ovaltine mix and white chocolate. Toss until completely coated and allow to dry.

Malt-fudge sauce
1. Place Ovaltine, chocolate, molasses and salt in a bowl and set aside. Combine cream, corn syrup, and sugar in bowl and microwave until everything has dissolved. Pour cream mixture over chocolate mixture and let stand for 1 minute, then stir until smooth. Whisk until sauce is glossy. Set aside.

Chocolate cake
1. Preheat oven to 180°C. Coat three 8-inch cake pans with nonstick spray. Line bottom of each pan with parchment round and coat parchment with nonstick spray. Place chocolate in small bowl and microwave in 15-second intervals just until melted, stirring occasionally. Set aside.
2. Sift flour, cocoa powder, baking powder and salt into medium bowl. Combine butter, sugar, and glucose in large bowl and beat on medium-high speed until fluffy and pale, about 2 minutes. Scrape down sides of bowl and add eggs. Beat to incorporate then increase speed to medium-high and beat until mixture is fluffy, about 2 minutes. Scrape down sides of bowl. Add melted chocolate and beat briefly until blended. Add buttermilk, oil, and vanilla and beat until pale brown, about 2 minutes. Add dry ingredients and beat on low speed just until blended. Divide batter among pans.
3. Bake cakes until tester inserted into center comes out clean, about 20-30 minutes. Cool completely in pans on racks.

Malt soak
1. Stir milk and Ovaltine in small bowl.

To assemble
1. Rewarm sauce until just pourable. Spoon a couple of tablespoons of it in the centre of your cake board and place the first chocolate cake round on top (this is to ensure it stays put). Brush over a few tablespoons of the malt soak, cover with some chocolate sauce, just under a third of it (allowing some to ooze over the edge if you feel so inclined), add a third of the malt crumbs and a quarter of the mini marshmallows. Torch the layer of marshmallows lightly for that charred, s’morsey feel. Add a little drizzle of chocolate sauce and add the second cake round. Repeat adding malt soak, chocolate sauce, crumbs marshmallows, torching and more sauce. Add the third cake round. This time top the cake with more sauce then the remainder of the marshmallows. Torch those bad boys then sprinkle with the remainder of the milk crumbs and drizzle the rest of the chocolate sauce on top (a word of advice: if it begins to do the leaning tower of Pisa thing, don’t sweat it; it’s rustic and beautiful). Add birthday candles and you’re all set.

Tags: , , , , ,

Poached Quince Cheesecake by alanabread

G’DAY FRIENDS. So, how’s life?

I’ve mentioned earlier that our internet lives are a shining beacon of filtered success. It’s no new revelation, a plethora of articles have already been written on the subject. Take a look at anybody’s instagram account and you’ll generally find only #cool and #kooky happenings of their lives. We don’t mention the unglamorous details of events gone wrong, straight up feels of downright sadness (that is, too sad to throw a romanticised spin on it), friendships gone bust or general upsetting happenings. It’s the internet! And our natural instinct is to only share what’s great. Look how successful I am! Look at my great hair today! TODAY I MET THIS AMAZING DOG. We literally live our lives frolicking in Valencia (the instagram filter, not the city). Not hatin’, just sayin’. It’s only natural in this day and age.

The very same sentiments mirror onto our blogs. Generally we only share our successes rather than our (cake) fails. There’s a beautiful art in the ol’ salavge mission so I want to hear your stories.

I was baking a baseless cheesecake in a Profiline PushPan for the sake of this post (The Cheeseboard Cheesecake aka The G.O.A.T.) however I managed to overbake the poor thing. Salvage mission 101: scorch the surface for DRF (dat rustic feel™) poach some quince with peppercorns and bayleaves, soak that badboy in the poaching juices and serve it up. CAKE (mostly) SAVED.

Poached Quince Cheesecake by alanabread

Poached Quince Cheesecake by alanabread

Poached Quince Cheesecake by alanabread

To pay tribute to my humble cake save I’m running a little competition. Tell me about your best cooking salvage mission. Did you cover an ugly cake with stuff? Did you transform your crumbled concoction into a trifle? Your story doesn’t need to be baking related; tell me all about it to be in the running to win a Profiline PushPan baking pack worth over $170. The lucky winner will receive 4x 12cm PushPans, 2x 20cm PushPans and 1x 26cm PushPan. Sound good? Good! Get entering by posting your tale in a comment on this post. Mark off your activities on the widget below because extra votes are awarded if you like alanabread on Facebook or have a little tweet. Cast aside your internet egos. I want to feel your pain. I want to know your inner food MacGyver. It can be as detailed or as short as you like, both essays and short sentences welcome. Good luck!

a Rafflecopter giveaway

Tags: , ,

As bloggers we are content creators, we make neat stuff whether it be photos, drawings or pieces of insightful writing to entertain and/or educate the internet masses. If we have a corner of the internet we have a responsibility to represent ourselves in entirety; creatively, emotionally, whatever. We push the boundaries of what we know and enjoy and create new and exciting things to share. In turn we are inspired by what others do. An honest blog is a beautiful outlet of nice sentiments and hard work. Personally, my benchmark of a good post is one that disregards all the trends and basks in the sweet glow of straight up originality (if there even is such a thing).

However.

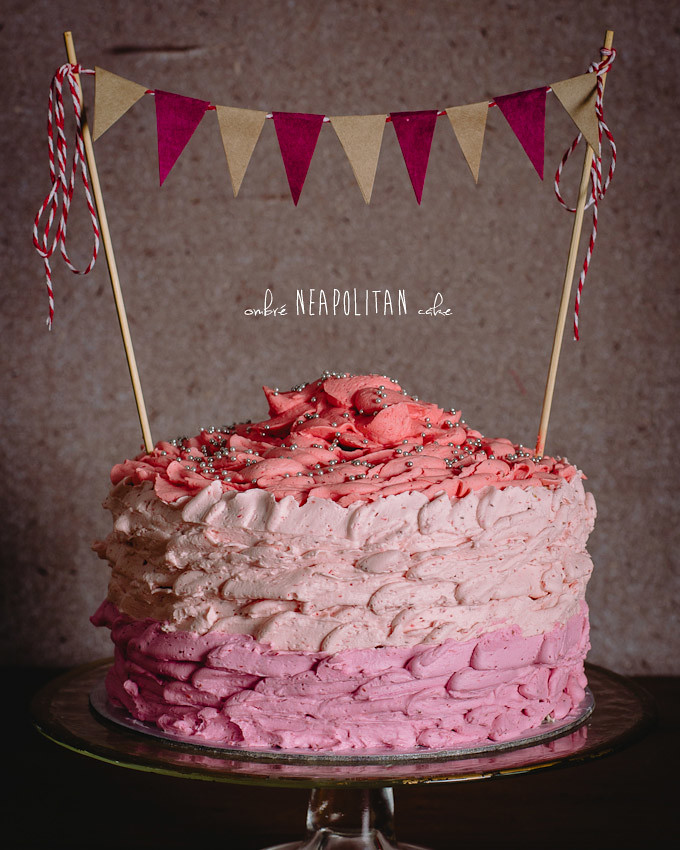
This weekend something took hold of me. A terrible monster. Like the devil’s grip I was thrown into the shallow abyss of kawaii cake trends. On Friday night I was up at 2am gluing small triangles onto striped twine and you know what? I felt so alive… like I was patting a pack of pugs whilst simultaneously poaching an egg for brunch. I made ombré cakes, I stacked them high and got rustic with a Wilton #125 tip. Pink. Chocolate. Strawberries. Ruffles (kinda). Bunting. Is this how God feels (on one of his more leisurely days)? Can I put a bird on it? These are my dirty kicks. I was possessed by a beautiful twee monster all in the name of creating a nice birthday cake for my friend Julie. HAPPY BIRTHDAY JULIE!

Basically what I’m trying to say is sometimes I cannot resist the warm, comforting yet disgusting lure of a good dessert trend. Ombré + bunting. It’s Etsy crack, it’s twee porn. But it’s ok (sometimes), or at least that’s what I’m trying to convince myself. I did not choose the Etsy life, the Etsy life chose me.

I named this a “Neapolitan Cake” mostly for the wank, however, upon actually tasting the combination of vanilla cake, chocolate ganache/buttercream, strawberry swiss meringue buttercream and slices of fresh strawberries together the cake really did emulate flavours of a straight up ghetto tub of Neapolitan ice cream. So good. One of my favourite cakes to date. In fact, pastry chef Felicia said it best when she confided “I know exactly what’s in this icing yet I can’t stop eating it”.

Because I so often keep it real I don’t have any staged “slicing of the cake” photos, instead I have some unglamorous shots as it was divided between the 12 of us at a restaurant in Glebe. In true (new?) alanabread style I’ve illustrated how to construct this tower of twee (no recipe this time but send me an email if you’d like some assistance on that front). Otherwise just stack it, dirty ice it then slater it (maybe stab it with bunting if you’re ready to embrace twee).

Also (not even an attempt at a suave segue here), I was recently informed alanabread was not only nominated but is a finalist in the Voices of 2013 blog awards! So thank you so, so very much to everyone who nominated me and of course to the judges, I really appreciate the recognition. Congratulations to all my blogging peers also, you can find the list of finalists here. But, I digress (sneaky tear), here are some cake related pixels. Good luck and enjoy!

Tags: , , , , , , ,

Happy 26th Birthday to me. YIKES.

I’m constantly saying birthdays are the most important time of the year; it’s a time that reminds us of the importance for being grateful for the wonderful friends we keep, it brings everybody together. This year I’ve felt too unemployed, too useless and therefore too undeserving to even begin contemplating the fine art of celebration for myself (the only happiness I see is the bottom of ice cream tubs) and it’s unfortunate that such a happy occasion should fall on such an awkward time in my life. But, thanks to some encouraging family and friends we partied nice this weekend and it was good.

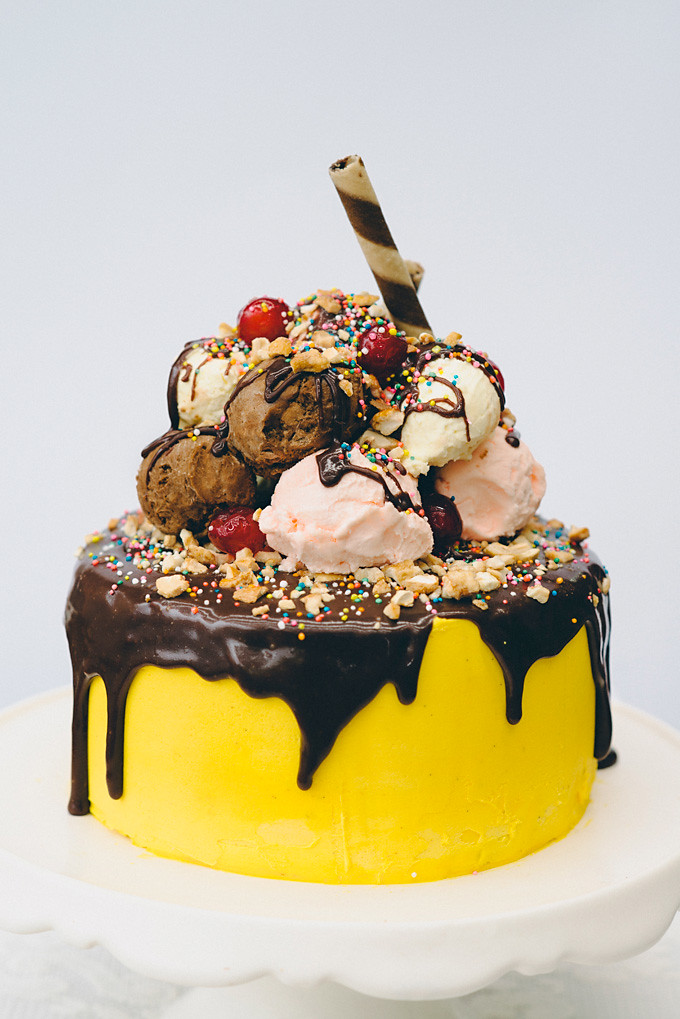
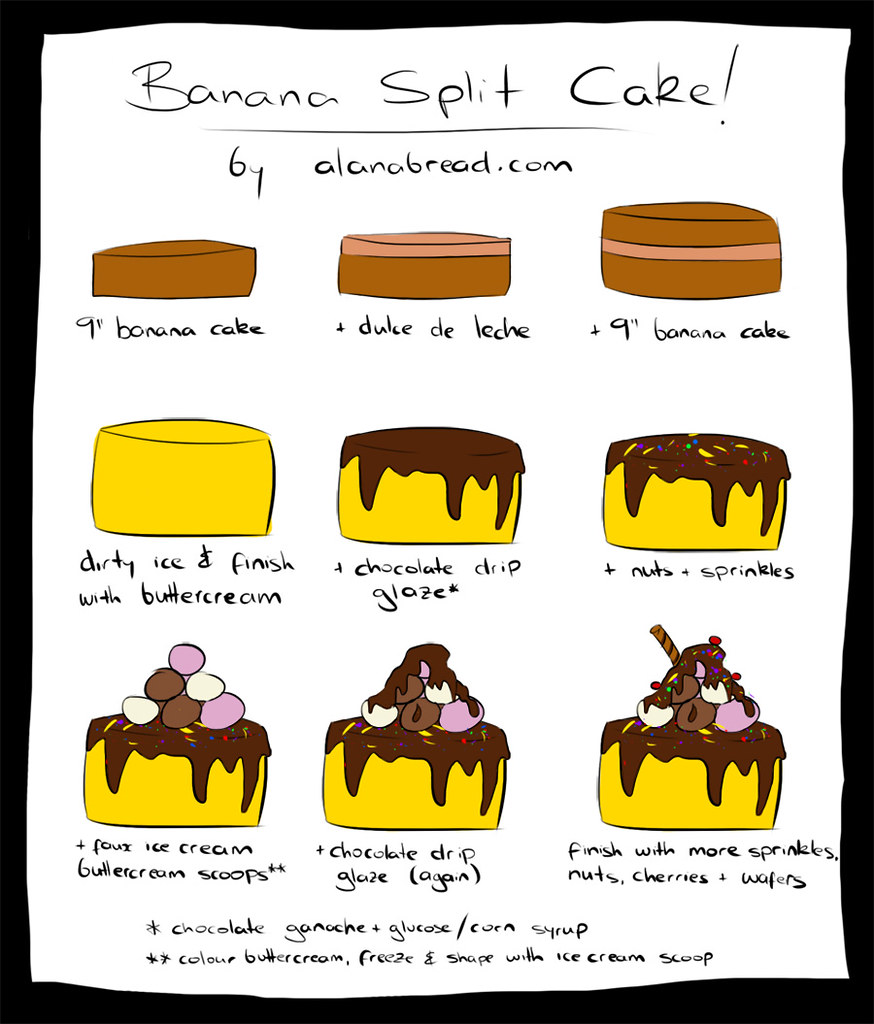
Such a terrifying number (twenty six, say it with me now) amplified by my post graduate and job seeking status warranted the creation of a delightful cake screaming of age denial. Welcome to my life, banana split cake; banana cake with a dulce de leche filling covered in yellow buttercream, chocolate glaze, honeyed cashews, 100s and 1000s, faux ice cream buttercream scoops in neapolitan colours and even more nuts, sprinkles, cherries and wafers. If your cake doesn’t scream “DIABETES” then you’re doing something wrong. This is an ode, no, a blaring symphony to my cake philosophy; FONDANT NEVER, BUTTERCREAM FOREVER. It’s my legacy instilled in sugar.

For a cake that began as a humble sketch pictured above it seemed apt to illustrate the procedure for creating this buttery wonder instead of documenting via photos and I assure you the lack of fancy cross-section photos has nothing to do with the eternal struggle between gin brain and camera/knife wielding after blowing out the candles. Guys, did I make an idiot out of myself when I made that speech… ? RIP me. Death by embarrassment.

The banana cake recipe was taken from a classic Women’s Weekly book (my mum used to make it all the time (~FAMILY HISTORY~)) and the dulce de leche filling was made by slow-cooking condensed milk in a bain-marie with a pinch of salt (too scared to boil dat can).

Beautiful, flourishing emotions aside, here’s how to decorate it; you’ll need two 9 inch rounds of cake, a filling of your choice (optional), lots of buttercream, food colouring (I find gel is best), crushed nuts, sprinkles / 100s and 1000s, chocolate, cream and glucose / corn syrup. It will make any 26 year old cry with happy tears or at the very least gently ease them into the final year of their “mid 20s”. There is no such thing as age appropriate when it comes to cake.

… twenty… six.


Tags: , , ,

I FEEL COMPELLED TO TYPE IN CAPITAL LETTERS FOR A SENTENCE OR SO BECAUSE I AM A BIT ANNOYED. I NEVER INTENDED FOR IT TO BE THIS WAY BUT UNFORTUNATELY MY EMOTIONS HAVE GOTTEN THE BETTER OF ME AND HERE I AM SHOUTING IN THE GENERAL DIRECTION OF THE INTERNET, MY PRECIOUS OUTLET. AHHHH! BOOO HISSS VENT VENT VENT ETC ETC

My camera is broken. Well, was broken (the nice people at Nikon HQ have since worked their repair magic). It began seriously playing up at the most inconvenient of times; in the middle of a photo shoot! Now, “photo shoot” is a term I avoid using at the best of times because it conjures weird and strange memories of dudes with enormous egos (it’s a long story and I am a complicated girl), however, the location was somewhere other than my bedroom for once, with a model, an assistant and a whole lot of pretty props so I’m allowing myself just this once to indulge in some jargon. The reason I had finally ventured away from my “bedroom studio” and was standing amongst all of these seemingly professional and nice things is because I was encouraged to enter the San Pellegrino Café Society photo competition by a tutor at uni to broaden my photographic horizons. As I may have mentioned before I’m making a big effort to work on photography, building up a portfolio and all that, to avoid the dreaded jack-of-all-trades-master-of-none syndrome that seems so easy to slip into these days like an unfortunate coma of artistic mediocrity. “So, what do you do for a living?” “Oh, I’m a creative“. No, no, no, no; that certainly isn’t the life for me.

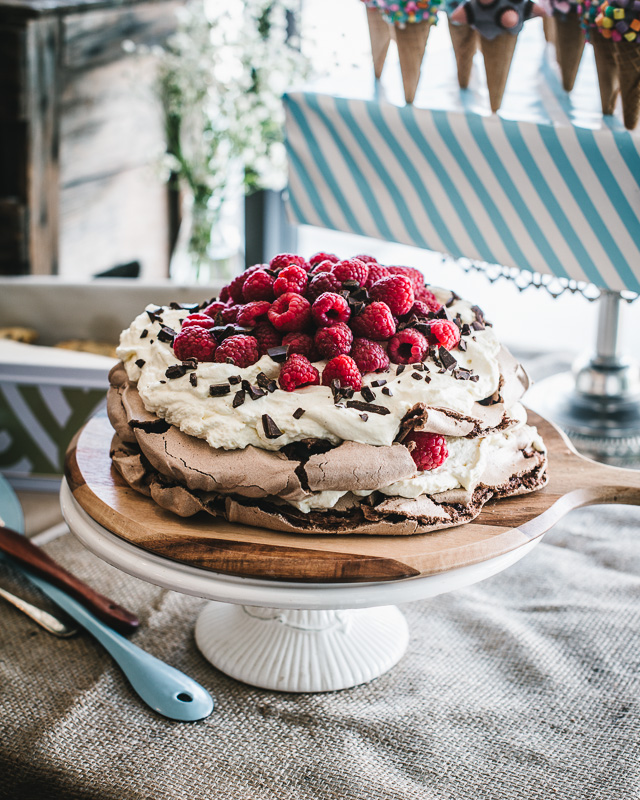
Café Shenkin in Erskineville was my allocated venue, a wonderful space dripping with rustic charm (~my dream~) with the gorgeous Chloe and assistant Felicia. I’d sourced some old books, acquired many coffee beans, picked some flowers, spent all of my play money on raspberries and baked a big ol’ chocolate cake for my table setting. Everything was going fine until my camera refused to focus and chromatic aberration (those annoying blue/purple lines that fringe objects in photos) was all over the place. Every single photo looked a little skewed and I could not work out why, I’d put it down to using a wide lens as I was snapping. It wasn’t until browsing my set on Lightroom however the intensity of the matter loomed over my foolish optimism (I then spent the next few minutes hulk-smashing everything in sight as it was clear something had gone spectacularly wrong). According to the repair report there was an alignment issue within the camera body, hence the amazing lack of clarity. Luckily the photos are salvagable!… but could have been so much better. At the same time the situation could have been so much worse. LIFE, OH LIFE, OHHHHH LIIIIFE (dooo do do doooo).

So! The photos you’re seeing are from a seriously busted (two month old!) camera. So much lost detail (sigh). Here are some portrait photos, tell me what you think (I went with the last one but just quietly the second-last will always and forever be my favourite)!

I didn’t exactly to think to take a thought out photo of the cake and only ended up snapping some at the last minute before dividing it up between the troops to enjoy for later. I actually (mostly) followed a recipe for this one since it needed to be photo-worthy and required an icing to withstand some car travel. No winging it this time! This recipe isn’t a life changer but it’s simple, easy and comforting; a nice blank canvas for any decoration or accompaniment. PRO TIP: Cut yourself a slice and microwave that badboy for 30 seconds. The icing will melt all around dat cake creating the most delicious faux-self-saucing pudding of all time.

Simple Chocolate Cake with Raspberries
(an adaptation from Anneka Manning’s Mastering the Art of Baking)

Cake batter
185g butter, room temperature
330g (1 1/2 cups) caster sugar
1 tsp vanilla extract
3 eggs, room temperature
260g (1 3/4 cups) self-raising flour
55g good quality cocoa powder
120ml milk
60ml espresso
1 tsp salt

Icing
120g dark chocolate, chopped
40g butter, chopped
165g (1 1/3 cup) icing sugar
3 tbs milk
Pinch of salt

To serve
Fresh raspberries
Icing sugar, for dusting

For the cake
1. Preheat oven to 180. Grease/line a 9″/22cm cake tin.
2. Beat the butter until creamed and beginning to pale. Add the sugar and vailla and continue to beat until combined. Add eggs, one at a time, until completely incorproated into the batter.
3. Sift flour and cocoa in another bowl with the salt and gently fold into the batter mixture, alternating with the milk and espresso.
4. Pour into cake tin and bake for around an hour. Allow to stand for 10 minutes before transferring to a wire rack to cool completely.

For the icing
1. Heat chocolate and butter slowly over simmering water, stirring continuously. Once melted and smooth slowly add sifted icing sugar and milk and continue to stir until smooth. Allow to cool to a spreadable consistency, if needed.

To serve
1. Ice cake, beginning at the top and moving down towards the sides. Adorn generously with fresh raspberries and a little icing sugar just before serving.

RIP the delightful pixels that could have been.

Tags: , , , ,

Apple Caramel Cupcakes

It’s 2am. I’m perched before my computer in the shadows, my face illuminated only by the sickly glow of the monitor. My eyes, heavy like a million suns, desperately struggle to remain alert. Amongst piles of notes, papers (and at least 40 tabs open in Safari) sits a solitary tub of Nutella. From my mouth hangs a chocolate-stained spoon. Sanity in a jar. Sweet, hazelnutty stress relief.

Okay, I’m not the most poetic of writers so I’ll just draw the scene for you instead.

Apple Caramel Cupcakes

So amongst the chaos that have been the past three weeks (taking photos, essay writing, picture editing, interning, event snapping, illustrating, etc etc!) my dad asked yesterday if I could make something for his fundraising morning tea at work for tomorrow. WHERE WILL I FIND THE TIME TO DO THIS?! Oh dad, it’s lucky this is for a charity event and there’s no way I could possibly say no to you, lord knows how much I love to bake for a good cause and help you out.

Apple Caramel Cupcakes

I remember seeing this style of decorating around the internet, I’m sure if you google “apple cupcakes” some similar looking treats will appear. I just winged it (this is the first time I’ve ever used fondant, ahh) but if anybody knows the original instructions to transforming the humble cupcake into a sparkling faux-apple please let me know so I can link it!

I Instagramed this earlier today as I didn’t think I’d have the time (or daylight, rather) to photograph + blog which explains why I have no detailed/photographed instructions re: the assembly so I drew something stupid for your viewing pleasure instead. This recipe makes 12 adorable cupcakes.

Apple Caramel Cupcakes

Apple Caramel Cupcakes
(an original recipe)

Caramel apple
1 large apple, chopped into small pieces
20g butter
30g brown sugar

Cake batter
100g butter, room temperature
100g (1/2 cup) caster sugar
30g (1/4 cup) brown sugar
2 eggs, room temperature
170g (1 1/2 cups) flour
125ml (1/2 cup) milk
2 tsp baking powder
2 tsp cinnamon

Buttercream
150g butter, room temperature
350g (3 cups) icing sugar
1 tsp vanilla extract
2 tbs milk
Red and green food colouring (I used gel)

Assembly
Red and green sanding sugar
1 Flake
Fondant
Green food colouring

For the caramel apple
1. In a small frying pan melt butter and sugar over medium heat. Add chopped apples and stir until sauce has reduced and caramelised nicely. The apples should just be beginning to tender. Remove from heat and place in a heatproof bowl to cool.

For the cake batter
1. Preheat oven to 180°C.
2. Beat butter until it begins to cream and pale. Add the sugars and continue to beat until combined and fluffy. Add eggs one at a time, beating and incorporating well after each addition. Add the flour, milk, baking powder and cinnamon and once again beat until completely combined. Stir in the caramel apple pieces.
3. Spoon batter into a prepared cupcake tin with liners. Place in oven and bake for aound 15-20 minutes or until the tops spring back when touched. Allow to cool for 5 minutes then transfer cupcakes to a wire rack to cool completely.

For the buttercream
1. Beat butter until it begins to cream and pale. Add icing sugar and vanilla and continue to beat until fluffy. Add milk until an ideal consistency is reached; it should be firm yet spreadable. Divide buttercream in half and add red colouring to one portion and green to the other.

Apple Caramel Cupcakes

For the assembly
1. Prepare fondant with green food colouring. Take a small piece and roll into a ball in the palm of your hand. Flatten into an oval shape and, with the back of a knife, score the piece vertically down the middle. Add a few additional, horizontal scores. Curl the leaf slightly, pinch its edges and allow to sit to return to room temperature.
2. Ice your cupcakes ensuring its entire surface is covered. Dip cupcakes into a bowl of sanding sugar ensuring the buttercream can no longer be seen. Gently break up the flake bar and insert a pice into each cupcake as the twig. Add the fondant leaves with a little buttercream to ensure they will stay put.

Apple Caramel Cupcakes

Okay, that was a nice distraction, I must now to finish this essay by midnight and it’s not going to write itself. Wish me luck!!

Tags: , , ,

Mango Cheesecake with Chocolate + GingerCan we talk about cheesecake for a moment? Cool. Please take a seat and make yourself comfortable, this may take a while.

Let’s talk dense, dry cheesecakes. Lingering in our cafés. Lurking beneath cake box lids. Taunting us with a seemingly inviting berry glaze until we discover that chalky mess upon our first bite. Such a shame. A dairy-riddled tragedy. Ordering cheesecake when I’m eating out is a risk I’m just not willing to take these days, it’s an extreme sport of the yuppie variety.

This cake was actually inspired by that girl who cries all the time on MasterChef. She made a messy, lemon cheesecake last week and although I try to sympathise with the pressures of cooking with a plethora of cameras in your face I couldn’t help but feel a little taken back. As soon as the episode finished I promptly began working on this silky wonder to right the wrongs of that young beanie-head. I’m a cheesecake snob, a real jerk I’ll admit, so if I’m into this recipe then I’m sure you’ll be too!

Mango Cheesecake with Chocolate + Ginger

While I’m at it let’s get a dialogue happening regarding ginger because it’s so disappointing when awesome spices have such exhausted connotations. In my day-to-day life ground ginger only makes a brief appearance in hot cross buns at Easter, when not being overpowered by it’s far more popular cousin cinnamon, and on occasion gingerbread makes a vague appearance down here in sunny Australia. Like salt to chocolate, ginger to mango is really special. It makes me all warm and fuzzy.

The base of this cheesecake is wonderfully spiced and the cheese filling bakes to the texture of a firm custard. Add a little more chocolate on top, and… ahh. Hello, lover. I’ve used a combination of biscuits readily available in Australian supermarkets but of course you can use whatever you please so long as they’re crunchy. If you’re reading this out-of-peak mango season then using the tinned stuff is fine as well, the flavour will be a little more subutle.

Mango Cheesecake with Chocolate + Ginger

On another related note, I’ve been spending my free time (or what little of it I have left these days) interning at a really cool magazine here in Sydney taking snaps in cafés and learning heaps along the way from some incredibly talented people. For these shots I mustered everything I had learnt over the week and tried to apply them here; natural lighting, tripod skills and remaining calm. I threw open my blinds and took many deep breaths. Coincidentally they required the least amount of editing of any set of photos I’ve taken. I’m fairly pleased with the results but as always do tell me what you think! This will serve 10-12 people.

Mango Cheesecake with Chocolate + Ginger
(an original recipe)

125g ginger nut biscuits
125g chocolate ripple biscuits
70g butter, melted
1 1/2 tsp ground ginger
Flesh of 1 large mango (around 200g)
250g cream cheese
250g mascarpone
100g sour cream
120g caster sugar
40g brown sugar
2 eggs
1 egg yolk
100g dark chocolate, roughly chopped
40g cream
1 tsp glucose / corn syrup
Cocoa, for serving

1. Preheat oven to 150°C and grease/line a 9 or 10 inch spring form pan.
2. Prepare biscuits in a food processor until ground. Add 1 tsp of ground ginger and stir in melted butter. Press into base of springform pan until flat and firm. Chill in refrigterator.
3. Prepare mango flesh in food processor until beginning to puree. Add cream cheese, mascarpone, sour cream, caster sugar and brown sugar and process until combined. Add the eggs and egg yolk and once again process until combined. Remove base from fridge and pour filling into springform pan. Bake in oven for 1 1/2 hours. The edges should be fairly firm with a bit of wobble towards the centre. Remove cheesecake from pan once cooled and place in the fridge to chill completely.
4. In a small saucepan (or microwave) warm cream until almost boiling. Pour over the chopped chocolate in a heat-proof bowl and stir until mostly melted and combined. Add 1/2 tsp of ground ginger and glucose and again stir to combine. Remove cheesecake from fridge and place on serving platter. Drizzle chocolate sauce over the top, Pollock style. Sprinkle a little cocoa and serve.

NOTE: You can also bake these as cupcakes if you like, I’d suggest baking them for around 25 minutes.

Mango Cheesecake with Chocolate + Ginger

Let’s dedicate this post to all the lost causes out there. Bad cheesecakes, my heart weeps for you. My heart weeps for this too but in a different way. It’s so naughty yet I feel no remorse. None, whatsoever.


Tags: , , , ,

HAPPY BIRTHDAY, DAD!!! WOOOO, YEAH! ETC! Making this cake was too much fun, albeit a little rushed as I only had the morning to prepare it. My self-imposed brief was to create a cake based on his favourite desserts: chocolate, pandan (a new discovery thanks to yours truly) and maltesers. Needless to say it was going to be fantastic (idiotic) from the very start.


The look on his face was priceless when I brought it out. And there’s nothing like cutting into what seems like a chocolate cake only to find BRIGHT GREEN.

The pandan cake is my white-girl version, no authentic pandan leaf here unfortunately! I assure you it’s fantastic though and may even be a nice, celebratory cake to bust out for New Years! Just throw some sparklers and gold leaf on there or something. This recipe will make two 9-inch rounds to stack.

Pandan + Chocolate Ganache Birthday Cake

(an original recipe)

Pandan Cake

1 1/2 cups plain flour

1 1/2 cups self-raising flour

200 g butter, room temperature

2 cups sugar

4 eggs, room temperature

1/2 cup buttermilk

1/2 cup coconut milk

1 1/2 tsp pandan paste


Chocolate Ganache

350 g chocolate, roughly chopped

150 ml cream

Pinch of salt


Assembly

1x jumbo pack Maltesers

2x Flakes

Strawberries


For the pandan cake

1. Preheat oven to 180°C.

2. Beat butter until it begins to cream and pale. Add the sugar and continue to beat until combined and fluffy.

3. Add the eggs one at a time beating after each addition. Add the self-raising flour, butter milk, plain flour, coconut milk and pandan paste once again beating after each addition.

4. Divide between two greased 9-inch cake tins. Rap the pan by dropping it from a small height to knock out any air bubbles.

5. Place in oven and bake for around an hour or until the tops spring back when touched (don’t be alarmed if the cakes crown too much – they can be trimmed back later). Allow to cool for 15 minutes, carefully remove from tins, wrap in plastic and allow to cool completely.


For the chocolate ganache

1. Heat cream in a pan, or in the microwave, until hot. Pour in roughly chopped chocolate and salt and stir until the pieces have completely melted into a smooth, velvety ganache. Allow to cool in the fridge.


For the assembly

1. Once cakes are completely cool trim the tops so they’re nice and even. Place one on your cake stand. Pipe ganache over the top to create an even layer then top with the remaining cake. Pour some ganache over the top (the consistency shouldn’t be too runny or too stiff) and, with an offset spatula, gently encourage it over the sides of the cake. Continue this process until the cake is completely covered using the spatula to smooth around the edges.

2. Whilst the ganache is yet to set, arrange Maltesers around the base of the cake as pictured above (a three-tiered diagonal pattern), or any way you wish. Create a Malteser border around the top of the cake and adorn with broken Flakes and strawberries. Place cake in the fridge to set and once ready to serve bring to room temperature.

I’ve seen so many beautiful photos on other people’s food blog capturing a gorgeous slices of cake – there’ll be none of that here unfortunately as this is what happens when a man cuts and serves cake for everybody.

Hahahahah! Oh well. Happy Birthday, Dad! I love you.

Tags: , ,


This post is dedicated to the Australian Women’s Weekly Children’s Birthday Cake Book. Shout outs to my Australian pals!

Hopefully for those living in the great sunny land down-under this image should stir nostalgic delight within each and every one of you.


Perhaps I should explain for my international friends. This book was held precious to many families in the 90s with its simple instructions and how-tos for creating adorable cakes. It’s so popular that a commemorative Vintage Collector’s Edition was released in Februrary this year. It’s so popular it has a number of Facebook fan groups and fan pages. It’s so popular this book has barely aged; it’s incredible to see how many people continue refer to this gem of a book for fun cake ideas. It’s simply amazing.

Amongst its pages of how-tos for the Teddy Bear cake, Train cake, Piano cake and Butterfly cakes lies the most infamous cake of all – The Swimming Pool cake. It was every kid’s dream cake when I was younger, and why wouldn’t it be? Delicious cake slathered in buttercream and jelly (or jell-o for my American pals) covered in lollies and candy. It was a dream come true. I might go as far as to call this an Australian Icon.

Thankfully, however,  the culinary world has evolved from using algae-green jelly and nailpolish as decorating components.

My version is a little different from the recipe listed (I didn’t use “1 packet butter cake mix”, for example) so here’s my step-by-step guide to creating this iconic Australian cake. It’s best started a day in advance to prepare the cake, and more importantly the blue jelly. I hope you have lots of lollies ready in your pantry!

Swimming Pool Cake

(Alana’s Illustrated Guide)

1. BUY LOLLIES AND CANDY. Blue jelly, desiccated coconut, Teevee snacks (or long chocolate covered biscuits), jelly babies, gummy bears, snakes, kool mints and cocktail umbrellas. GO NUTS!

2. Prepare blue jelly according to packet instructions. Place in fridge and allow to set completely.

3. Prepare a 9-inch round cake. I used my standard vanilla cake recipe and added a chocolate swirl by adding a little cocoa in some of the remaining mixture. Once baked (180°C for around 50 minutes), wrap in plastic so it doesn’t dry out and place in the fridge until your jelly is ready.

4. Remove cake from fridge. With a sharp knife trim the cake to remove the dome that has probably formed in the baking process to create a nice, flat surface.

5. With the sharp knife, cut around the top in a circle to represent the wall of the swimming pool. Hollow out the centre if the cake to form a recess for the jelly.

6. Prepare chocolate buttercream by beating 125g butter, 1 1/2 cups icing sugar, 50g melted chocolate and a tablespoon of cocoa. Spread around the cake covering the edges and around the wall of the recess.

7. Prepare green coconut “grass” by combing desiccated coconut with a few drops of green food colouring. Gently place or spoon around the rim of the cake ensuring not to spill any on the sides (a little overflow is fine though as they will be covered by the biscuits). I know it’s looking a little silly now but just bare with me, it will be worth it, I promise!

8. Create the fence of the pool by arranging the Teevee snacks (or biscuits sticks) around the edge of the cake. Be sure to leave a 1 1/2 inch gap to make room for the ladder.

9. Construct the ladder out of must sticks and thin candy strips, I used thin sour laces. Use a little of the buttercream to attach the pieces and lean against the cake.

10. Remove your set jelly from the fridge and mash with a fork to represent water. Carefully spoon into the crevice of your cake, ensuring you don’t spill any onto the coconut grass (once it sticks, it stays!).

11. It’s time for the decoration! Adorn your cake with cocktail umbrellas, jelly babies, gummy bears, kool mints for balls or anything else you like. I had my brother make create some lounging jelly babies floating in pool toys constructed from snakes. Place them in and around the pool edges!


Note: you may have a LOT of sweet treats leftover if you bought as much as I did.

It’s a sight to behold, isn’t it? It’s just so adorable taking a knife to is seems almost blasphemous…

NOOOOOOOOOOOOOOO-

Oh well. Good night, sweet prince.

You were everything I ever dreamed of and more as a 5 year old.

Tags: , , , , ,

« Older entries